JVC GY-DV500U GY-DV500 User Manual - PDF (4,089KB) - Page 43
Viewfinder Adjustment, External Monitor Adjustment - remote control
 |
View all JVC GY-DV500U manuals
Add to My Manuals
Save this manual to your list of manuals |
Page 43 highlights
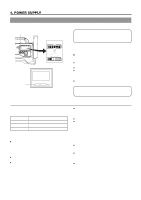
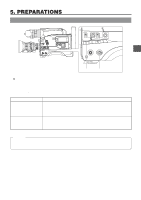
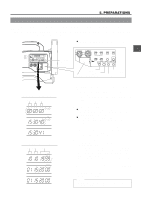
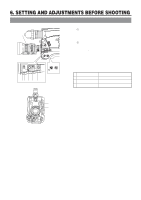
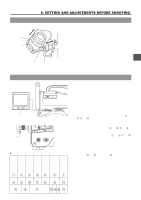
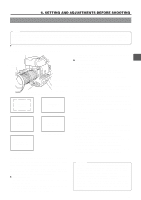
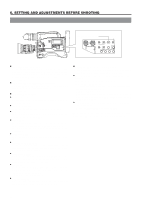
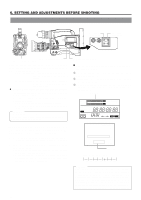
6. SETTING AND ADJUSTMENTS BEFORE SHOOTING 6-2 Viewfinder Adjustment 1. Eyepiece 1. 2. Eyepiece focusing ring 1. 1. Adjust the position and angle of the viewfinder. 2. Diopter adjustment Rotate the eyepiece focusing ring until the viewfinder screen image is clearly visible. 3. Brightness and contrast adjustment When the ambient brightness changes, etc., the brightness and contrast of the viewfinder screen can be adjusted with the BRIGHT and CONT controls. 3. 3. CONT BRIGHT 6-3 External Monitor Adjustment PUSH Colour video monitor 1. DV CAMCORDER GY-DV500 3.~8. Y/C OUT MONITOR OUT LINE OUT CH-1 CH-2 VTR REMOTE SYNC IN TEST OUTPUT MIC IN LENS 2. SPOT L COMPRESS PRST A B AUTO OKFNFEE BARS CAM ON HML SAVE STBY VTR GAIN OUTPUT WHT.BAL NG POWER ON OFF Ⅲ SMTPE type color bars Display the camera built-in color bar signal on the video monitor and adjust the colors, contrast and brightness. 1. Connect a color video monitor to the MONITOR OUT connector of the GY-DV500. 2. Set the OUTPUT switch to BARS to output the color bar signal (SMTPE type color bars). 3. Set the monitor's BLUE CHECK function to ON so that the screen turns entirely blue. 4. Adjust the CHROMA control of the monitor so that there is no difference in brightness between the color bars 1 and 8, 7 and D. 5. With the BLUE CHECK function ON, adjust the PHASE control of the monitor so that there is no difference in brightness between the color bars 3 and 0, 5 and B. 6. If the phase control adjustment above causes a difference in brightness between the color bars 1 and 8, 7 and D, start again from the CHROMA control adjustment in step 4. 7. Set the monitor's BLUE CHECK function to OFF to switch the monitor back to the standard screen (R, G and B will all appear). 8. Use the monitor's brightness control to adjust so that the color bars H and I disappear but J is visible. White Yellow Cyan Green Magenta Red Blue 1234 Blue Black Magenta Black 890A Black E White F Black G 5 67 Cyan B Black C White D HIJ K 43
-
 1
1 -
2
-
3
-
4
-
5
-
6
-
7
-
8
-
9
-
10
-
11
-
12
-
13
-
14
-
15
-
16
-
17
-
18
-
19
-
20
-
21
-
22
-
23
-
24
-
25
-
26
-
27
-
28
-
29
-
30
-
31
-
32
-
33
-
34
-
35
-
36
-
37
-
 38
38 -
 39
39 -
 40
40 -
 41
41 -
 42
42 -
 43
43 -
 44
44 -
 45
45 -
 46
46 -
 47
47 -
 48
48 -
49
-
50
-
51
-
52
-
53
-
54
-
55
-
56
-
57
-
58
-
59
-
60
-
61
-
62
-
63
-
64
-
65
-
66
-
67
-
68
-
69
-
70
-
71
-
72
-
73
-
74
-
75
-
76
-
77
-
78
-
79
-
80
-
81
-
82
-
83
-
84
-
85
-
86
-
87
-
88
-
89
-
90
-
91
-
92
-
93
-
94
-
95
-
96
 |
 |
