JVC GY-DV500U GY-DV500 User Manual - PDF (4,089KB) - Page 84
How to Use Skin Detail
 |
View all JVC GY-DV500U manuals
Add to My Manuals
Save this manual to your list of manuals |
Page 84 highlights
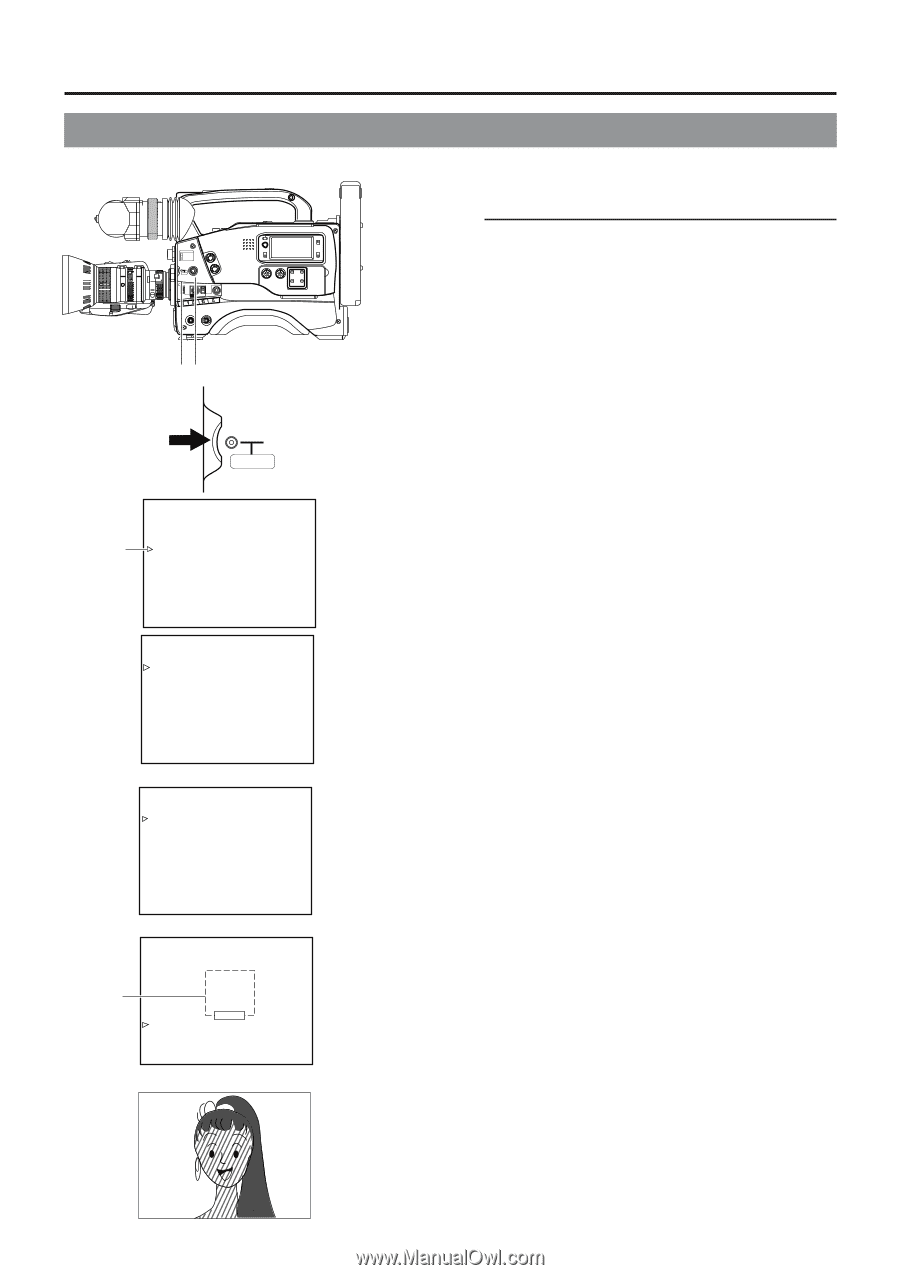
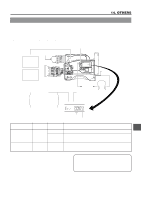
13. FEATURES OF THE CAMERA SECTION 13-6 How to Use Skin Detail The contour emphasis in the skin color areas of the video signal can be controlled and made to appear gentle and smooth. Ⅲ Setting the Color and Range of the Skin Detail Function FILTER 1 3200k 2 5600k 3 5600k+ND SHUTTER STATUS MENU ALARM MONITOR AUTO IRIS FULL AUTO BLACK BACK L NORMAL SPOT L STRETCH NORMAL COMPRESS LOLUX PRST A B ON KNEE OFF AUTO BARS CAM HML SAVE STBY VTR GAIN OUTPUT WHT.BAL NG POWER ON OFF OPERATE/WARNING RESET MONITOR SELECT CH-1 AUDIO CH-2 LEVEL LIGHT ON OFF COUNTER CTL TC UB 2. ~ 8. 1. STATUS button SHUTTER dial SHUTTER 1. Press the STATUS button for about 1 second to display the CAMERA MENU screen. 2. Turn the SHUTTER dial downward to align the cursor (>) with the PROCESS item. Then press the SHUTTER dial in the direction of the arrow to display the PROCESS screen. 3. Turn the SHUTTER dial downward to align the cursor (>) with the ADVANCED PROCESS item. Then press the SHUTTER dial in the direction of the arrow to display the ADVANCED PROCESS screen. MENU Cursor - - - CAMERA MENU - - - SCENE F I LE :A VF D I SP L AY MENU OPERAT I ON MENU PROCESS MENU F I L E MANAGE SETUP MENU EX I T - - - PROCESS - - - SCENE F I LE A MASTER B L ACK : NORMA L DETA I L : NORMA L DTL . V / H BAL : NORMA L DT L . FREQUENCY : LOW SK I N COLOR DETECT : OFF V RESOLUT I ON : NORMA L ADVANCED PROCESS PAGE BACK PROCESS screen - - - ADVANCED PROCESS - - - SCENE F I LE A COLOR MATR I X : ON GAMMA : NORMA L SK I N COLOR ADJUS T PAGE BACK ADVANCED PROCESS screen - - SK I N COLOR AD J UST - - Detection area ERORR SK I N COLOR DET . : EXECUTE SK I N COLOR RANGE : NORMA L PAGE BACK SKIN COLOR ADJUST screen 4. Turn the SHUTTER dial downward to align the cursor (>) with the SKIN COLOR ADJUST item. Then press the SHUTTER dial in the direction of the arrow to display the SKIN COLOR ADJUST screen. • The frame shown on the screen indicates the detection area of the skin detail function. 5. When the cursor (>) is aligned with the SKIN COLOR DET. item, the SHUTTER dial is pressed in the direction of the arrow and EXECUTE selected, the skin color detection mode is activated. 6. Shoot so that the area with the color that you want to detect is brought within the detection area frame. To decide on the color for the detection, press the SHUTTER dial to set SKIN COLOR DET. to STOP. • The areas recognized by the skin detail function appear with superimposed zebra patterns. • If the color is not recognized as a color that the skin detail function works with, "ERROR" is displayed on the screen. 7. If you want to change the color range recognized by the skin detail function, perform the following operations. Set the SKIN COLOR DET. item to EXECUTE. 1 Turn the SHUTTER dial to align the cursor (>) with SKIN COLOR RANGE, and then press the SHUTTER dial in the direction of the arrow. a The area with the setting value starts blinking, and the value can now be changed. 2 Turn the SHUTTER dial up or down to widen or narrow the color range. • Adjust the range while observing the zebra patterns. 3 To decide the color range, press the SHUTTER dial in the direction of the arrow. a The setting value stops blinking but remains lit. 8. To stop the SKIN COLOR ADJUST operation, align the cursor (>) with BACK PAGE and press the SHUTTER dial in the direction of the arrow. SKIN COLOR ADJUST screen 84
-
 1
1 -
2
-
3
-
4
-
5
-
6
-
7
-
8
-
9
-
10
-
11
-
12
-
13
-
14
-
15
-
16
-
17
-
18
-
19
-
20
-
21
-
22
-
23
-
24
-
25
-
26
-
27
-
28
-
29
-
30
-
31
-
32
-
33
-
34
-
35
-
36
-
37
-
38
-
39
-
40
-
41
-
42
-
43
-
44
-
45
-
46
-
47
-
48
-
49
-
50
-
51
-
52
-
53
-
54
-
55
-
56
-
57
-
58
-
59
-
60
-
61
-
62
-
63
-
64
-
65
-
66
-
67
-
68
-
69
-
70
-
71
-
72
-
73
-
74
-
75
-
76
-
77
-
78
-
 79
79 -
 80
80 -
 81
81 -
 82
82 -
 83
83 -
 84
84 -
 85
85 -
 86
86 -
 87
87 -
 88
88 -
 89
89 -
90
-
91
-
92
-
93
-
94
-
95
-
96
 |
 |