Konica Minolta bizhub 283 bizhub 423/363/283/223 Print Operations User Guide - Page 153
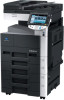
Proof Print, Proof Copy, Start, While [Current Jobs] is displayed, press [Release Held Job].
 |
View all Konica Minolta bizhub 283 manuals
Add to My Manuals
Save this manual to your list of manuals |
Page 153 highlights
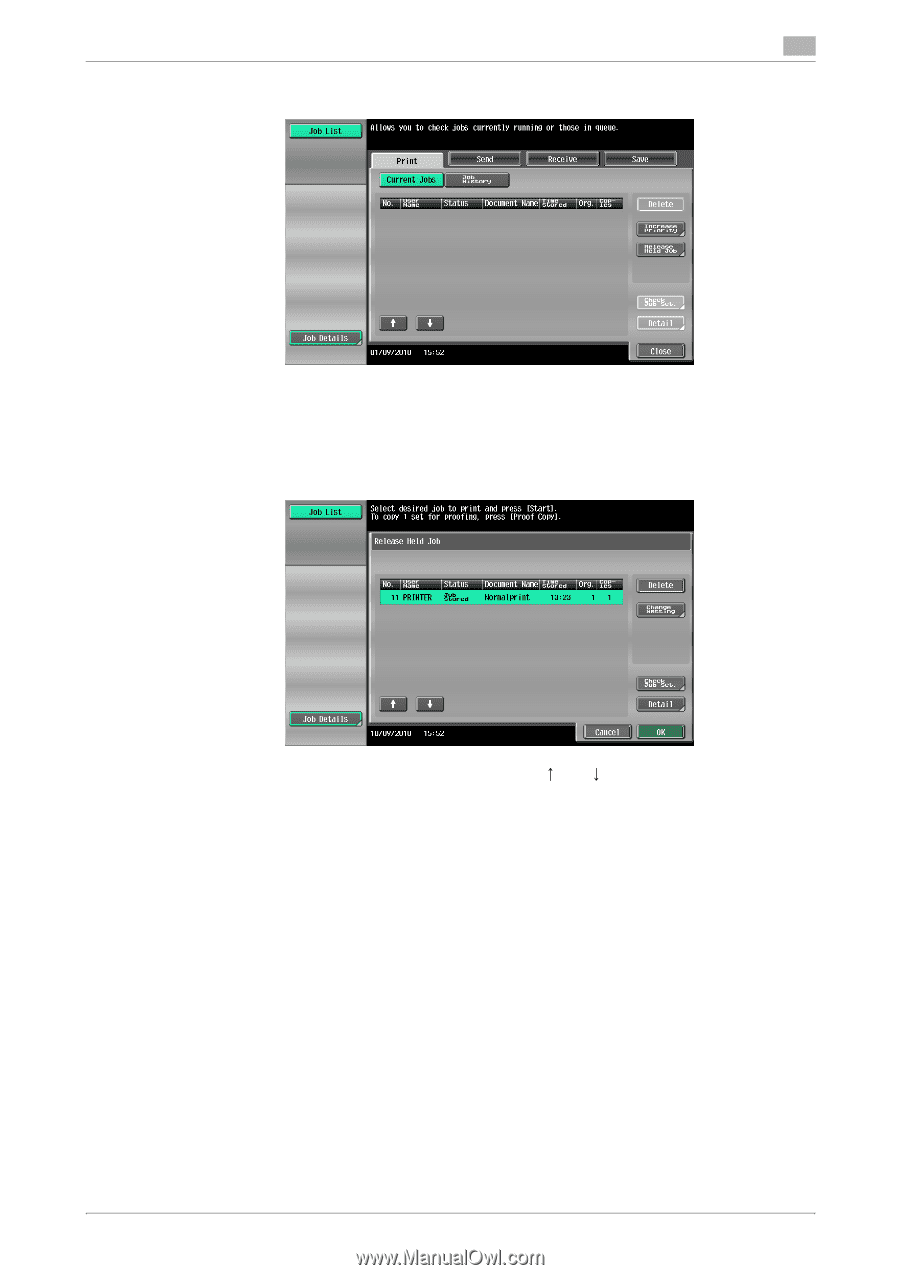
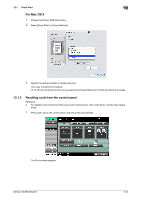
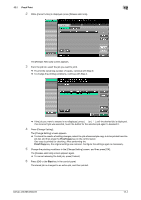
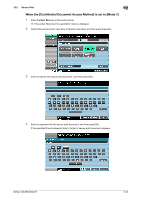
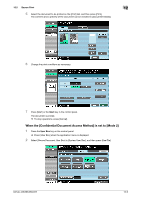
12.1 Proof Print 12 2 While [Current Jobs] is displayed, press [Release Held Job]. The [Release Held Job] screen appears. 3 From the job list, select the job you want to print. % To print the remaining number of copies, continue with Step 6. % To change the printing conditions, continue with Step 4. % If the job you want to release is not displayed, press [ ] or [ ] until the desired job is displayed. If an incorrect job was selected, touch the button for the selected job again to deselect it. 4 Press [Change Setting]. The [Change Setting] screen appears. % To check the results of setting changes, select the job whose sample copy is to be printed from the job list, and then press the Proof Copy key on the control panel. One copy is printed for checking. After performing the Proof Copy key, the original settings are restored. Configure the settings again as necessary. 5 Change the printing conditions in the [Change Setting] screen, and then press [OK]. The [Release Held Job] screen appears again. % To cancel releasing the held job, press [Cancel]. 6 Press [OK] or the Start key in the control panel. The stored job is changed to an active job, and then printed. bizhub 423/363/283/223 12-4
-
 1
1 -
2
-
3
-
4
-
5
-
6
-
7
-
8
-
9
-
10
-
11
-
12
-
13
-
14
-
15
-
16
-
17
-
18
-
19
-
20
-
21
-
22
-
23
-
24
-
25
-
26
-
27
-
28
-
29
-
30
-
31
-
32
-
33
-
34
-
35
-
36
-
37
-
38
-
39
-
40
-
41
-
42
-
43
-
44
-
45
-
46
-
47
-
48
-
49
-
50
-
51
-
52
-
53
-
54
-
55
-
56
-
57
-
58
-
59
-
60
-
61
-
62
-
63
-
64
-
65
-
66
-
67
-
68
-
69
-
70
-
71
-
72
-
73
-
74
-
75
-
76
-
77
-
78
-
79
-
80
-
81
-
82
-
83
-
84
-
85
-
86
-
87
-
88
-
89
-
90
-
91
-
92
-
93
-
94
-
95
-
96
-
97
-
98
-
99
-
100
-
101
-
102
-
103
-
104
-
105
-
106
-
107
-
108
-
109
-
110
-
111
-
112
-
113
-
114
-
115
-
116
-
117
-
118
-
119
-
120
-
121
-
122
-
123
-
124
-
125
-
126
-
127
-
128
-
129
-
130
-
131
-
132
-
133
-
134
-
135
-
136
-
137
-
138
-
139
-
140
-
141
-
142
-
143
-
144
-
145
-
146
-
147
-
 148
148 -
 149
149 -
 150
150 -
 151
151 -
 152
152 -
 153
153 -
 154
154 -
 155
155 -
 156
156 -
 157
157 -
 158
158 -
159
-
160
-
161
-
162
-
163
-
164
-
165
-
166
-
167
-
168
-
169
-
170
-
171
-
172
-
173
-
174
-
175
-
176
-
177
-
178
-
179
-
180
-
181
-
182
-
183
-
184
-
185
-
186
-
187
-
188
-
189
-
190
-
191
-
192
-
193
-
194
-
195
-
196
-
197
-
198
-
199
-
200
-
201
-
202
-
203
-
204
-
205
-
206
-
207
-
208
-
209
-
210
-
211
-
212
-
213
-
214
-
215
-
216
-
217
-
218
-
219
-
220
-
221
-
222
-
223
-
224
-
225
-
226
-
227
-
228
-
229
-
230
-
231
-
232
-
233
-
234
-
235
-
236
-
237
-
238
-
239
-
240
-
241
-
242
-
243
-
244
-
245
-
246
-
247
-
248
-
249
-
250
-
251
-
252
-
253
-
254
-
255
-
256
-
257
-
258
-
259
-
260
-
261
-
262
-
263
-
264
-
265
-
266
-
267
-
268
-
269
-
270
-
271
-
272
-
273
-
274
-
275
-
276
-
277
-
278
-
279
-
280
-
281
-
282
-
283
-
284
-
285
-
286
-
287
-
288
-
289
-
290
-
291
-
292
-
293
-
294
 |
 |