Konica Minolta bizhub 283 bizhub 423/363/283/223 Print Operations User Guide - Page 93
Print function of PCL/PS/XPS drivers for Windows, 9.1 Print operations
 |
View all Konica Minolta bizhub 283 manuals
Add to My Manuals
Save this manual to your list of manuals |
Page 93 highlights
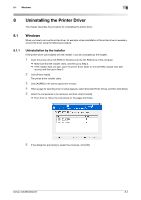
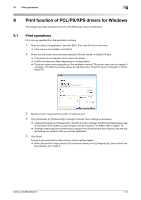
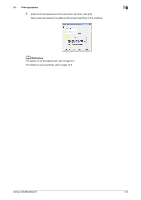
9.1 Print operations 9 9 9.1 Print function of PCL/PS/XPS drivers for Windows This chapter describes functions of the PCL/PS/XPS printer drivers for Windows. Print operations Print jobs are specified from the application software. 1 Open the data in the application, and click [File]. Then click [Print] from the menu. % If the menu is not available, click [Print]. 2 Check that the printer name has been selected in [Printer Name] ( or [Select Printer]). % If the printer is not selected, click to select the printer. % The [Print] dialog box differs depending on the application. % The printer name varies depending on the installation method. The printer name can be changed if necessary. The following window shows an example where the printer name is changed to "Printer Name PS". 3 Specify the print range and the number of copies to print. 4 Click [Properties] (or [Preferences]) to change the printer driver settings as necessary. % Clicking [Properties] or [Preferences] in the [Print] window displays the [Printing Preferences] page of the printer driver where you can configure various functions. For details, refer to page 9-10. % [Printing Preferences] of the printer driver changed in the [Print] window are not saved, and the original settings are restored when you exit the application. 5 Click [Print]. Printing is executed and the data indicator of the machine flashes. % When [Secure Print Only] is set to [On] on [Device Option] of the [Configure] tab, [Secure Print] win- dow appears. Go to Step 6. bizhub 423/363/283/223 9-2
-
 1
1 -
2
-
3
-
4
-
5
-
6
-
7
-
8
-
9
-
10
-
11
-
12
-
13
-
14
-
15
-
16
-
17
-
18
-
19
-
20
-
21
-
22
-
23
-
24
-
25
-
26
-
27
-
28
-
29
-
30
-
31
-
32
-
33
-
34
-
35
-
36
-
37
-
38
-
39
-
40
-
41
-
42
-
43
-
44
-
45
-
46
-
47
-
48
-
49
-
50
-
51
-
52
-
53
-
54
-
55
-
56
-
57
-
58
-
59
-
60
-
61
-
62
-
63
-
64
-
65
-
66
-
67
-
68
-
69
-
70
-
71
-
72
-
73
-
74
-
75
-
76
-
77
-
78
-
79
-
80
-
81
-
82
-
83
-
84
-
85
-
86
-
87
-
 88
88 -
 89
89 -
 90
90 -
 91
91 -
 92
92 -
 93
93 -
 94
94 -
 95
95 -
 96
96 -
 97
97 -
 98
98 -
99
-
100
-
101
-
102
-
103
-
104
-
105
-
106
-
107
-
108
-
109
-
110
-
111
-
112
-
113
-
114
-
115
-
116
-
117
-
118
-
119
-
120
-
121
-
122
-
123
-
124
-
125
-
126
-
127
-
128
-
129
-
130
-
131
-
132
-
133
-
134
-
135
-
136
-
137
-
138
-
139
-
140
-
141
-
142
-
143
-
144
-
145
-
146
-
147
-
148
-
149
-
150
-
151
-
152
-
153
-
154
-
155
-
156
-
157
-
158
-
159
-
160
-
161
-
162
-
163
-
164
-
165
-
166
-
167
-
168
-
169
-
170
-
171
-
172
-
173
-
174
-
175
-
176
-
177
-
178
-
179
-
180
-
181
-
182
-
183
-
184
-
185
-
186
-
187
-
188
-
189
-
190
-
191
-
192
-
193
-
194
-
195
-
196
-
197
-
198
-
199
-
200
-
201
-
202
-
203
-
204
-
205
-
206
-
207
-
208
-
209
-
210
-
211
-
212
-
213
-
214
-
215
-
216
-
217
-
218
-
219
-
220
-
221
-
222
-
223
-
224
-
225
-
226
-
227
-
228
-
229
-
230
-
231
-
232
-
233
-
234
-
235
-
236
-
237
-
238
-
239
-
240
-
241
-
242
-
243
-
244
-
245
-
246
-
247
-
248
-
249
-
250
-
251
-
252
-
253
-
254
-
255
-
256
-
257
-
258
-
259
-
260
-
261
-
262
-
263
-
264
-
265
-
266
-
267
-
268
-
269
-
270
-
271
-
272
-
273
-
274
-
275
-
276
-
277
-
278
-
279
-
280
-
281
-
282
-
283
-
284
-
285
-
286
-
287
-
288
-
289
-
290
-
291
-
292
-
293
-
294
 |
 |