Konica Minolta bizhub 283 bizhub 423/363/283/223 Print Operations User Guide - Page 98
Registering the default settings
 |
View all Konica Minolta bizhub 283 manuals
Add to My Manuals
Save this manual to your list of manuals |
Page 98 highlights
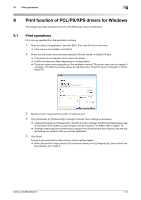
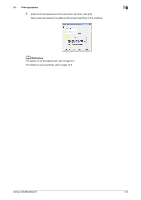
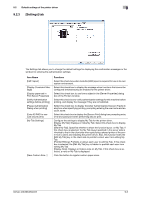
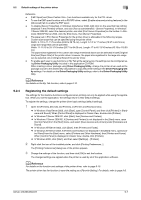
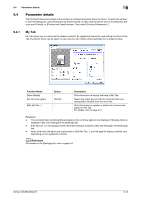
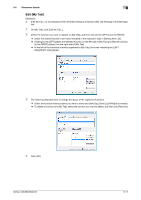
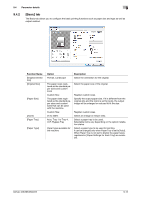
9.2 Default settings of the printer driver 9 Reference - [EMF Spool] and [Save Custom Size...] are functions available only for the PCL driver. - To use the EMF spool function with a PS/XPS driver, select [Enable advanced printing features] in the [Advanced] tab to enable the EMF spool. - To display [Server Properties], in Windows Vista/Server 2008, right-click on the area that has nothing displayed in the [Printers] window, and click [Run as administrator] - [Server Properties]. In Windows 7/Server 2008 R2, select the desired printer, and click [Print Server Properties] on the toolbar. In Windows 2000/XP/Server 2003, click the [File] menu, then [Server Properties]. - The paper set in Print Server Properties for the printer driver is allowable in the following ranges. Custom size range that can be specified using the printer driver: Width: 3-1/2 to 11-11/16 inches (9.00 to 29.70 cm), Length: 5-1/2 to 17 inches (13.97 to 43.18 cm) Large size range that can be specified: Width: 11-11/16 to 33-1/16 inches (29.71 to 84.00 cm), Length: 17 to 46-13/16 inches (43.19 to 118.90 cm) The paper sizes registered in the custom size range mentioned above can be selected in both [Original Size] and [Paper Size] of the printer driver. However, the paper size registered in the large size range can be selected only in [Original Size] of the printer driver. - To enable each user to use functions on My Tab at the same layout, the settings can be configured using Driver Packaging Utility included in the application CD-ROM. When creating a driver package using Driver Packaging Utility, change the printer driver used as the package source to the desired My Tab position to copy the printer setting in the Driver Packaging Utility settings. For details on the Driver Packaging Utility settings, refer to the Driver Packaging Utility Help. d Reference For details on the My Tab function, refer to page 9-10. 9.2.4 Registering the default settings The settings for the machine functions configured when printing can only be applied while using the application. When you exit the application, the settings return to their default settings. To register the settings, change the printer driver basic settings (default settings). 1 Open the [Printers], [Devices and Printers], or [Printers and Faxes] window. % In Windows Vista/Server 2008, click [Start], open [Control Panel], and then click [Printers] in [Hardware and Sound]. When [Control Panel] is displayed in Classic View, double-click [Printers]. % In Windows 7/Server 2008 R2, click [Start], then [Devices and Printers]. % In Windows 7/Server 2008 R2, if [Devices and Printers] is not displayed in the [Start] menu, open [Control Panel] from the [Start] menu, and select [View devices and printers] under [Hardware and Sound]. % In Windows XP/Server 2003, click [Start], then [Printers and Faxes]. % In Windows XP/Server 2003, if [Printers and Faxes] is not displayed in the [Start] menu, open [Control Panel] from the [Start] menu, select [Printers and Other Hardware], then [Printers and Faxes]. When [Control Panel] is displayed in Classic View, double-click [Printers]. % In Windows 2000, click [Start], and then select [Settings] − [Printers]. 2 Right-click the icon of the installed printer, and click [Printing Preferences...]. The [Printing Preferences] dialog box of the printer appears. 3 Change the settings of the function, and then click [OK] to exit the function. The changed settings are applied when the printer is used by all of the application software. d Reference For details on the function and settings of the printer driver, refer to page 9-10. The printer driver has the function to save the setting as a [Favorite Setting]. For details, refer to page 9-8. bizhub 423/363/283/223 9-7
-
 1
1 -
2
-
3
-
4
-
5
-
6
-
7
-
8
-
9
-
10
-
11
-
12
-
13
-
14
-
15
-
16
-
17
-
18
-
19
-
20
-
21
-
22
-
23
-
24
-
25
-
26
-
27
-
28
-
29
-
30
-
31
-
32
-
33
-
34
-
35
-
36
-
37
-
38
-
39
-
40
-
41
-
42
-
43
-
44
-
45
-
46
-
47
-
48
-
49
-
50
-
51
-
52
-
53
-
54
-
55
-
56
-
57
-
58
-
59
-
60
-
61
-
62
-
63
-
64
-
65
-
66
-
67
-
68
-
69
-
70
-
71
-
72
-
73
-
74
-
75
-
76
-
77
-
78
-
79
-
80
-
81
-
82
-
83
-
84
-
85
-
86
-
87
-
88
-
89
-
90
-
91
-
92
-
 93
93 -
 94
94 -
 95
95 -
 96
96 -
 97
97 -
 98
98 -
 99
99 -
 100
100 -
 101
101 -
 102
102 -
 103
103 -
104
-
105
-
106
-
107
-
108
-
109
-
110
-
111
-
112
-
113
-
114
-
115
-
116
-
117
-
118
-
119
-
120
-
121
-
122
-
123
-
124
-
125
-
126
-
127
-
128
-
129
-
130
-
131
-
132
-
133
-
134
-
135
-
136
-
137
-
138
-
139
-
140
-
141
-
142
-
143
-
144
-
145
-
146
-
147
-
148
-
149
-
150
-
151
-
152
-
153
-
154
-
155
-
156
-
157
-
158
-
159
-
160
-
161
-
162
-
163
-
164
-
165
-
166
-
167
-
168
-
169
-
170
-
171
-
172
-
173
-
174
-
175
-
176
-
177
-
178
-
179
-
180
-
181
-
182
-
183
-
184
-
185
-
186
-
187
-
188
-
189
-
190
-
191
-
192
-
193
-
194
-
195
-
196
-
197
-
198
-
199
-
200
-
201
-
202
-
203
-
204
-
205
-
206
-
207
-
208
-
209
-
210
-
211
-
212
-
213
-
214
-
215
-
216
-
217
-
218
-
219
-
220
-
221
-
222
-
223
-
224
-
225
-
226
-
227
-
228
-
229
-
230
-
231
-
232
-
233
-
234
-
235
-
236
-
237
-
238
-
239
-
240
-
241
-
242
-
243
-
244
-
245
-
246
-
247
-
248
-
249
-
250
-
251
-
252
-
253
-
254
-
255
-
256
-
257
-
258
-
259
-
260
-
261
-
262
-
263
-
264
-
265
-
266
-
267
-
268
-
269
-
270
-
271
-
272
-
273
-
274
-
275
-
276
-
277
-
278
-
279
-
280
-
281
-
282
-
283
-
284
-
285
-
286
-
287
-
288
-
289
-
290
-
291
-
292
-
293
-
294
 |
 |