Kyocera KM-6030 KX Driver Operation Guide Rev. 1.3.1 - Page 57
Using a Different Print Size, Description Language PDL Settings - brochure
 |
View all Kyocera KM-6030 manuals
Add to My Manuals
Save this manual to your list of manuals |
Page 57 highlights
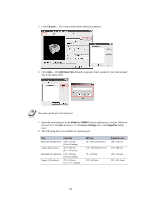
Printing from Applications 2 If you click Advanced..., you can adjust the outside margins in a range from 5.0 to 25.4 mm. • For outside margins to the left of the page, enter a number into the Left (Long Edge) Width box. • For outside margins to the top of the page, enter a number into the Top (Short Edge) Width box. Left (Long Edge) Top (Short Edge) • Select the Reduce Image to Fit check box if the printing data extends beyond the edge of the paper when setting a binding margin. The margins are reduced to match the page size adjustment. Reduce Image to Fit When you want to change the page size (for example, to enlarge an A4-size brochure for printing on A3 paper), refer to Using a Different Print Size on page 51. Matching the Paper Size before Printing The printer automatically selects the paper size specified in the Page Size setting on the Media tab by default when you are printing on regular paper. However, the printer supports a wide variety of printing media depending on your printer model. You can specify the media type in the Media Type setting for automatic paper source selection when using recycled paper, labels, or transparencies. You can also specify the finishing settings for best results. Automatic selection of paper sizes can be disabled in the PCL XL detail settings. For further details, refer to Page Description Language (PDL) Settings on page 36. Labels, transparencies, and envelopes must be printed using the multi-purpose tray. Ensure the paper is properly loaded by following the instructions outlined in the supplied printer's Operation Guide. NOTE When paper is loaded properly in the paper cassette, the printer can automatically detect the paper size. However, it is necessary to use the print operator panel on the printer to assign the media type of the paper cassette so that the printer can recognize it. The steps to specify the media settings are listed below. 1 Load the paper in a paper cassette or the multi-purpose tray. NOTE Use the multi-purpose tray in cassette mode (the default). For further details on multi-purpose tray modes, refer to the printer's Operation Guide. 2 Specify the media type in the print operator panel on the printer. 53
-
 1
1 -
2
-
3
-
4
-
5
-
6
-
7
-
8
-
9
-
10
-
11
-
12
-
13
-
14
-
15
-
16
-
17
-
18
-
19
-
20
-
21
-
22
-
23
-
24
-
25
-
26
-
27
-
28
-
29
-
30
-
31
-
32
-
33
-
34
-
35
-
36
-
37
-
38
-
39
-
40
-
41
-
42
-
43
-
44
-
45
-
46
-
47
-
48
-
49
-
50
-
51
-
 52
52 -
 53
53 -
 54
54 -
 55
55 -
 56
56 -
 57
57 -
 58
58 -
 59
59 -
 60
60 -
 61
61 -
 62
62 -
63
-
64
-
65
-
66
-
67
-
68
-
69
-
70
-
71
-
72
-
73
-
74
-
75
-
76
-
77
-
78
-
79
-
80
-
81
-
82
-
83
-
84
-
85
-
86
-
87
-
88
-
89
-
90
-
91
-
92
-
93
-
94
-
95
-
96
-
97
-
98
-
99
-
100
-
101
-
102
-
103
-
104
-
105
-
106
-
107
-
108
-
109
-
110
-
111
-
112
-
113
-
114
-
115
-
116
-
117
-
118
-
119
-
120
-
121
-
122
-
123
-
124
-
125
-
126
-
127
-
128
-
129
-
130
-
131
-
132
-
133
-
134
-
135
-
136
-
137
-
138
-
139
-
140
-
141
-
142
-
143
-
144
-
145
 |
 |
