LG 50PJ340 Training Manual - Page 24
X Drive Circuit Board Removal Continued
 |
View all LG 50PJ340 manuals
Add to My Manuals
Save this manual to your list of manuals |
Page 24 highlights
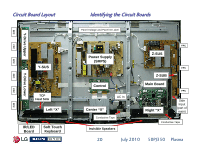
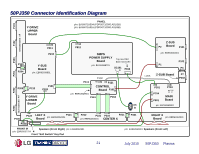
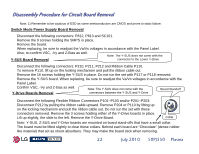
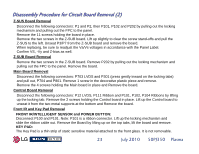
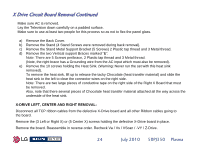
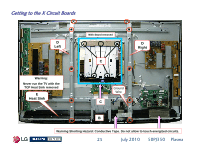
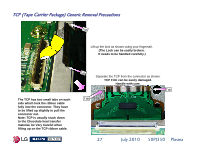
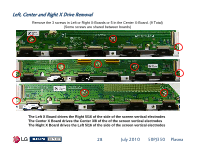
X Drive Circuit Board Removal Continued Make sure AC is removed. Lay the Television down carefully on a padded surface. Make sure to use at least two people for this process so as not to flex the panel glass. a) Remove the Back Cover. b) Remove the Stand (4 Stand Screws were removed during back removal). c) Remove the Stand Metal Support Bracket (5 Screws) 2 Plastic tap thread and 3 Metal thread. d) Remove the two Vertical support Braces marked "E". Note: There are 5 Screws per/brace, 2 Plastic tap thread and 3 Metal thread. (Note, the right brace has a Grounding wire from the AC input which must also be removed). e) Remove the 10 screws holding the Heat Sink. (Warning: Never run the set with this heat sink removed). To remove the heat sink, lift up to release the tacky Chocolate (heat transfer material) and slide the heat sink to the left to clear the connector wires on the right side. Note: There are two large pieces of conductive tape on the right side of the Right X Board that must be removed. Also, note that there several pieces of Chocolate heat transfer material attached all the way across the underside of the heat sink. X-DRIVE LEFT, CENTER AND RIGHT REMOVAL: Disconnect all TCP ribbon cables from the defective X-Drive board and all other Ribbon cables going to the board. Remove the (3 Left or Right X) or (5 Center X) screws holding the defective X-Drive board in place. Remove the board. Reassemble in reverse order. Recheck Va / Vs / VScan / -VY / Z-Drive. 24 July 2010 50PJ350 Plasma
-
 1
1 -
2
-
3
-
4
-
5
-
6
-
7
-
8
-
9
-
10
-
11
-
12
-
13
-
14
-
15
-
16
-
17
-
18
-
 19
19 -
 20
20 -
 21
21 -
 22
22 -
 23
23 -
 24
24 -
 25
25 -
 26
26 -
 27
27 -
 28
28 -
 29
29 -
30
-
31
-
32
-
33
-
34
-
35
-
36
-
37
-
38
-
39
-
40
-
41
-
42
-
43
-
44
-
45
-
46
-
47
-
48
-
49
-
50
-
51
-
52
-
53
-
54
-
55
-
56
-
57
-
58
-
59
-
60
-
61
-
62
-
63
-
64
-
65
-
66
-
67
-
68
-
69
-
70
-
71
-
72
-
73
-
74
-
75
-
76
-
77
-
78
-
79
-
80
-
81
-
82
-
83
-
84
-
85
-
86
-
87
-
88
-
89
-
90
-
91
-
92
-
93
-
94
-
95
-
96
-
97
-
98
-
99
-
100
-
101
-
102
-
103
-
104
-
105
-
106
-
107
-
108
-
109
-
110
-
111
-
112
-
113
-
114
-
115
-
116
-
117
-
118
-
119
-
120
-
121
-
122
-
123
-
124
-
125
-
126
-
127
-
128
-
129
-
130
-
131
-
132
-
133
 |
 |
