LG 50PJ340 Training Manual - Page 73
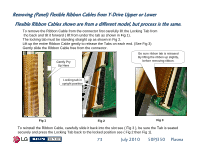
Removing (Panel) Flexible Ribbon Cables from Y-Drive Upper or Lower
 |
View all LG 50PJ340 manuals
Add to My Manuals
Save this manual to your list of manuals |
Page 73 highlights
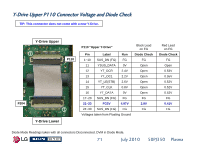
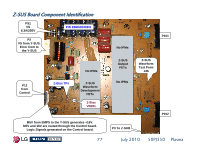
Removing (Panel) Flexible Ribbon Cables from Y-Drive Upper or Lower Flexible Ribbon Cables shown are from a different model, but process is the same. To remove the Ribbon Cable from the connector first carefully lift the Locking Tab from the back and tilt it forward ( lift from under the tab as shown in Fig 1). The locking tab must be standing straight up as shown in Fig 2. Lift up the entire Ribbon Cable gently to release the Tabs on each end. (See Fig 3) Gently slide the Ribbon Cable free from the connector. Gently Pry Up Here Be sure ribbon tab is released By lifting the ribbon up slightly, before removing ribbon. Locking tab in upright position Fig 1 Fig 2 Fig 3 To reinstall the Ribbon Cable, carefully slide it back into the slot see ( Fig 3 ), be sure the Tab is seated securely and press the Locking Tab back to the locked position see ( Fig 2 then Fig 1). 73 July 2010 50PJ350 Plasma
-
 1
1 -
2
-
3
-
4
-
5
-
6
-
7
-
8
-
9
-
10
-
11
-
12
-
13
-
14
-
15
-
16
-
17
-
18
-
19
-
20
-
21
-
22
-
23
-
24
-
25
-
26
-
27
-
28
-
29
-
30
-
31
-
32
-
33
-
34
-
35
-
36
-
37
-
38
-
39
-
40
-
41
-
42
-
43
-
44
-
45
-
46
-
47
-
48
-
49
-
50
-
51
-
52
-
53
-
54
-
55
-
56
-
57
-
58
-
59
-
60
-
61
-
62
-
63
-
64
-
65
-
66
-
67
-
 68
68 -
 69
69 -
 70
70 -
 71
71 -
 72
72 -
 73
73 -
 74
74 -
 75
75 -
 76
76 -
 77
77 -
 78
78 -
79
-
80
-
81
-
82
-
83
-
84
-
85
-
86
-
87
-
88
-
89
-
90
-
91
-
92
-
93
-
94
-
95
-
96
-
97
-
98
-
99
-
100
-
101
-
102
-
103
-
104
-
105
-
106
-
107
-
108
-
109
-
110
-
111
-
112
-
113
-
114
-
115
-
116
-
117
-
118
-
119
-
120
-
121
-
122
-
123
-
124
-
125
-
126
-
127
-
128
-
129
-
130
-
131
-
132
-
133
 |
 |
