LG PM-225 User Guide - Page 106
Assigning Speed Dial Numbers
 |
UPC - 652810513586
View all LG PM-225 manuals
Add to My Manuals
Save this manual to your list of manuals |
Page 106 highlights
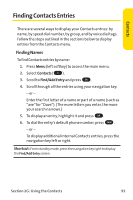
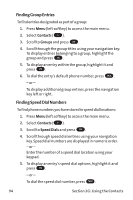
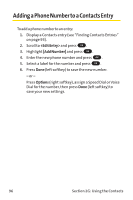
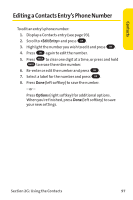
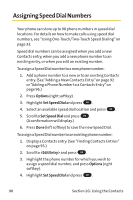
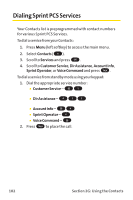
Assigning Speed Dial Numbers Your phone can store up to 98 phone numbers in speed dial locations. For details on how to make calls using speed dial numbers, see "Using One-Touch/Two-Touch Speed Dialing"on page 33. Speed dial numbers can be assigned when you add a new Contacts entry, when you add a new phone number to an existing entry, or when you edit an existing number. To assign a Speed Dial number to a new phone number: 1. Add a phone number to a new or to an existing Contacts entry. (See "Adding a New Contacts Entry"on page 92 or "Adding a Phone Number to a Contacts Entry"on page 96.) 2. Press Options (right softkey). 3. Highlight Set Speed Dial and press OK . 4. Select an available speed dial location and press OK . 5. Scroll to Set Speed Dial and press OK . (A confirmation will display.) 6. Press Done (left softkey) to save the new Speed Dial. To assign a Speed Dial number to an existing phone number: 1. Display a Contacts entry. (See "Finding Contacts Entries" on page 93.) 2. Scroll to and press OK . 3. Highlight the phone number for which you wish to assign a speed dial number, and press Options (right softkey). 4. Highlight Set Speed Dial and press OK . 98 Section 2G: Using the Contacts
-
 1
1 -
2
-
3
-
4
-
5
-
6
-
7
-
8
-
9
-
10
-
11
-
12
-
13
-
14
-
15
-
16
-
17
-
18
-
19
-
20
-
21
-
22
-
23
-
24
-
25
-
26
-
27
-
28
-
29
-
30
-
31
-
32
-
33
-
34
-
35
-
36
-
37
-
38
-
39
-
40
-
41
-
42
-
43
-
44
-
45
-
46
-
47
-
48
-
49
-
50
-
51
-
52
-
53
-
54
-
55
-
56
-
57
-
58
-
59
-
60
-
61
-
62
-
63
-
64
-
65
-
66
-
67
-
68
-
69
-
70
-
71
-
72
-
73
-
74
-
75
-
76
-
77
-
78
-
79
-
80
-
81
-
82
-
83
-
84
-
85
-
86
-
87
-
88
-
89
-
90
-
91
-
92
-
93
-
94
-
95
-
96
-
97
-
98
-
99
-
100
-
 101
101 -
 102
102 -
 103
103 -
 104
104 -
 105
105 -
 106
106 -
 107
107 -
 108
108 -
 109
109 -
 110
110 -
 111
111 -
112
-
113
-
114
-
115
-
116
-
117
-
118
-
119
-
120
-
121
-
122
-
123
-
124
-
125
-
126
-
127
-
128
-
129
-
130
-
131
-
132
-
133
-
134
-
135
-
136
-
137
-
138
-
139
-
140
-
141
-
142
-
143
-
144
-
145
-
146
-
147
-
148
-
149
-
150
-
151
-
152
-
153
-
154
-
155
-
156
-
157
-
158
-
159
-
160
-
161
-
162
-
163
-
164
-
165
-
166
-
167
-
168
-
169
-
170
-
171
-
172
-
173
-
174
-
175
-
176
-
177
-
178
-
179
-
180
-
181
-
182
-
183
-
184
-
185
-
186
-
187
-
188
-
189
-
190
-
191
-
192
-
193
-
194
-
195
-
196
-
197
-
198
-
199
-
200
-
201
-
202
-
203
-
204
-
205
-
206
-
207
-
208
-
209
-
210
-
211
-
212
-
213
-
214
-
215
-
216
 |
 |