Lexmark E260dn Service Manual - Page 81
Partial blank image/white spots no repeating pattern - drum
 |
View all Lexmark E260dn manuals
Add to My Manuals
Save this manual to your list of manuals |
Page 81 highlights
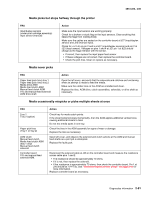
4513-220, -230 Partial blank image/white spots (no repeating pattern) FRU Toner cartridge (not a FRU) Paper (not a FRU) Action Remove the toner cartridge assembly, and gently shake the assembly to evenly distribute the toner. Check to make sure that the laser light path is not blocked. If the toner cartridge is low, then try a new one. Make sure recommended media is being used. Check the media settings in the printer driver. A heavier media may require higher heat to properly fuse. Variation in image density horizontally across page FRU PC Kit (not a FRU) Transfer roll Action The charge roll may have an unbalanced force against the PC (photoconductor) drum. Try a new PC Kit. Note: Do not touch the transfer roll except at its ends. Place a sheet of paper over the roll to prevent damage from finger oils or hand lotion. Check the springs in the left and right transfer roll bearings. The bearing assemblies should support the transfer roll, applying evenly distributed forces to the PC drum. Replace the transfer roll assembly if the springs or bearings show signs of damage or fatigue. Inspect the transfer roll for signs of wear, damage, or contamination. Replace as necessary. Poor fusing of image FRU Fuser Media (not a FRU) Action The fuser may not be operating at the proper temperature to fuse the toner to the paper. See"LVPS/HVPS service check" on page 2-49 for more information. Try changing the setting to heavier paper or even card stock. Make sure recommended media is being used. Check the media settings in the printer driver. Diagnostics information 2-55
-
 1
1 -
2
-
3
-
4
-
5
-
6
-
7
-
8
-
9
-
10
-
11
-
12
-
13
-
14
-
15
-
16
-
17
-
18
-
19
-
20
-
21
-
22
-
23
-
24
-
25
-
26
-
27
-
28
-
29
-
30
-
31
-
32
-
33
-
34
-
35
-
36
-
37
-
38
-
39
-
40
-
41
-
42
-
43
-
44
-
45
-
46
-
47
-
48
-
49
-
50
-
51
-
52
-
53
-
54
-
55
-
56
-
57
-
58
-
59
-
60
-
61
-
62
-
63
-
64
-
65
-
66
-
67
-
68
-
69
-
70
-
71
-
72
-
73
-
74
-
75
-
 76
76 -
 77
77 -
 78
78 -
 79
79 -
 80
80 -
 81
81 -
 82
82 -
 83
83 -
 84
84 -
 85
85 -
 86
86 -
87
-
88
-
89
-
90
-
91
-
92
-
93
-
94
-
95
-
96
-
97
-
98
-
99
-
100
-
101
-
102
-
103
-
104
-
105
-
106
-
107
-
108
-
109
-
110
-
111
-
112
-
113
-
114
-
115
-
116
-
117
-
118
-
119
-
120
-
121
-
122
-
123
-
124
-
125
-
126
-
127
-
128
-
129
-
130
-
131
-
132
-
133
-
134
-
135
-
136
-
137
-
138
-
139
-
140
-
141
-
142
-
143
-
144
-
145
-
146
-
147
-
148
-
149
-
150
-
151
-
152
-
153
-
154
-
155
-
156
-
157
-
158
-
159
-
160
-
161
-
162
-
163
-
164
-
165
-
166
-
167
-
168
-
169
-
170
-
171
-
172
-
173
-
174
-
175
-
176
 |
 |