Lexmark E260dn Service Manual - Page 87
Diagnostic aids, Accessing service menus, Printing menus, Moving around the menu - print configuration page
 |
View all Lexmark E260dn manuals
Add to My Manuals
Save this manual to your list of manuals |
Page 87 highlights
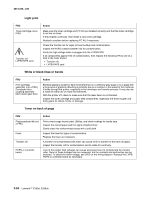
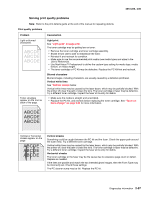
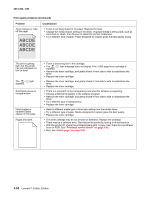
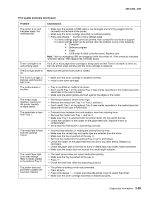
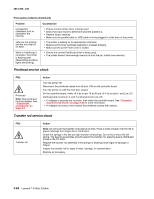
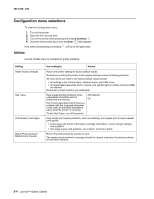
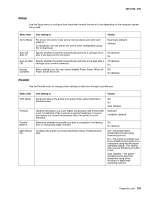
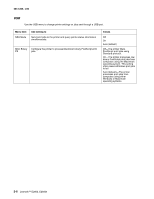
3. Diagnostic aids 4513-220, -230 Accessing service menus There are two different test menus that can be accessed during POR to identify problems with the printer. Configuration Menu Diagnostics Mode 1. Turn off the printer. 2. Open the front access door. 3. Turn on the printer while pressing and holding Continue . 4. Close the front access door once the Error light displays. 1. Turn off the printer. 2. Open the front access door. 3. Turn on the printer while pressing and holding Cancel . 4. Close the front access door once the Error light displays. The Configuration menu group contains a set of menus, settings and operations which are infrequently required by a user. Generally, the options made available in this menu group are used to configure a printer for operation. See "Configuration menu selections" on page 3-4. The Diagnostic menu group contains the settings and operations used while manufacturing and servicing the printer. See "Diagnostics mode selections" on page 3-8. Printing menus Print Configuration menus by pressing and holding Continue until all of the lights flash, then release the button. The Configuration Mode Instruction page will print. Print Diagnostic menus by pressing and holding Continue until all of the lights flash, then release the button. The Ready/Data light will blink when the page is being formatted and printed. Note: The Configuration Mode Instruction page and Diagnostic menu page in this manual are samples only and may not match your specific machine. Moving around the menu "Configuration Menu printout" on page 3-2 and "Diagnostics mode printout sample" on page 3-3 are similar to the instructions printed by following steps 1-3 above. These menu items are designated by the nonindented items listed along the left edge of the page (Bottom as printed from printer). These items are also unshaded. • Press and release to move sequentially from one menu item to another. • Press and hold to jump to home state (top four lights on). • Press and release to move through the menu settings (indicated by and • This action rotates only through the possible settings of the selected menu item. lights). Diagnostic aids 3-1
-
 1
1 -
2
-
3
-
4
-
5
-
6
-
7
-
8
-
9
-
10
-
11
-
12
-
13
-
14
-
15
-
16
-
17
-
18
-
19
-
20
-
21
-
22
-
23
-
24
-
25
-
26
-
27
-
28
-
29
-
30
-
31
-
32
-
33
-
34
-
35
-
36
-
37
-
38
-
39
-
40
-
41
-
42
-
43
-
44
-
45
-
46
-
47
-
48
-
49
-
50
-
51
-
52
-
53
-
54
-
55
-
56
-
57
-
58
-
59
-
60
-
61
-
62
-
63
-
64
-
65
-
66
-
67
-
68
-
69
-
70
-
71
-
72
-
73
-
74
-
75
-
76
-
77
-
78
-
79
-
80
-
81
-
 82
82 -
 83
83 -
 84
84 -
 85
85 -
 86
86 -
 87
87 -
 88
88 -
 89
89 -
 90
90 -
 91
91 -
 92
92 -
93
-
94
-
95
-
96
-
97
-
98
-
99
-
100
-
101
-
102
-
103
-
104
-
105
-
106
-
107
-
108
-
109
-
110
-
111
-
112
-
113
-
114
-
115
-
116
-
117
-
118
-
119
-
120
-
121
-
122
-
123
-
124
-
125
-
126
-
127
-
128
-
129
-
130
-
131
-
132
-
133
-
134
-
135
-
136
-
137
-
138
-
139
-
140
-
141
-
142
-
143
-
144
-
145
-
146
-
147
-
148
-
149
-
150
-
151
-
152
-
153
-
154
-
155
-
156
-
157
-
158
-
159
-
160
-
161
-
162
-
163
-
164
-
165
-
166
-
167
-
168
-
169
-
170
-
171
-
172
-
173
-
174
-
175
-
176
 |
 |
