Lexmark E260dn Service Manual - Page 86
Printhead service check, Transfer roll service check - toner light blinking
 |
View all Lexmark E260dn manuals
Add to My Manuals
Save this manual to your list of manuals |
Page 86 highlights
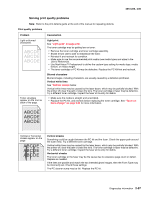
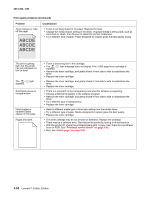
4513-220, -230 Print quality problems (Continued) Problem Unexpected characters print or characters are missing. Jobs are not printing, and the error light is on solid. While in PostScript 3 emulation, the printer is flushing data (Ready/Data and Error lights are blinking). Cause/action • Ensure correct printer driver is being used. • Select hex trace mode to determine what the problem is. • Restore factory defaults. • Make sure the parallel cable or USB cable is firmly plugged in at the back of the printer. • The printer is waiting for an appropriate command. • Make sure the toner cartridge assembly is installed properly. • Make sure the printer front cover is closed. • Ensure the correct PostScript driver is being used. • The printer doesn't have enough memory to print the job. Install more memory. Printhead service check FRU Printhead Note: New printhead must be aligned. See "Adjustment procedures" on page 3-9. Action Turn the printer off. Disconnect the printhead cables from J8 and J100 on the controller board. Turn the printer on with the front door closed. On the controller board, verify +5 V dc on pin 10 at J8 and +5 V dc on pins 1 and 2 at J15. Verify grounds on pins 2, 4, and 7 at J8 and on pin 4 at J15. • If voltages or grounds are incorrect, then check the controller board. See "Controller board service check" on page 2-46 for more information. • If voltages are correct, then replace the printhead (comes with cables). Transfer roll service check FRU Transfer roll Action Note: Do not touch the transfer roll except at its ends. Place a sheet of paper over the roll to prevent damage from finger oils or hand lotion. Check the springs in the left and right transfer roll bearings. Do not try to move the left spring. The bearing assemblies should support the transfer roll, applying evenly distributed forces to the PC drum. Replace the transfer roll assembly if the springs or bearings show signs of damage or fatigue. Inspect the transfer roll for signs of wear, damage, or contamination. Replace as necessary. 2-60 Lexmark™ E260d, E260dn
-
 1
1 -
2
-
3
-
4
-
5
-
6
-
7
-
8
-
9
-
10
-
11
-
12
-
13
-
14
-
15
-
16
-
17
-
18
-
19
-
20
-
21
-
22
-
23
-
24
-
25
-
26
-
27
-
28
-
29
-
30
-
31
-
32
-
33
-
34
-
35
-
36
-
37
-
38
-
39
-
40
-
41
-
42
-
43
-
44
-
45
-
46
-
47
-
48
-
49
-
50
-
51
-
52
-
53
-
54
-
55
-
56
-
57
-
58
-
59
-
60
-
61
-
62
-
63
-
64
-
65
-
66
-
67
-
68
-
69
-
70
-
71
-
72
-
73
-
74
-
75
-
76
-
77
-
78
-
79
-
80
-
 81
81 -
 82
82 -
 83
83 -
 84
84 -
 85
85 -
 86
86 -
 87
87 -
 88
88 -
 89
89 -
 90
90 -
 91
91 -
92
-
93
-
94
-
95
-
96
-
97
-
98
-
99
-
100
-
101
-
102
-
103
-
104
-
105
-
106
-
107
-
108
-
109
-
110
-
111
-
112
-
113
-
114
-
115
-
116
-
117
-
118
-
119
-
120
-
121
-
122
-
123
-
124
-
125
-
126
-
127
-
128
-
129
-
130
-
131
-
132
-
133
-
134
-
135
-
136
-
137
-
138
-
139
-
140
-
141
-
142
-
143
-
144
-
145
-
146
-
147
-
148
-
149
-
150
-
151
-
152
-
153
-
154
-
155
-
156
-
157
-
158
-
159
-
160
-
161
-
162
-
163
-
164
-
165
-
166
-
167
-
168
-
169
-
170
-
171
-
172
-
173
-
174
-
175
-
176
 |
 |
