Lexmark Multifunction Laser C77x - Menus and Messages Guide - Page 10
Unlock Device, Continue, Information on LCD touch-screen buttons on Cancel
 |
View all Lexmark Multifunction Laser manuals
Add to My Manuals
Save this manual to your list of manuals |
Page 10 highlights
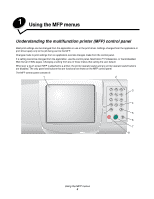
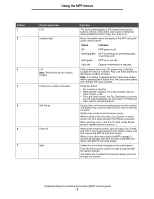
Using the MFP menus Button Cancel Jobs Button name Unlock Device Cancel Jobs Function This button appears on the screen when the MFP is locked. The control panel buttons and shortcuts cannot be used while it appears and no default copy starts may occur. To unlock the MFP: 1 Touch Unlock Device to open a PIN entry screen. 2 Enter the correct PIN to unlock the numeric keypad (0-9) and the Backspace button on the control panel. Note: If an invalid PIN is entered, Invalid PIN. appears. A pop-up screen appears with the Continue button shown. Touch Continue. The home screen returns with the Unlock Device button shown. Open the Cancel Jobs screen. The Cancel Jobs screen shows any of the following items under three headings on the screen, which are Print, Fax, and Network: • print job • copy job • fax • profile • FTP • e-mail send Each heading has its own list of jobs shown in a column under it. Each column can only show three jobs per screen. Each job appears as a button. If more than three jobs exist in a column, then the down arrow appears at the bottom of the column. Each touch of the down arrow accesses one job in the list. When more than three jobs exist, once the fourth job in the list is reached, then an up arrow appears at the top of the column. For illustrations of the up and down arrow buttons, see Information on LCD touch-screen buttons on page 15. To cancel a job, see the User's Guide for instructions. Understanding the multifunction printer (MFP) control panel 10
-
 1
1 -
2
-
3
-
4
-
 5
5 -
 6
6 -
 7
7 -
 8
8 -
 9
9 -
 10
10 -
 11
11 -
 12
12 -
 13
13 -
 14
14 -
 15
15 -
16
-
17
-
18
-
19
-
20
-
21
-
22
-
23
-
24
-
25
-
26
-
27
-
28
-
29
-
30
-
31
-
32
-
33
-
34
-
35
-
36
-
37
-
38
-
39
-
40
-
41
-
42
-
43
-
44
-
45
-
46
-
47
-
48
-
49
-
50
-
51
-
52
-
53
-
54
-
55
-
56
-
57
-
58
-
59
-
60
-
61
-
62
-
63
-
64
-
65
-
66
-
67
-
68
-
69
-
70
-
71
-
72
-
73
-
74
-
75
-
76
-
77
-
78
-
79
-
80
-
81
-
82
-
83
-
84
-
85
-
86
-
87
-
88
-
89
-
90
-
91
-
92
-
93
-
94
-
95
-
96
-
97
-
98
-
99
-
100
-
101
-
102
-
103
-
104
-
105
-
106
-
107
-
108
-
109
-
110
-
111
-
112
-
113
-
114
-
115
-
116
-
117
-
118
-
119
-
120
-
121
-
122
-
123
-
124
-
125
-
126
-
127
-
128
 |
 |
