Lexmark X864 PKI-Enabled Device Installation and Configuration Guide - Page 17
Default Scan Settings, Creating file shares
 |
View all Lexmark X864 manuals
Add to My Manuals
Save this manual to your list of manuals |
Page 17 highlights
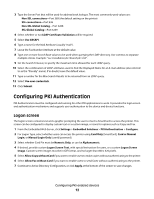
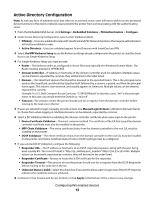
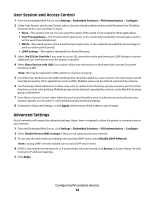
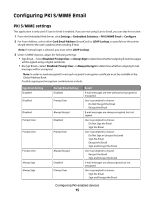
5 From Scan to Network Authorization, select which Access Control should be used to authorize user groups. If groups are not being used, select the same setting used for Device Access Control in PKI Authentication (usually Solution-specific access control 1). Note: Authorization can be further restricted when configuring specific Scan to Network file shares. 6 Continue to Default Scan Settings, or click Apply at the bottom of the screen to save changes. Default Scan Settings The default scan settings are passed to all new file shares. You can keep these defaults for individual file shares, or select new settings for each. 1 From the Embedded Web Server, click Settings > Embedded Solutions > PKI Scan to Network > Configure. 2 Under Default Scan Settings, adjust the following settings as needed: • Format-The default file format for scanned documents. • Content-The default for the type of content in scanned documents. • Color-Determines whether scanned documents will be in color, black and white, or grayscale. • Resolution-The default resolution for scanned documents. Note: Higher resolutions produce better quality images, but also increase the file size of scanned documents. • Darkness-The default darkness level for scanned documents. • Original Size-The default paper size for scanned documents. • Sides (Duplex)-Specifies whether the document being scanned is 1-sided or 2-sided. • Select Scan Edge to Edge to scan documents all the way to the edge of the paper. Note: Leaving a small space around the edges that is not scanned usually results in better image quality. • Select Scan Preview to allow users preview and verify the first page of a document before the rest is scanned. 3 Click Apply at the bottom of the screen to save changes, before continuing to File Shares. Creating file shares To create a new file share: 1 From the Embedded Web Server, click Settings > Embedded Solutions > PKI Scan to Network > Configure. 2 Under File Shares, click Add to create a new share. The Add File Shares page will be displayed. 3 Under General Settings, configure the following attributes for the new share: • File Share Authorization-Select the solution access control that determines which groups can access this file share. If a user is not allowed to access this share, it will not appear in the list of shares available to the user. Note: If groups are not being used, select the same setting used for Device Access Control in PKI Authentication (usually Solution-specific access control 1). • Display Name-The name used to represent this file share in the list of shares available to a user. Configuring PKI-enabled devices 17
-
 1
1 -
2
-
3
-
4
-
5
-
6
-
7
-
8
-
9
-
10
-
11
-
 12
12 -
 13
13 -
 14
14 -
 15
15 -
 16
16 -
 17
17 -
 18
18 -
 19
19 -
 20
20 -
 21
21 -
 22
22 -
23
-
24
-
25
-
26
-
27
-
28
-
29
-
30
-
31
-
32
-
33
-
34
-
35
-
36
-
37
-
38
 |
 |