Lexmark Xs463de User Guide - Page 114
Sides (Duplex), Collate, Options, Paper Saver, Create Booklet, Advanced Imaging, Custom Job
 |
UPC - 734646309271
View all Lexmark Xs463de manuals
Add to My Manuals
Save this manual to your list of manuals |
Page 114 highlights
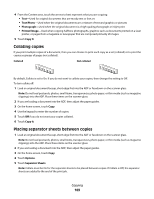
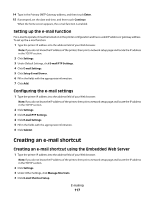
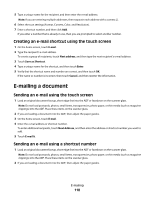
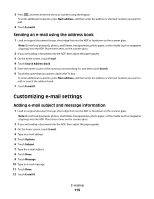
Sides (Duplex) Use this option to select duplex settings. You can print copies on one or two sides, make two-sided copies (duplex) of two-sided original documents, make two-sided copies from one-sided original documents, or make one-sided copies (simplex) from two-sided original documents. Collate This option keeps the pages of a print job stacked in sequence when printing multiple copies of the document. The factory default setting for Collate is on; the output pages of your copies will be ordered (1,2,3) (1,2,3) (1,2,3). If you want all the copies of each page to remain together, turn Collate off, and your copies will be ordered (1,1,1) (2,2,2) (3,3,3). Options Touching the Options button opens a screen where you can change Paper Saver, Create Booklet, Advanced Imaging, Custom Job, Separator Sheets, Margin Shift, Edge Erase, Header/Footer, Overlay, Advanced Duplex, and Save as Shortcut settings. Paper Saver This option lets you print two or more sheets of an original document together on the same page. Paper Saver is also called N-up printing. The N stands for Number. For example, 2-up would print two pages of your document on a single page, and 4-up would print four pages of your document on a single page. Touching Print Page Borders adds or removes the outline border surrounding the original document pages on the output page. Create Booklet This option creates a stack of collated pages that, when folded, forms a booklet half the page size of the original document and with all the pages in order. Note: To use Create Booklet, you must have a duplex unit attached to the printer. Advanced Imaging This option lets you adjust Background Removal, Color Dropout, Contrast, Mirror Image, Negative Image, Shadow Detail, Scan Edge to Edge, and sharpness before you copy the document. Custom Job This option combines multiple scanning jobs into a single job. Separator Sheets This option places a blank piece of paper between copies, pages, and print jobs. The separator sheets can be drawn from a tray that contains a type or color of paper that is different from the paper your copies are printed on. Margin Shift This option increases the size of the margin a specified distance. This can be useful in providing space to bind or holepunch copies. Use the increase or decrease arrows to set how much of a margin you want. If the additional margin is too large, then the copy will be cropped. Copying 114
-
 1
1 -
2
-
3
-
4
-
5
-
6
-
7
-
8
-
9
-
10
-
11
-
12
-
13
-
14
-
15
-
16
-
17
-
18
-
19
-
20
-
21
-
22
-
23
-
24
-
25
-
26
-
27
-
28
-
29
-
30
-
31
-
32
-
33
-
34
-
35
-
36
-
37
-
38
-
39
-
40
-
41
-
42
-
43
-
44
-
45
-
46
-
47
-
48
-
49
-
50
-
51
-
52
-
53
-
54
-
55
-
56
-
57
-
58
-
59
-
60
-
61
-
62
-
63
-
64
-
65
-
66
-
67
-
68
-
69
-
70
-
71
-
72
-
73
-
74
-
75
-
76
-
77
-
78
-
79
-
80
-
81
-
82
-
83
-
84
-
85
-
86
-
87
-
88
-
89
-
90
-
91
-
92
-
93
-
94
-
95
-
96
-
97
-
98
-
99
-
100
-
101
-
102
-
103
-
104
-
105
-
106
-
107
-
108
-
 109
109 -
 110
110 -
 111
111 -
 112
112 -
 113
113 -
 114
114 -
 115
115 -
 116
116 -
 117
117 -
 118
118 -
 119
119 -
120
-
121
-
122
-
123
-
124
-
125
-
126
-
127
-
128
-
129
-
130
-
131
-
132
-
133
-
134
-
135
-
136
-
137
-
138
-
139
-
140
-
141
-
142
-
143
-
144
-
145
-
146
-
147
-
148
-
149
-
150
-
151
-
152
-
153
-
154
-
155
-
156
-
157
-
158
-
159
-
160
-
161
-
162
-
163
-
164
-
165
-
166
-
167
-
168
-
169
-
170
-
171
-
172
-
173
-
174
-
175
-
176
-
177
-
178
-
179
-
180
-
181
-
182
-
183
-
184
-
185
-
186
-
187
-
188
-
189
-
190
-
191
-
192
-
193
-
194
-
195
-
196
-
197
-
198
-
199
-
200
-
201
-
202
-
203
-
204
-
205
-
206
-
207
-
208
-
209
-
210
-
211
-
212
-
213
-
214
-
215
-
216
-
217
-
218
-
219
-
220
-
221
-
222
-
223
-
224
-
225
-
226
-
227
-
228
-
229
-
230
-
231
-
232
-
233
-
234
-
235
-
236
-
237
-
238
-
239
-
240
-
241
-
242
-
243
-
244
-
245
-
246
-
247
-
248
-
249
-
250
-
251
-
252
-
253
-
254
-
255
-
256
-
257
-
258
-
259
-
260
-
261
-
262
-
263
-
264
-
265
-
266
-
267
-
268
-
269
-
270
-
271
-
272
-
273
-
274
-
275
-
276
-
277
-
278
-
279
-
280
-
281
-
282
-
283
-
284
-
285
-
286
-
287
-
288
-
289
-
290
-
291
-
292
-
293
-
294
-
295
-
296
-
297
-
298
-
299
-
300
-
301
-
302
-
303
-
304
-
305
-
306
-
307
-
308
-
309
-
310
-
311
-
312
-
313
-
314
-
315
-
316
-
317
 |
 |