Lexmark Xs463de User Guide - Page 88
Assigning a custom paper type name, Changing a Custom Type <x> name, Warning-Potential Damage - fuser
 |
UPC - 734646309271
View all Lexmark Xs463de manuals
Add to My Manuals
Save this manual to your list of manuals |
Page 88 highlights
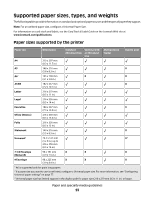
To unlink a tray, change the following tray settings so that they do not match the settings of any other tray: • Paper Type (for example: Plain Paper, Letterhead, Custom Type ) Paper Type names describe the paper characteristics. If the name that best describes your paper is used by linked trays, assign a different Paper Type name to the tray, such as Custom Type , or define your own custom name. • Paper Size (for example: letter, A4, statement) Paper Size settings are not automatic; they must be set manually from the Paper Size/Type menu. Warning-Potential Damage: Do not assign a Paper Type name that does not accurately describe the type of paper loaded in the tray. The temperature of the fuser varies according to the specified Paper Type. Paper may not be properly processed if an inaccurate Paper Type is selected. Assigning a custom paper type name Assign a custom paper type name to a tray when linking or unlinking the tray. 1 Make sure the printer is on and Ready appears. 2 From the home screen, touch . 3 Touch Paper Menu. 4 Touch Paper Size/Type. 5 Touch the paper type arrows for the desired tray until the correct custom type appears. 6 Touch the tray number or MP Feeder Type. 7 Touch Submit. Changing a Custom Type name You can use the Embedded Web Server or MarkVision ProfessionalTM to define a name other than Custom Type for each of the custom paper types that are loaded. When a Custom Type name is changed, the menus display the new name instead of Custom Type . To change a Custom Type name from the Embedded Web Server: 1 Type the printer IP address into the address field of your Web browser. Note: If you do not know the IP address of the printer, then print a network setup page and locate the IP address in the TCP/IP section. 2 Click Settings. 3 Under Default Settings, click Paper Menu. 4 Click Custom Names. 5 Type a name for the paper type in a Custom Name box. Note: This custom name will replace a custom type name under the Custom Types and Paper Size/Type menus. 6 Click Submit. 7 Click Custom Types. Custom Types appears, followed by your custom name. Loading paper and specialty media 88
-
 1
1 -
2
-
3
-
4
-
5
-
6
-
7
-
8
-
9
-
10
-
11
-
12
-
13
-
14
-
15
-
16
-
17
-
18
-
19
-
20
-
21
-
22
-
23
-
24
-
25
-
26
-
27
-
28
-
29
-
30
-
31
-
32
-
33
-
34
-
35
-
36
-
37
-
38
-
39
-
40
-
41
-
42
-
43
-
44
-
45
-
46
-
47
-
48
-
49
-
50
-
51
-
52
-
53
-
54
-
55
-
56
-
57
-
58
-
59
-
60
-
61
-
62
-
63
-
64
-
65
-
66
-
67
-
68
-
69
-
70
-
71
-
72
-
73
-
74
-
75
-
76
-
77
-
78
-
79
-
80
-
81
-
82
-
 83
83 -
 84
84 -
 85
85 -
 86
86 -
 87
87 -
 88
88 -
 89
89 -
 90
90 -
 91
91 -
 92
92 -
 93
93 -
94
-
95
-
96
-
97
-
98
-
99
-
100
-
101
-
102
-
103
-
104
-
105
-
106
-
107
-
108
-
109
-
110
-
111
-
112
-
113
-
114
-
115
-
116
-
117
-
118
-
119
-
120
-
121
-
122
-
123
-
124
-
125
-
126
-
127
-
128
-
129
-
130
-
131
-
132
-
133
-
134
-
135
-
136
-
137
-
138
-
139
-
140
-
141
-
142
-
143
-
144
-
145
-
146
-
147
-
148
-
149
-
150
-
151
-
152
-
153
-
154
-
155
-
156
-
157
-
158
-
159
-
160
-
161
-
162
-
163
-
164
-
165
-
166
-
167
-
168
-
169
-
170
-
171
-
172
-
173
-
174
-
175
-
176
-
177
-
178
-
179
-
180
-
181
-
182
-
183
-
184
-
185
-
186
-
187
-
188
-
189
-
190
-
191
-
192
-
193
-
194
-
195
-
196
-
197
-
198
-
199
-
200
-
201
-
202
-
203
-
204
-
205
-
206
-
207
-
208
-
209
-
210
-
211
-
212
-
213
-
214
-
215
-
216
-
217
-
218
-
219
-
220
-
221
-
222
-
223
-
224
-
225
-
226
-
227
-
228
-
229
-
230
-
231
-
232
-
233
-
234
-
235
-
236
-
237
-
238
-
239
-
240
-
241
-
242
-
243
-
244
-
245
-
246
-
247
-
248
-
249
-
250
-
251
-
252
-
253
-
254
-
255
-
256
-
257
-
258
-
259
-
260
-
261
-
262
-
263
-
264
-
265
-
266
-
267
-
268
-
269
-
270
-
271
-
272
-
273
-
274
-
275
-
276
-
277
-
278
-
279
-
280
-
281
-
282
-
283
-
284
-
285
-
286
-
287
-
288
-
289
-
290
-
291
-
292
-
293
-
294
-
295
-
296
-
297
-
298
-
299
-
300
-
301
-
302
-
303
-
304
-
305
-
306
-
307
-
308
-
309
-
310
-
311
-
312
-
313
-
314
-
315
-
316
-
317
 |
 |