Netgear FVG318v1 FVG318 Reference Manual - Page 123
Generate, Upload, Transmit the Self Certificate Request data to the Trusted Root CA.
 |
View all Netgear FVG318v1 manuals
Add to My Manuals
Save this manual to your list of manuals |
Page 123 highlights
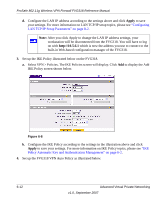
ProSafe 802.11g Wireless VPN Firewall FVG318 Reference Manual g. Click Generate The FVG318 generates a pending Self Certificate Request as shown below. Click view to display the data. Highlight, copy, and paste this data into a text file. Figure 6-11 4. Transmit the Self Certificate Request data to the Trusted Root CA. a. Highlight the text in the Data to supply to CA area, copy it, and paste it into a text file. b. Give the certificate request data to the CA. In the case of a Windows 2000 internal CA, you might simply e-mail it to the CA administrator. The procedures of a CA like Verisign and a CA such as a Windows 2000 certificate server administrator will differ. Follow the procedures of your CA. 5. Receive the certificate back from the Trusted Root CA and save it as a text file. Note: In the case of a Windows 2000 internal CA, the CA administrator might simply email it to back to you. Follow the procedures of your CA. Save the certificate you get back from the CA as a text file called final.txt. 6. Upload the new certificate. c. Select the checkbox of the Self Certificate Request you want to upload. d. Browse to the location of the file you saved in Step 5 above that contains the certificate from the CA. e. Click Upload button. Advanced Virtual Private Networking v1.0, September 2007 6-17
-
 1
1 -
2
-
3
-
4
-
5
-
6
-
7
-
8
-
9
-
10
-
11
-
12
-
13
-
14
-
15
-
16
-
17
-
18
-
19
-
20
-
21
-
22
-
23
-
24
-
25
-
26
-
27
-
28
-
29
-
30
-
31
-
32
-
33
-
34
-
35
-
36
-
37
-
38
-
39
-
40
-
41
-
42
-
43
-
44
-
45
-
46
-
47
-
48
-
49
-
50
-
51
-
52
-
53
-
54
-
55
-
56
-
57
-
58
-
59
-
60
-
61
-
62
-
63
-
64
-
65
-
66
-
67
-
68
-
69
-
70
-
71
-
72
-
73
-
74
-
75
-
76
-
77
-
78
-
79
-
80
-
81
-
82
-
83
-
84
-
85
-
86
-
87
-
88
-
89
-
90
-
91
-
92
-
93
-
94
-
95
-
96
-
97
-
98
-
99
-
100
-
101
-
102
-
103
-
104
-
105
-
106
-
107
-
108
-
109
-
110
-
111
-
112
-
113
-
114
-
115
-
116
-
117
-
 118
118 -
 119
119 -
 120
120 -
 121
121 -
 122
122 -
 123
123 -
 124
124 -
 125
125 -
 126
126 -
 127
127 -
 128
128 -
129
-
130
-
131
-
132
-
133
-
134
-
135
-
136
-
137
-
138
-
139
-
140
-
141
-
142
-
143
-
144
-
145
-
146
-
147
-
148
-
149
-
150
-
151
-
152
-
153
-
154
-
155
-
156
-
157
-
158
-
159
-
160
-
161
-
162
-
163
-
164
-
165
-
166
-
167
-
168
-
169
-
170
-
171
-
172
-
173
-
174
-
175
-
176
 |
 |
