Netgear FVG318v1 FVG318 Reference Manual - Page 87
NETGEAR_VPN_router, RoadWarrior, Select the Connect using Secure Gateway Tunnel check box.
 |
View all Netgear FVG318v1 manuals
Add to My Manuals
Save this manual to your list of manuals |
Page 87 highlights
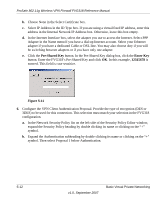
ProSafe 802.11g Wireless VPN Firewall FVG318 Reference Manual Note: In this example, the Connection Name used on the client side of the VPN tunnel is NETGEAR_VPN_router and it does not have to match the RoadWarrior Connection Name used on the gateway side of the VPN tunnel (see Figure 5-8) because Connection Names are unrelated to how the VPN tunnel functions. Tip: Choose Connection Names that make sense to the people using and administrating the VPN. Figure 5-7 3. Enter the connection settings for the new connection: a. Select Secure in the Connection Security check box b. Select IP Subnet in the ID Type menu. In this example, type 192.168.0.0 in the Subnet field as the network address of the FVG318. c. Enter 255.255.255.0 in the Mask field as the LAN Subnet Mask of the FVG318. d. Select All in the Protocol menu to allow all traffic through the VPN tunnel. e. Select the Connect using Secure Gateway Tunnel check box. Basic Virtual Private Networking 5-9 v1.0, September 2007
-
 1
1 -
2
-
3
-
4
-
5
-
6
-
7
-
8
-
9
-
10
-
11
-
12
-
13
-
14
-
15
-
16
-
17
-
18
-
19
-
20
-
21
-
22
-
23
-
24
-
25
-
26
-
27
-
28
-
29
-
30
-
31
-
32
-
33
-
34
-
35
-
36
-
37
-
38
-
39
-
40
-
41
-
42
-
43
-
44
-
45
-
46
-
47
-
48
-
49
-
50
-
51
-
52
-
53
-
54
-
55
-
56
-
57
-
58
-
59
-
60
-
61
-
62
-
63
-
64
-
65
-
66
-
67
-
68
-
69
-
70
-
71
-
72
-
73
-
74
-
75
-
76
-
77
-
78
-
79
-
80
-
81
-
 82
82 -
 83
83 -
 84
84 -
 85
85 -
 86
86 -
 87
87 -
 88
88 -
 89
89 -
 90
90 -
 91
91 -
 92
92 -
93
-
94
-
95
-
96
-
97
-
98
-
99
-
100
-
101
-
102
-
103
-
104
-
105
-
106
-
107
-
108
-
109
-
110
-
111
-
112
-
113
-
114
-
115
-
116
-
117
-
118
-
119
-
120
-
121
-
122
-
123
-
124
-
125
-
126
-
127
-
128
-
129
-
130
-
131
-
132
-
133
-
134
-
135
-
136
-
137
-
138
-
139
-
140
-
141
-
142
-
143
-
144
-
145
-
146
-
147
-
148
-
149
-
150
-
151
-
152
-
153
-
154
-
155
-
156
-
157
-
158
-
159
-
160
-
161
-
162
-
163
-
164
-
165
-
166
-
167
-
168
-
169
-
170
-
171
-
172
-
173
-
174
-
175
-
176
 |
 |
