Netgear FVG318v1 FVG318 Reference Manual - Page 97
Setting Up a Gateway-to-Gateway VPN Configuration, Table 5-1
 |
View all Netgear FVG318v1 manuals
Add to My Manuals
Save this manual to your list of manuals |
Page 97 highlights
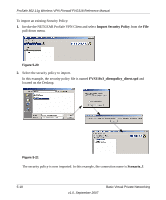
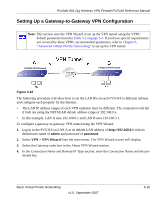
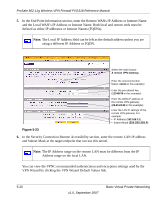
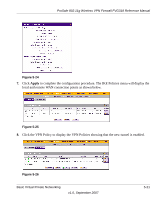
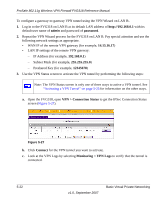
ProSafe 802.11g Wireless VPN Firewall FVG318 Reference Manual Setting Up a Gateway-to-Gateway VPN Configuration Note: This section uses the VPN Wizard to set up the VPN tunnel using the VPNC default parameters listed in Table 5-1 on page 5-4. If you have special requirements not covered by these VPNC-recommended parameters, refer to Chapter 6, "Advanced Virtual Private Networking" to set up the VPN tunnel. FVG318 VPN Firewall FVG318 VPN Firewall Figure 5-22 The following procedure will show how to set the LAN IPs on each FVG318 to different subnets and configure each properly for the Internet. • The LAN IP address ranges of each VPN endpoint must be different. The connection will fail if both are using the NETGEAR default address range of 192.168.0.x. • In this example, LAN A uses 192.168.0.1 and LAN B uses 192.168.3.1. To configure a gateway-to-gateway VPN tunnel using the VPN Wizard. 1. Log in to the FVG318 on LAN A at its default LAN address of http://192.168.0.1 with its default user name of admin and password of password. 2. Select VPN > VPN Wizard from the main menu. The VPN Wizard screen will display. 3. Select the Gateway radio box in the About VPN Wizard section. 4. In the Connection Name and Remote IP Type section, enter the Connection Name and the preshared key. Basic Virtual Private Networking v1.0, September 2007 5-19
-
 1
1 -
2
-
3
-
4
-
5
-
6
-
7
-
8
-
9
-
10
-
11
-
12
-
13
-
14
-
15
-
16
-
17
-
18
-
19
-
20
-
21
-
22
-
23
-
24
-
25
-
26
-
27
-
28
-
29
-
30
-
31
-
32
-
33
-
34
-
35
-
36
-
37
-
38
-
39
-
40
-
41
-
42
-
43
-
44
-
45
-
46
-
47
-
48
-
49
-
50
-
51
-
52
-
53
-
54
-
55
-
56
-
57
-
58
-
59
-
60
-
61
-
62
-
63
-
64
-
65
-
66
-
67
-
68
-
69
-
70
-
71
-
72
-
73
-
74
-
75
-
76
-
77
-
78
-
79
-
80
-
81
-
82
-
83
-
84
-
85
-
86
-
87
-
88
-
89
-
90
-
91
-
 92
92 -
 93
93 -
 94
94 -
 95
95 -
 96
96 -
 97
97 -
 98
98 -
 99
99 -
 100
100 -
 101
101 -
 102
102 -
103
-
104
-
105
-
106
-
107
-
108
-
109
-
110
-
111
-
112
-
113
-
114
-
115
-
116
-
117
-
118
-
119
-
120
-
121
-
122
-
123
-
124
-
125
-
126
-
127
-
128
-
129
-
130
-
131
-
132
-
133
-
134
-
135
-
136
-
137
-
138
-
139
-
140
-
141
-
142
-
143
-
144
-
145
-
146
-
147
-
148
-
149
-
150
-
151
-
152
-
153
-
154
-
155
-
156
-
157
-
158
-
159
-
160
-
161
-
162
-
163
-
164
-
165
-
166
-
167
-
168
-
169
-
170
-
171
-
172
-
173
-
174
-
175
-
176
 |
 |
