Philips DVD740VR Owners Manual - Page 13
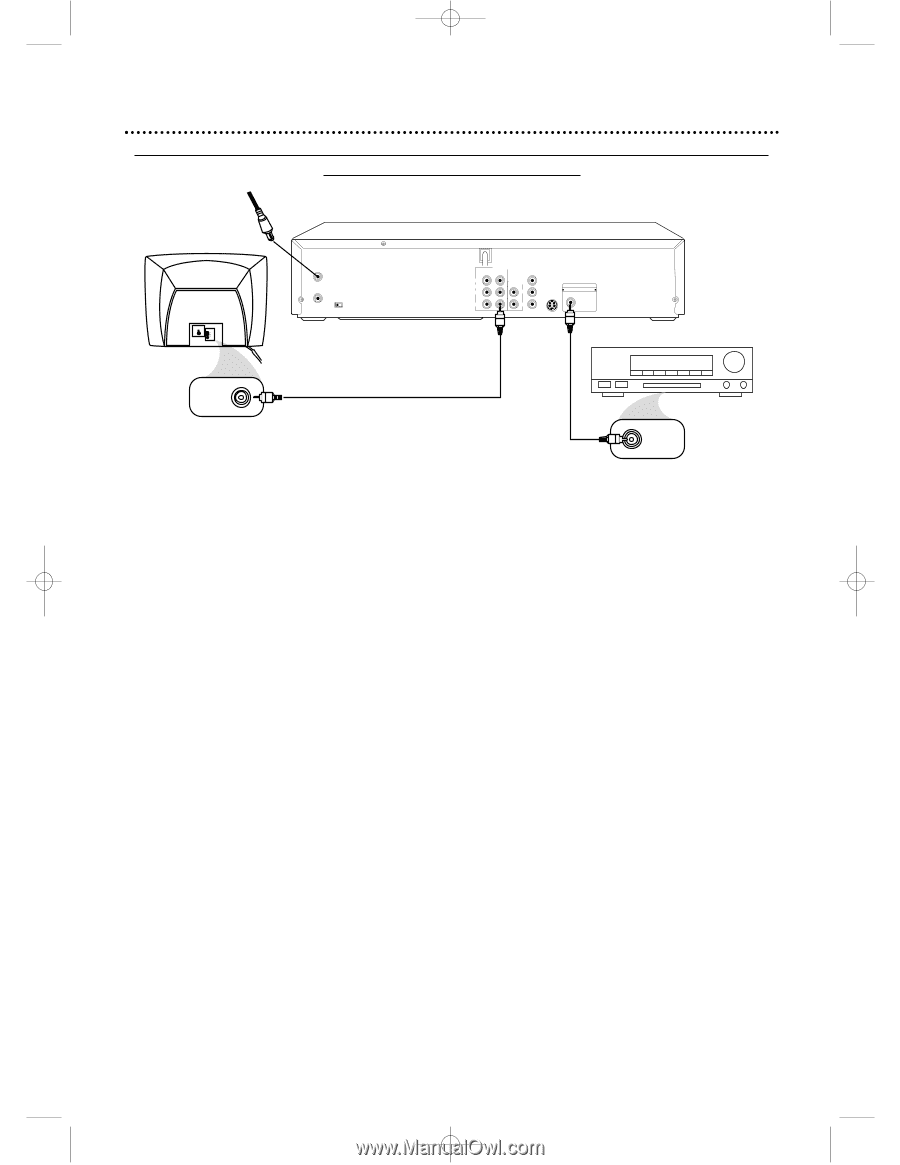
DVD/VCR to a TV and to a Stereo Receiver that is Dolby Digital-compatible, Using Digital Audio
 |
View all Philips DVD740VR manuals
Add to My Manuals
Save this manual to your list of manuals |
Page 13 highlights
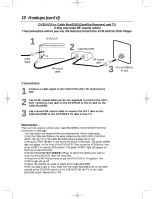
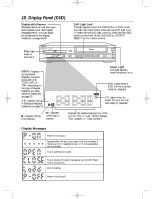
DVD740VR 4/12/02 12:08 PM Page 13 Hookups (cont'd) 13 DVD/VCR to a TV and to a Stereo Receiver that is Dolby Digital-compatible Using Digital Audio connections 1Antenna/Cable TV Signal DVD/VCR ANT-IN ANT-OUT CH3 CH4 1 VIDEO IN Back of TV (example only) IN L AUDIO R DVD/VCR OUT COMPONENT VIDEO OUT DVD/VCR AUDIO OUT Y S-VIDEO L Cb OUT DIGITAL AUDIO OUT PCM / MULTICHANNEL COAXIAL VIDEO R Cr 3 2 Stereo Receiver COAXIAL DIGITAL AUDIO IN 1 Connect the antenna or Cable TV signal to the ANT-IN (Antenna In) jack of your DVD/VCR. 2 Connect a coaxial digital audio cable (not supplied) to the DVD/VCR's COAXIAL DIGITAL AUDIO OUT jack and to the COAXIAL DIGITAL AUDIO IN jack on the Stereo Receiver. This digital audio connection only provides sound for the DVD Player of the DVD/VCR. So, in order to use the VCR features or view TV channels at the DVD/VCR, you still need to either connect the RF coaxial cable between the ANT-OUT jack of the DVD/VCR and the TV's Antenna In jack, or connect the supplied red/white audio cables. To connect the supplied RF coaxial cable, see step 2 on page eight. To connect the red/white audio cables, see step 2 on page 11. 3 Connect the supplied yellow video cable to the yellow DVD/VCR VIDEO OUT jack on the DVD/VCR and to the VIDEO IN jack on the TV. To use component video cable or S-Video cable instead for the DVD Player, see pages 11-12. You will still need the yellow video cable or RF coaxial cable for VCR features. 4 Plug in the power cords of the stereo receiver, TV, and DVD/VCR. Turn on the stereo receiver and select its Auxiliary IN channel. Turn on the TV and set it to the correct Video In channel. 5 You are ready to turn on the DVD/VCR. Go to page 15 before turning on the DVD/VCR. Remember... Some DVDs are recorded in 5.1 channel Dolby Digital Surround. Select 5.1 channel Dolby Digital Surround Sound in the DVD Disc menu. If you connect the DVD/VCR to a Dolby Digital Stereo Receiver, set DOLBY DIGITAL to ON in the DVD Player's Setup menu. Details are on page 70. If the DVD/VCR is not connected to a Dolby Digital-compatible Stereo Receiver, set DOLBY DIGITAL to OFF. Incorrect settings may cause noise distortion and damage the speakers.
-
 1
1 -
2
-
3
-
4
-
5
-
6
-
7
-
 8
8 -
 9
9 -
 10
10 -
 11
11 -
 12
12 -
 13
13 -
 14
14 -
 15
15 -
 16
16 -
 17
17 -
 18
18 -
19
-
20
-
21
-
22
-
23
-
24
-
25
-
26
-
27
-
28
-
29
-
30
-
31
-
32
-
33
-
34
-
35
-
36
-
37
-
38
-
39
-
40
-
41
-
42
-
43
-
44
-
45
-
46
-
47
-
48
-
49
-
50
-
51
-
52
-
53
-
54
-
55
-
56
-
57
-
58
-
59
-
60
-
61
-
62
-
63
-
64
-
65
-
66
-
67
-
68
-
69
-
70
-
71
-
72
-
73
-
74
-
75
-
76
-
77
-
78
-
79
-
80
 |
 |