Pioneer VSX-820-K Owner's Manual - Page 43
Manual speaker setup, Speaker Setting, Manual SP Setup menu. - test
 |
UPC - 884938109277
View all Pioneer VSX-820-K manuals
Add to My Manuals
Save this manual to your list of manuals |
Page 43 highlights
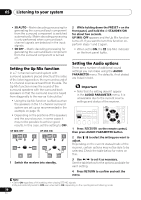
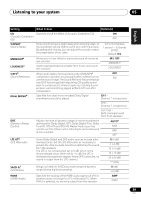
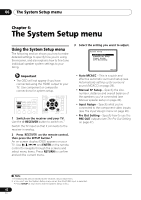
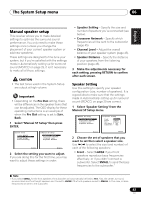
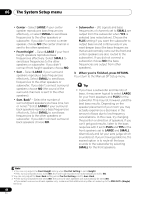
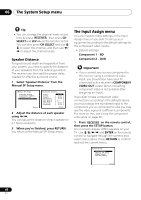
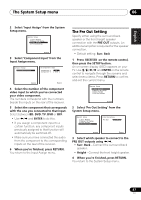
The System Setup menu 06 English Deutsch Français Italiano Nederlands Español Manual speaker setup This receiver allows you to make detailed settings to optimize the surround sound performance. You only need to make these settings once (unless you change the placement of your current speaker system or add new speakers). These settings are designed to fine-tune your system, but if you're satisfied with the settings made in Automatically setting up for surround sound (MCACC) on page 29, it isn't necessary to make all of these settings. CAUTION • The test tones used in the System Setup are output at high volume. Important • Depending on the Pre Out setting, there will be differences in the speaker items that can be adjusted. The OSD display for these operating instructions is an example of when the Pre Out setting is set to Surr. Back. 1 Select 'Manual SP Setup' then press ENTER. System Setup 1.Auto MCACC 2.Manual SP Setup 3.Input Assign 4.Pre Out Setting 2.Manual SP Setup a.Speaker Setting b.Crossover Network c.Channel Level d.Speaker Distance Return Return 2 Select the setting you want to adjust. If you are doing this for the first time, you may want to adjust these settings in order: • Speaker Setting - Specify the size and number of speakers you've connected (see below). • Crossover Network - Specify which frequencies will be sent to the subwoofer (page 45). • Channel Level - Adjust the overall balance of your speaker system (page 45). • Speaker Distance - Specify the distance of your speakers from the listening position (page 46). 3 Make the adjustments necessary for each setting, pressing RETURN to confirm after each screen. Speaker Setting Use this setting to specify your speaker configuration (size, number of speakers). It is a good idea to make sure that the settings made in Automatically setting up for surround sound (MCACC) on page 29 are correct. 1 Select 'Speaker Setting' from the Manual SP Setup menu. 2.Manual SP Setup a.Speaker Setting b.Crossover Network c.Channel Level d.Speaker Distance 2a.Speaker Setting Front SMALL Center [ SMALL ] Surr [ SMALL ] Surr. Back [ NO ] Subwoofer: YES Return Return 2 Choose the set of speakers that you want to set then select a speaker size. Use / to select the size (and number) of each of the following speakers: • Front - Select LARGE if your front speakers reproduce bass frequencies effectively, or if you didn't connect a subwoofer. Select SMALL to send the bass frequencies to the subwoofer.1 Note 1 If you select SMALL for the front speakers, the subwoofer will automatically be fixed to YES. Also, the center, surround, surround back and front height speakers can't be set to LARGE if the front speakers are set to SMALL. In this case, all bass frequencies are sent to the subwoofer. 43 En
-
 1
1 -
2
-
3
-
4
-
5
-
6
-
7
-
8
-
9
-
10
-
11
-
12
-
13
-
14
-
15
-
16
-
17
-
18
-
19
-
20
-
21
-
22
-
23
-
24
-
25
-
26
-
27
-
28
-
29
-
30
-
31
-
32
-
33
-
34
-
35
-
36
-
37
-
 38
38 -
 39
39 -
 40
40 -
 41
41 -
 42
42 -
 43
43 -
 44
44 -
 45
45 -
 46
46 -
 47
47 -
 48
48 -
49
-
50
-
51
-
52
-
53
-
54
-
55
-
56
-
57
-
58
-
59
-
60
-
61
-
62
-
63
-
64
-
65
-
66
-
67
-
68
-
69
-
70
-
71
-
72
-
73
-
74
-
75
-
76
-
77
-
78
-
79
-
80
-
81
-
82
-
83
-
84
-
85
-
86
-
87
-
88
-
89
-
90
-
91
-
92
-
93
-
94
-
95
-
96
-
97
-
98
-
99
-
100
-
101
-
102
-
103
-
104
-
105
-
106
-
107
-
108
-
109
-
110
-
111
-
112
-
113
-
114
-
115
-
116
-
117
-
118
-
119
-
120
-
121
-
122
-
123
-
124
-
125
-
126
-
127
-
128
-
129
-
130
-
131
-
132
-
133
-
134
-
135
-
136
-
137
-
138
-
139
-
140
-
141
-
142
-
143
-
144
-
145
-
146
-
147
-
148
-
149
-
150
-
151
-
152
-
153
-
154
-
155
-
156
-
157
-
158
-
159
-
160
-
161
-
162
-
163
-
164
-
165
-
166
-
167
-
168
-
169
-
170
-
171
-
172
-
173
-
174
-
175
-
176
-
177
-
178
-
179
-
180
-
181
-
182
-
183
-
184
-
185
-
186
-
187
-
188
-
189
-
190
-
191
-
192
-
193
-
194
-
195
-
196
-
197
-
198
-
199
-
200
-
201
-
202
-
203
-
204
-
205
-
206
-
207
-
208
-
209
-
210
-
211
-
212
-
213
-
214
-
215
-
216
-
217
-
218
-
219
-
220
-
221
-
222
-
223
-
224
-
225
-
226
-
227
-
228
 |
 |