Ricoh Aficio MP 171 Operating Instructions - Page 110
Setting procedure of custom size when scanning an entire original, Scan Settings, Scan Size
 |
View all Ricoh Aficio MP 171 manuals
Add to My Manuals
Save this manual to your list of manuals |
Page 110 highlights
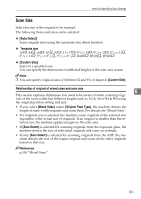
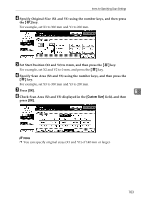
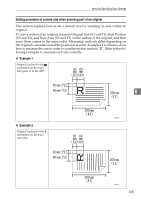
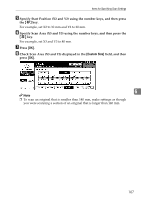
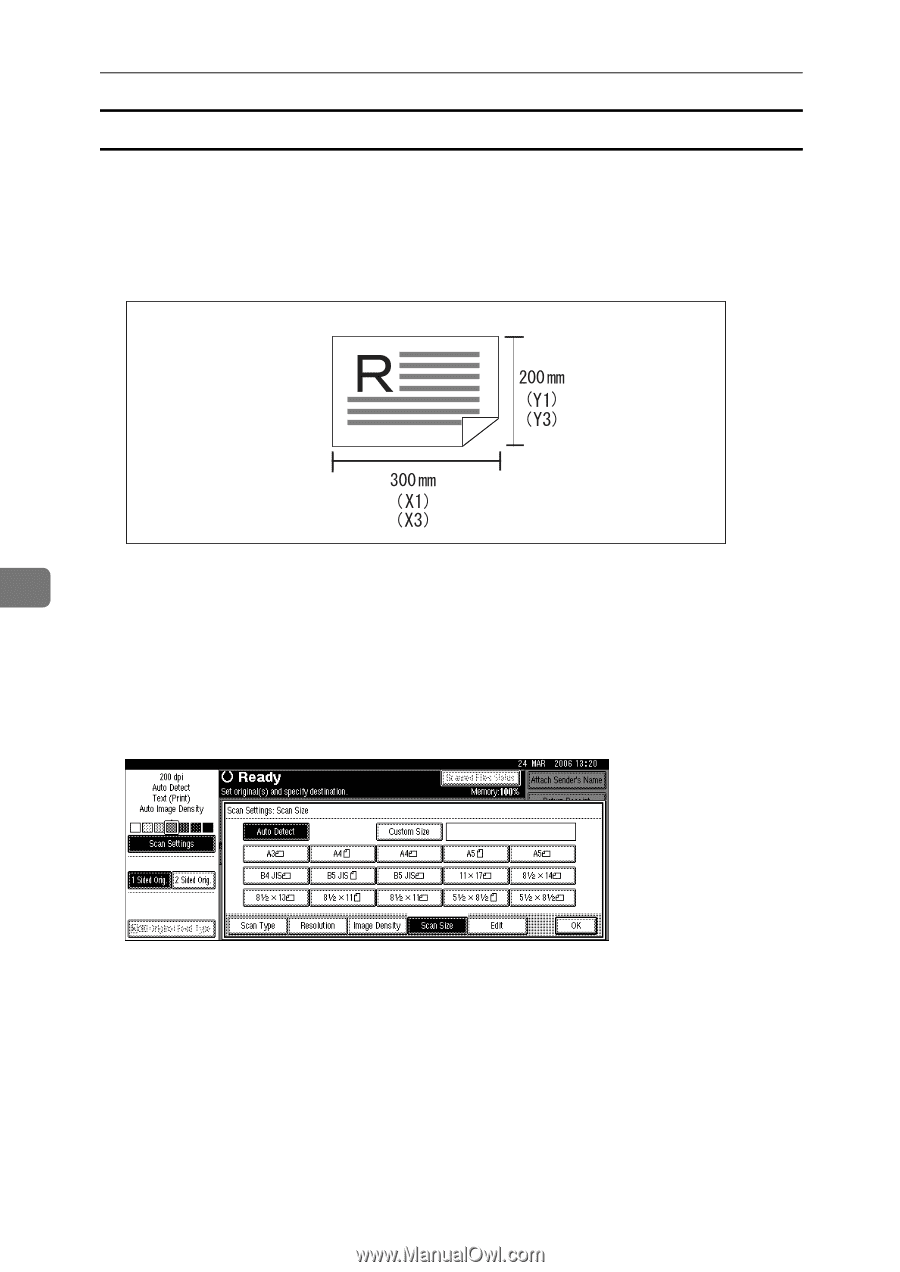
Various Scan Settings Setting procedure of custom size when scanning an entire original This section explains how to set a custom size for scanning an entire original. To scan the entire area of an original, measure its dimensions on the surface of the original and enter them under Original Size (X1 and Y1) and Scan Area (X3 and Y3). The example below explains scanning an original of the following size. ARE001S 6 You do not need to specify a Start Position (X2 and Y2). Specify it as 0 mm. For Scan Size, enter the same value as Original Size. A Press [Scan Settings]. B Press [Scan Size]. C Press [Custom Size]. 102
-
 1
1 -
2
-
3
-
4
-
5
-
6
-
7
-
8
-
9
-
10
-
11
-
12
-
13
-
14
-
15
-
16
-
17
-
18
-
19
-
20
-
21
-
22
-
23
-
24
-
25
-
26
-
27
-
28
-
29
-
30
-
31
-
32
-
33
-
34
-
35
-
36
-
37
-
38
-
39
-
40
-
41
-
42
-
43
-
44
-
45
-
46
-
47
-
48
-
49
-
50
-
51
-
52
-
53
-
54
-
55
-
56
-
57
-
58
-
59
-
60
-
61
-
62
-
63
-
64
-
65
-
66
-
67
-
68
-
69
-
70
-
71
-
72
-
73
-
74
-
75
-
76
-
77
-
78
-
79
-
80
-
81
-
82
-
83
-
84
-
85
-
86
-
87
-
88
-
89
-
90
-
91
-
92
-
93
-
94
-
95
-
96
-
97
-
98
-
99
-
100
-
101
-
102
-
103
-
104
-
 105
105 -
 106
106 -
 107
107 -
 108
108 -
 109
109 -
 110
110 -
 111
111 -
 112
112 -
 113
113 -
 114
114 -
 115
115 -
116
-
117
-
118
-
119
-
120
-
121
-
122
-
123
-
124
-
125
-
126
-
127
-
128
-
129
-
130
-
131
-
132
-
133
-
134
-
135
-
136
-
137
-
138
-
139
-
140
-
141
-
142
-
143
-
144
-
145
-
146
-
147
-
148
-
149
-
150
-
151
-
152
-
153
-
154
-
155
-
156
-
157
-
158
 |
 |
Various Scan Settings
102
6
Setting procedure of custom size when scanning an entire original
This section explains how to set a custom size for scanning an entire original.
To scan the entire area of an original, measure its dimensions on the surface of
the original and enter them under Original Size (X1 and Y1) and Scan Area (X3
and Y3).
The example below explains scanning an original of the following size.
You do not need to specify a Start Position (X2 and Y2). Specify it as 0 mm.
For Scan Size, enter the same value as Original Size.
A
Press
[
Scan Settings
]
.
B
Press
[
Scan Size
]
.
C
Press
[
Custom Size
]
.
ARE001S