Ricoh Aficio MP 171 Operating Instructions - Page 47
Prev., Clear / Stop, Check Modes, Start, p.55 Simultaneous Storage and Sending by Scan to Folder
 |
View all Ricoh Aficio MP 171 manuals
Add to My Manuals
Save this manual to your list of manuals |
Page 47 highlights
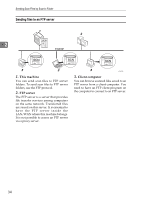
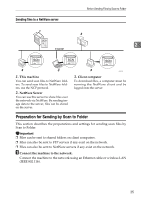
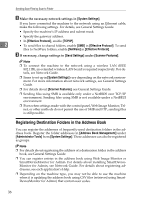
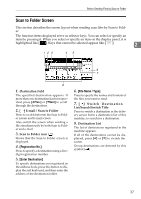
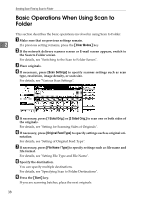
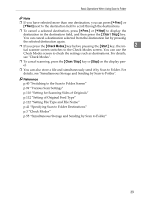
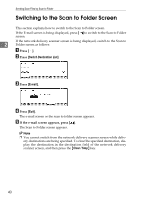
Basic Operations When Using Scan to Folder Note ❒ If you have selected more than one destination, you can press [UPrev.] or [TNext] next to the destination field to scroll through the destinations. ❒ To cancel a selected destination, press [UPrev.] or [TNext] to display the destination in the destination field, and then press the {Clear / Stop} key. You can cancel a destination selected from the destination list by pressing the selected destination again. ❒ If you press the {Check Modes} key before pressing the {Start} key, the ini- 2 tial scanner screen switches to the Check Modes screen. You can use the Check Modes screen to check the settings such as destinations. For details, see "Check Modes". ❒ To cancel scanning, press the {Clear / Stop} key or [Stop] on the display panel. ❒ You can also store a file and simultaneously send it by Scan to Folder. For details, see "Simultaneous Storage and Sending by Scan to Folder". Reference p.40 "Switching to the Scan to Folder Screen" p.99 "Various Scan Settings" p.110 "Setting for Scanning Sides of Originals" p.112 "Setting of Original Feed Type" p.122 "Setting File Type and File Name" p.41 "Specifying Scan to Folder Destinations" p.3 "Check Modes" p.55 "Simultaneous Storage and Sending by Scan to Folder" 39
-
 1
1 -
2
-
3
-
4
-
5
-
6
-
7
-
8
-
9
-
10
-
11
-
12
-
13
-
14
-
15
-
16
-
17
-
18
-
19
-
20
-
21
-
22
-
23
-
24
-
25
-
26
-
27
-
28
-
29
-
30
-
31
-
32
-
33
-
34
-
35
-
36
-
37
-
38
-
39
-
40
-
41
-
 42
42 -
 43
43 -
 44
44 -
 45
45 -
 46
46 -
 47
47 -
 48
48 -
 49
49 -
 50
50 -
 51
51 -
 52
52 -
53
-
54
-
55
-
56
-
57
-
58
-
59
-
60
-
61
-
62
-
63
-
64
-
65
-
66
-
67
-
68
-
69
-
70
-
71
-
72
-
73
-
74
-
75
-
76
-
77
-
78
-
79
-
80
-
81
-
82
-
83
-
84
-
85
-
86
-
87
-
88
-
89
-
90
-
91
-
92
-
93
-
94
-
95
-
96
-
97
-
98
-
99
-
100
-
101
-
102
-
103
-
104
-
105
-
106
-
107
-
108
-
109
-
110
-
111
-
112
-
113
-
114
-
115
-
116
-
117
-
118
-
119
-
120
-
121
-
122
-
123
-
124
-
125
-
126
-
127
-
128
-
129
-
130
-
131
-
132
-
133
-
134
-
135
-
136
-
137
-
138
-
139
-
140
-
141
-
142
-
143
-
144
-
145
-
146
-
147
-
148
-
149
-
150
-
151
-
152
-
153
-
154
-
155
-
156
-
157
-
158
 |
 |
