Ricoh Aficio MP 171 Operating Instructions - Page 90
Start, Manual Input, Prev., Clear / Stop, turn Receipt, Check Modes, If necessary
 |
View all Ricoh Aficio MP 171 manuals
Add to My Manuals
Save this manual to your list of manuals |
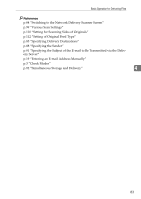
Page 90 highlights
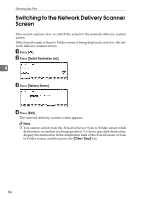
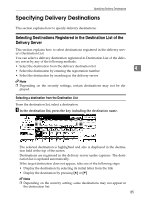
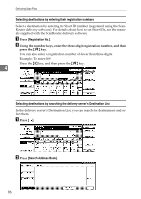
Delivering Scan Files I If necessary, specify the e-mail subject. For details, see "Specifying the Subject of the E-mail to Be Transmitted via the Delivery Server". J Press the {Start} key. If you are scanning batches, place the next originals. Note ❒ By pressing [Manual Input] on the network delivery scanner screen, you can send a file by e-mail via the delivery server's network. For details about entering the e-mail address directly, see "Entering an E-mail Address Manually". ❒ If you have selected more than one destination, press [UPrev.] or [TNext] 4 next to the destination field to scroll through the destinations. ❒ To cancel a selected destination, display the destination in the destination field, and then press the {Clear / Stop} key. You can cancel a destination se- lected from the destination list by pressing the selected destination again. ❒ You can use the Return Receipt function when sending e-mail via delivery server. An e-mail is sent to the sender selected in step H, notifying him/her that the recipient has read his/her e-mail. To specify this setting, press [Return Receipt]. ❒ To enable the Return Receipt function, you must specify the ScanRouter delivery software settings for sending e-mail by SMTP. For details about specifying this setting, see the ScanRouter delivery software manual. Note, however, that if the e-mail software used at the destination does not support Message Disposition Notification (MDN), e-mail notification that the e-mail has been opened may not be sent. ❒ Register the sender's e-mail address using the ScanRouter delivery software in advance. ❒ If you press the {Check Modes} key before pressing the {Start} key, the initial scanner screen switches to the Check Modes screen. You can use the Check Modes screen to check the settings such as destinations. For details, see "Check Modes". ❒ To cancel scanning, press the {Clear / Stop} key or [Stop] on the display panel. ❒ You can also store a scan file and simultaneously deliver it. For details, see "Simultaneous Storage and Delivery". 82
-
 1
1 -
2
-
3
-
4
-
5
-
6
-
7
-
8
-
9
-
10
-
11
-
12
-
13
-
14
-
15
-
16
-
17
-
18
-
19
-
20
-
21
-
22
-
23
-
24
-
25
-
26
-
27
-
28
-
29
-
30
-
31
-
32
-
33
-
34
-
35
-
36
-
37
-
38
-
39
-
40
-
41
-
42
-
43
-
44
-
45
-
46
-
47
-
48
-
49
-
50
-
51
-
52
-
53
-
54
-
55
-
56
-
57
-
58
-
59
-
60
-
61
-
62
-
63
-
64
-
65
-
66
-
67
-
68
-
69
-
70
-
71
-
72
-
73
-
74
-
75
-
76
-
77
-
78
-
79
-
80
-
81
-
82
-
83
-
84
-
 85
85 -
 86
86 -
 87
87 -
 88
88 -
 89
89 -
 90
90 -
 91
91 -
 92
92 -
 93
93 -
 94
94 -
 95
95 -
96
-
97
-
98
-
99
-
100
-
101
-
102
-
103
-
104
-
105
-
106
-
107
-
108
-
109
-
110
-
111
-
112
-
113
-
114
-
115
-
116
-
117
-
118
-
119
-
120
-
121
-
122
-
123
-
124
-
125
-
126
-
127
-
128
-
129
-
130
-
131
-
132
-
133
-
134
-
135
-
136
-
137
-
138
-
139
-
140
-
141
-
142
-
143
-
144
-
145
-
146
-
147
-
148
-
149
-
150
-
151
-
152
-
153
-
154
-
155
-
156
-
157
-
158
 |
 |