Ricoh Aficio SP 9100DN Hardware Guide - Page 37
Connecting the Printer, Network Connection
 |
View all Ricoh Aficio SP 9100DN manuals
Add to My Manuals
Save this manual to your list of manuals |
Page 37 highlights
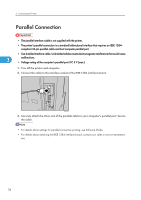
3. Connecting the Printer Network Connection The following explains the procedure for connecting the printer to the computer through the network.Prepare the hub and other network devices before connecting the 10BASE-T or 100BASE-TX cable to the printer's Ethernet port. Alternatively, the optional gigabit ethernet board, which supports 1000BASE-T, is available. • Use shielded Ethernet cable. Unshielded cables create electromagnetic interference that could cause 3 malfunctions. • The Ethernet cable is not supplied with this printer. Select your cable according to the network environment. 1. Attach one ferrite core at the printer end of the Ethernet cable, and then attach the other ferrite core about 10 cm (4 inches) (1) from this core making two loops as shown. AQU130S 2. Connect the Ethernet cable to the Ethernet port. AST012S 3. Connect the other end of the cable to the printer's network, such as a hub. • Follow the same procedure for the gigabit Ethernet cable. 35
-
 1
1 -
2
-
3
-
4
-
5
-
6
-
7
-
8
-
9
-
10
-
11
-
12
-
13
-
14
-
15
-
16
-
17
-
18
-
19
-
20
-
21
-
22
-
23
-
24
-
25
-
26
-
27
-
28
-
29
-
30
-
31
-
 32
32 -
 33
33 -
 34
34 -
 35
35 -
 36
36 -
 37
37 -
 38
38 -
 39
39 -
 40
40 -
 41
41 -
 42
42 -
43
-
44
-
45
-
46
-
47
-
48
-
49
-
50
-
51
-
52
-
53
-
54
-
55
-
56
-
57
-
58
-
59
-
60
-
61
-
62
-
63
-
64
-
65
-
66
-
67
-
68
-
69
-
70
-
71
-
72
-
73
-
74
-
75
-
76
-
77
-
78
-
79
-
80
-
81
-
82
-
83
-
84
-
85
-
86
-
87
-
88
-
89
-
90
-
91
-
92
-
93
-
94
-
95
-
96
-
97
-
98
-
99
-
100
-
101
-
102
-
103
-
104
-
105
-
106
-
107
-
108
-
109
-
110
-
111
-
112
-
113
-
114
-
115
-
116
-
117
-
118
-
119
-
120
-
121
-
122
-
123
-
124
-
125
-
126
-
127
-
128
-
129
-
130
-
131
-
132
-
133
-
134
-
135
-
136
-
137
-
138
-
139
-
140
-
141
-
142
-
143
-
144
-
145
-
146
-
147
-
148
-
149
-
150
-
151
-
152
-
153
-
154
-
155
-
156
-
157
-
158
-
159
-
160
-
161
-
162
-
163
-
164
-
165
-
166
-
167
-
168
 |
 |
