Samsung CLP 610ND SyncThru 5.0 Job Accounting Plug-in Guide (ENGLISH) - Page 16
User List, Exporting users, Modifying user information, Deleting users
 |
UPC - 635753720587
View all Samsung CLP 610ND manuals
Add to My Manuals
Save this manual to your list of manuals |
Page 16 highlights
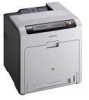
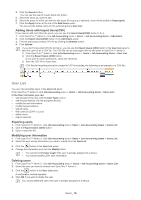
4. Click the Search button. You can see the search results below the button. 5. Select the users you want to add. 6. Select the group to which you want to add users (If no group is selected, users will be added to Ungrouped). 7. Click the Apply button at the top of the Add Users panel. You can see the added user(s) in the selected group's User List. Adding Users with Import Users(CSV) If you need to add more than ten users, you can use the Import Users(CSV) button to do it. 1. From SyncThru™ Admin 5, click Job Accounting menu > Users > Job Accounting Users > Add Users. 2. Click the Import Users(CSV) button in the Add Users panel. 3. Find the previously created CSV file by clicking the Browse button. 4. Click Upload. If you don't know what CSV file format is, you can use the Export Users (CSV) button in the User List panel to save the user list as a CSV file. The CSV file can be used again later to add users to SyncThru™ Admin 5. 1) From SyncThru™ Admin 5, click Job Accounting menu > Users > Job Accounting Users > User List. 2) Click the Export Users (CSV) button. If you want to export passwords, check the checkbox. 3) Save the CSV file to reuse later. CSV files for importing should be created in UTF-8 encoding, the following is an example of a CSV file: User List You can view all added users in the User List panel. From SyncThru™ Admin 5, click Job Accounting menu > Users > Job Accounting Users > Users List. In the User List panel, you can: • see the type of the user with the User Type column. • see the permissions with the assigned devices. • modify the user information. • modify the permissions. • search users. • filter users by LDAP or Local. • delete users. • export users list. Exporting users 1. From SyncThru™ Admin 5, click Job Accounting menu> Users > Job Accounting Users > Users List. 2. Click the Export Users (CSV) button. 3. Open or save the file. Modifying user information 1. From SyncThru™ Admin 5, click Job Accounting menu> Users > Job Accounting Users > Users List. 2. Select the user whose information you want to modify from the User List. 3. Click the button in the User List panel. 4. Change the information and click the Modify button. • You cannot modify User Login if the user is already assigned to a device. • You cannot modify LDAP user information. Deleting users 1. From SyncThru™ Admin 5, click Job Accounting menu > Users > Job Accounting Users > Users List. 2. Select the user you want to remove from SyncThru™ Admin 5. 3. Click the button in the User List panel. A confirmation window appears. 4. Click OK if you want to delete the user. You cannot delete the user if the user is already assigned to a device. Users_ 16
-
 1
1 -
2
-
3
-
4
-
5
-
6
-
7
-
8
-
9
-
10
-
 11
11 -
 12
12 -
 13
13 -
 14
14 -
 15
15 -
 16
16 -
 17
17 -
 18
18 -
 19
19 -
 20
20 -
 21
21 -
22
-
23
-
24
-
25
-
26
-
27
-
28
-
29
-
30
-
31
-
32
-
33
-
34
-
35
-
36
-
37
-
38
-
39
-
40
-
41
-
42
-
43
-
44
-
45
-
46
-
47
-
48
-
49
-
50
-
51
-
52
-
53
-
54
-
55
-
56
-
57
-
58
-
59
-
60
-
61
-
62
-
63
-
64
-
65
 |
 |