Samsung CLP 610ND SyncThru 5.0 Job Accounting Plug-in Guide (ENGLISH) - Page 17
User Groups, Managing user groups, Adding a new group, Adding users to a specific group
 |
UPC - 635753720587
View all Samsung CLP 610ND manuals
Add to My Manuals
Save this manual to your list of manuals |
Page 17 highlights
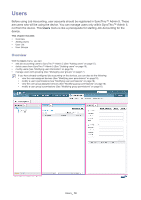
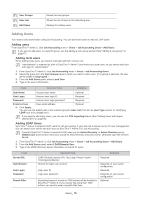
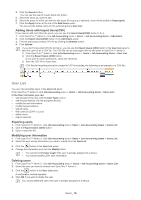
User Groups You can group users into different categories for easier management. For example, you have 2 different marketing teams that have different printing permissions for the area printer. You can set up two different groups with different sets of permissions. Managing user groups You can manage users by grouping. All, Ungrouped and Grouped are created as a default in the User Groups panel. These groups are used for group permissions. If you want to use Group Permissions for Job Accounting, you have to create your own user groups. The following are three predefined groups: • All: This tree menu displays all the users in the system. • Ungrouped: This section of the tree menu displays the users, not assigned to any group. The Ungrouped devices are moved to Grouped when you assign them to at least one group, • Grouped: This section of the tree menu displays the users who are in at least one group. Adding user groups Adding a new group 1. From SyncThru™ Admin 5, click Job Accounting menu > Users > Job Accounting Users > Users Groups. 2. Click the button in the User Groups panel. The Create User Group window appears. 3. Type in the information; Description is optional. 4. Click the Create button. You can now see the group under Group. Adding users to a specific group 1. From SyncThru™ Admin 5, click Job Accounting menu > Users > Job Accounting Users > Users List. 2. Select the users you want to move to a new group. 3. Drag-and-drop the users to the specific group. Users can be assigned to only one group. Modifying a user group's information 1. From SyncThru™ Admin 5, click Job Accounting menu > Users > Job Accounting Users > Users Groups. 2. Select the group you want to modify under Grouped. All, Ungrouped, and Grouped cannot be modified. 3. Click the button in the User Groups panel. 4. Change the information and click the Modify button. You cannot modify the user group if the user group is already assigned to a device. Deleting a user group 1. From SyncThru™ Admin 5, click Job Accounting menu > Users > Job Accounting Users > Users Groups. 2. Select the group you want to remove under Grouped. All, Ungrouped, and Grouped cannot be removed. 3. Click the button in the User Groups panel. A confirmation window appears. 4. Click OK if you want to delete the group. The users in the deleted group are moved to Ungrouped. You cannot delete the user group if the user group is already assigned to a device. Users_ 17
-
 1
1 -
2
-
3
-
4
-
5
-
6
-
7
-
8
-
9
-
10
-
11
-
 12
12 -
 13
13 -
 14
14 -
 15
15 -
 16
16 -
 17
17 -
 18
18 -
 19
19 -
 20
20 -
 21
21 -
 22
22 -
23
-
24
-
25
-
26
-
27
-
28
-
29
-
30
-
31
-
32
-
33
-
34
-
35
-
36
-
37
-
38
-
39
-
40
-
41
-
42
-
43
-
44
-
45
-
46
-
47
-
48
-
49
-
50
-
51
-
52
-
53
-
54
-
55
-
56
-
57
-
58
-
59
-
60
-
61
-
62
-
63
-
64
-
65
 |
 |
