Samsung CLP 610ND SyncThru 5.0 Job Accounting Plug-in Guide (ENGLISH) - Page 18
Managing user permissions, Modify Device Permissions for Selected User Group
 |
UPC - 635753720587
View all Samsung CLP 610ND manuals
Add to My Manuals
Save this manual to your list of manuals |
Page 18 highlights
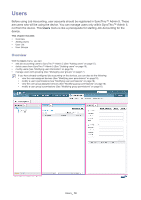
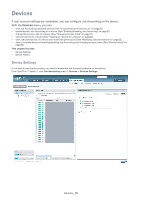
Managing user permissions If you are already using job accounting, you can change the specified permissions from the User List panel or the User Groups panel. Modifying user permissions 1. From SyncThru™ Admin 5, click Job Accounting menu > Users > Job Accounting Users > User List. 2. Select the user you want to modify. 3. Click the Devices button in the Modify Devices column. • If you cannot find the Device button, resize the panel (See "Resizing panels" on page10). • If the Devices button is grayed out, it means there is no user assigned to a device. Assign a user to a device first (From the SyncThru™ Admin 5, click Job Accounting menu > User Permissions > User Permission Settings). The Modify Device Permissions for Selected User window appears. You can see all the devices that have the specific user's permissions. 4. Change the permissions. 5. Click OK/Apply. This change will be accumulated in User Permissions History (See "User Permissions History" on page 27). Modifying group permissions 1. From SyncThru™ Admin 5, click Job Accounting menu > Users > Job Accounting Users > User Groups. 2. Select the user group you want modify. 3. Click the button in User Groups panel. If the button is grayed out, there are no groups assigned to a device. Assign a group to a device first (From the SyncThru™ Admin 5, click Job Accounting menu > Group Permissions > Group Permission Settings). The Modify Device Permissions for Selected User Group window appears. You can see all the devices that have the specific group's permissions. 4. Change the permissions. 5. Click OK/Apply. Changes are accumulated in the Group Permissions History (See "Group Permissions History" on page 31). Users_ 18
-
 1
1 -
2
-
3
-
4
-
5
-
6
-
7
-
8
-
9
-
10
-
11
-
12
-
 13
13 -
 14
14 -
 15
15 -
 16
16 -
 17
17 -
 18
18 -
 19
19 -
 20
20 -
 21
21 -
 22
22 -
 23
23 -
24
-
25
-
26
-
27
-
28
-
29
-
30
-
31
-
32
-
33
-
34
-
35
-
36
-
37
-
38
-
39
-
40
-
41
-
42
-
43
-
44
-
45
-
46
-
47
-
48
-
49
-
50
-
51
-
52
-
53
-
54
-
55
-
56
-
57
-
58
-
59
-
60
-
61
-
62
-
63
-
64
-
65
 |
 |
