Singer 9980 QUANTUM STYLIST Instruction Manual - Page 46
Ii. Elongation, C.setting Stitch Width And Length
 |
View all Singer 9980 QUANTUM STYLIST manuals
Add to My Manuals
Save this manual to your list of manuals |
Page 46 highlights
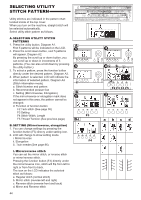
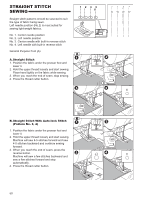
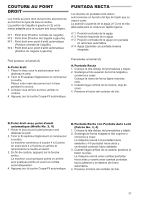
ii. ELONGATION Some patterns may be elongated up to 2 times B-ii the original length. You may elongate the pattern by pressing the function button (F5) directly under the elongation icon. a. Regular length b. Elongated F5 3. After these settings, press the return button (F1). LCD will indicate previous mode. (Stitch information mode) C. SETTING STITCH WIDTH AND LENGTH C Machine will set the stitch width and length suitable for the pattern. 1. You can make changes by pressing the function button (F4) directly under the width and length mark. 2. LCD will change to show the stitch width and length. For narrower width, press function button F2 (-). For wider width, press function button F3 (+). For shorter length, press function button F4 (-). For longer length, press function button F5 (+). Pre-set stitch width and length will be indicated as a highlighted number. When you press the return button (F1), LCD will indicate previous mode (Stitch Information mode). a. For straight stitch patterns (No. 1, 2, 3, 4, 6, 8), Stitch width buttons will change the needle position. To shift the needle to the left, press function button F2. To shift the needle to the right, press funtion button F3. Note: When further width or length adjustments are not possible, machine will emit multiple audible beeps. If the width, length or number icons are not indicated, the pattern cannot be changed. Adjustments to the patterns may be made while sewing. 46
-
 1
1 -
2
-
3
-
4
-
5
-
6
-
7
-
8
-
9
-
10
-
11
-
12
-
13
-
14
-
15
-
16
-
17
-
18
-
19
-
20
-
21
-
22
-
23
-
24
-
25
-
26
-
27
-
28
-
29
-
30
-
31
-
32
-
33
-
34
-
35
-
36
-
37
-
38
-
39
-
40
-
 41
41 -
 42
42 -
 43
43 -
 44
44 -
 45
45 -
 46
46 -
 47
47 -
 48
48 -
 49
49 -
 50
50 -
 51
51 -
52
-
53
-
54
-
55
-
56
-
57
-
58
-
59
-
60
-
61
-
62
-
63
-
64
-
65
-
66
-
67
-
68
-
69
-
70
-
71
-
72
-
73
-
74
-
75
-
76
-
77
-
78
-
79
-
80
-
81
-
82
-
83
-
84
-
85
-
86
-
87
-
88
-
89
-
90
-
91
-
92
-
93
-
94
-
95
-
96
-
97
-
98
-
99
-
100
-
101
-
102
-
103
-
104
-
105
-
106
-
107
-
108
 |
 |
