Singer 9980 QUANTUM STYLIST Instruction Manual - Page 88
Decorative & Letter, Stitch Sewing
 |
View all Singer 9980 QUANTUM STYLIST manuals
Add to My Manuals
Save this manual to your list of manuals |
Page 88 highlights
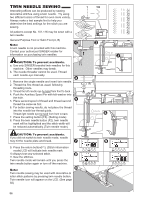
DECORATIVE & LETTER STITCH SEWING You can combine decorative & letter stitches into a sequence by selecting each pattern. A. SELECTING DECORATIVE & LETTER STITCH (selecting mode) 1. Press the decorative & letter stitch button. First 5 patterns of decorative patterns will be indicated on the lower line of LCD. 2. By pressing the decorative & letter stitch button, selecting group will change as below. a. Decorative stitches b. Block style font c. Script style font d. Italic style font e. Outline style font f. Cyrillic style font 3. After you select the group, press the scroll down button. Next 5 patterns of selected group will appear. By pressing the scroll up or down button, you can scroll up or down in increments of 5 patterns. 4. To select a pattern, press the function button directly under the indicated pattern. Selected pattern will be indicated on the top left side of LCD. 5. Using this same procedure, select the next patterns. Patterns will appear at the top of the LCD in the order selected. 6. As selected patterns over the indicating area, disappear from the screen, you can check them by pressing the cursor buttons. (See next page) NOTE: Machine can memorize a maximum of 60 patterns. You can combine the tack stitch (Pattern No. 35). This is used for sewing a single combination of patterns. (See next page 96) B. SHIFTING THE CURSOR Additional patterns may be added to the end of a string of combined patterns. Shift the "I" cursor over to the right, following the pattern string and then select new patterns. By pressing the cursor buttons, cursor will shift left or right. The cursor position will be highlighted. a. Press the cursor left button "", cursor will shift right. 88
-
 1
1 -
2
-
3
-
4
-
5
-
6
-
7
-
8
-
9
-
10
-
11
-
12
-
13
-
14
-
15
-
16
-
17
-
18
-
19
-
20
-
21
-
22
-
23
-
24
-
25
-
26
-
27
-
28
-
29
-
30
-
31
-
32
-
33
-
34
-
35
-
36
-
37
-
38
-
39
-
40
-
41
-
42
-
43
-
44
-
45
-
46
-
47
-
48
-
49
-
50
-
51
-
52
-
53
-
54
-
55
-
56
-
57
-
58
-
59
-
60
-
61
-
62
-
63
-
64
-
65
-
66
-
67
-
68
-
69
-
70
-
71
-
72
-
73
-
74
-
75
-
76
-
77
-
78
-
79
-
80
-
81
-
82
-
 83
83 -
 84
84 -
 85
85 -
 86
86 -
 87
87 -
 88
88 -
 89
89 -
 90
90 -
 91
91 -
 92
92 -
 93
93 -
94
-
95
-
96
-
97
-
98
-
99
-
100
-
101
-
102
-
103
-
104
-
105
-
106
-
107
-
108
 |
 |
