Sony MZ-N1 Operating Instructions - Page 20
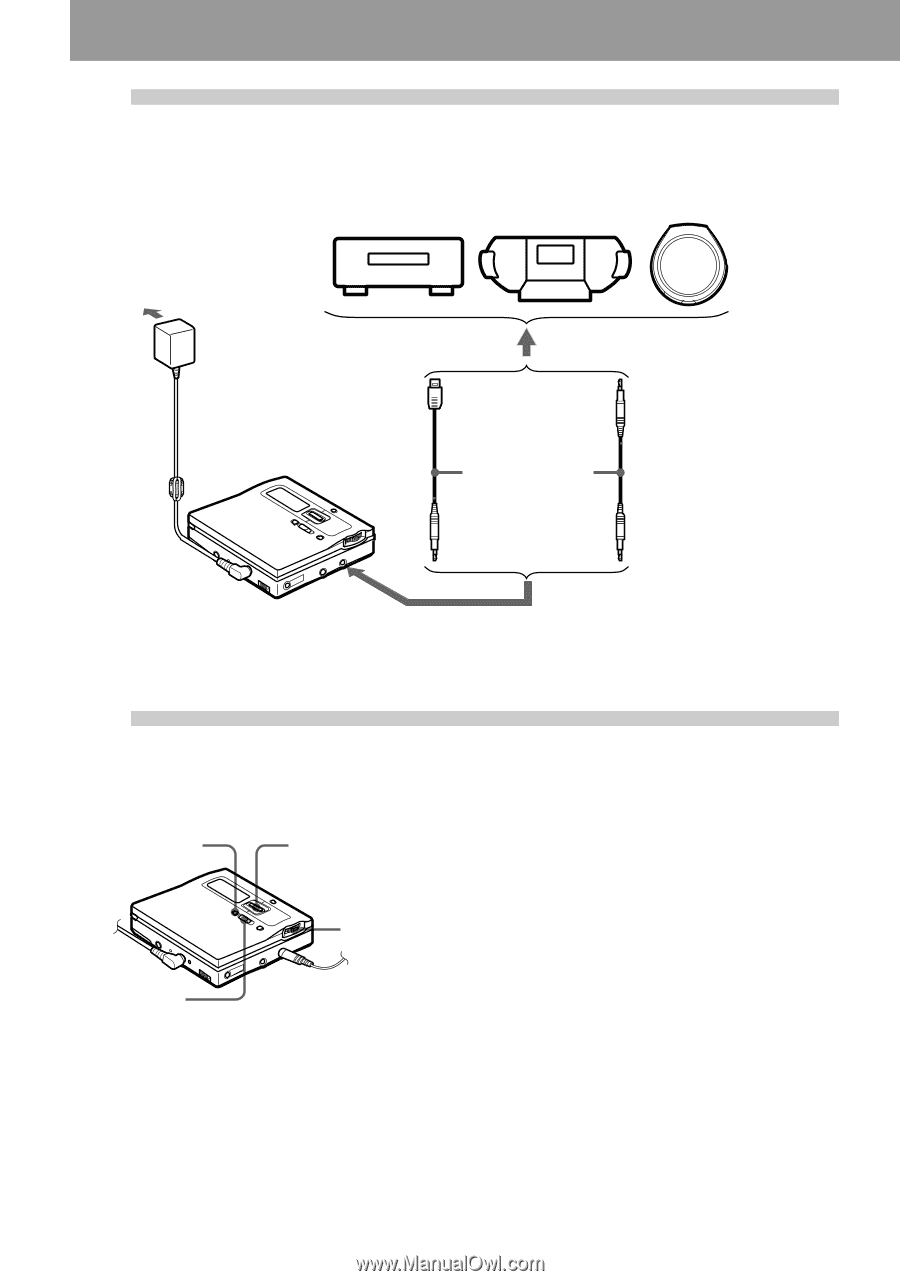
Make connections., Record an MD - accessories
 |
View all Sony MZ-N1 manuals
Add to My Manuals
Save this manual to your list of manuals |
Page 20 highlights
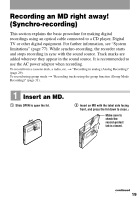
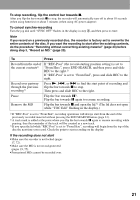
2 Make connections.(Insert the cables firmly and completely into the appropriate jacks.) to a wall outlet CD player, MD player, DVD video player, etc. Portable CD player, etc. to a digital (optical) out jack AC power Optical plug adaptor Optical mini-plug Optical cable POC-15B*, etc. to DC IN 3V to LINE IN (OPT) ∗ See "Optional accessories" (page 93). 3 Record an MD. END SEARCH Control bar (x/N/./ >/X) Jog dial REC 1 While the recorder is stopped, press the jog dial. Menu items appear in the display. 2 Turn the jog dial until "SYNC REC" flashes in the display, and then press to enter. 20 3 Turn the jog dial until "SYNC ON" flashes in the display, and then press to enter. "SYNC" appears in the display. 4 Press and slide REC to the right. The recorder pauses and stands by for recording. 5 Play the CD or tape you want to record. The recorder starts recording automatically when it receives the playing sound, and "REC" and the REC LED light up.
-
 1
1 -
2
-
3
-
4
-
5
-
6
-
7
-
8
-
9
-
10
-
11
-
12
-
13
-
14
-
 15
15 -
 16
16 -
 17
17 -
 18
18 -
 19
19 -
 20
20 -
 21
21 -
 22
22 -
 23
23 -
 24
24 -
 25
25 -
26
-
27
-
28
-
29
-
30
-
31
-
32
-
33
-
34
-
35
-
36
-
37
-
38
-
39
-
40
-
41
-
42
-
43
-
44
-
45
-
46
-
47
-
48
-
49
-
50
-
51
-
52
-
53
-
54
-
55
-
56
-
57
-
58
-
59
-
60
-
61
-
62
-
63
-
64
-
65
-
66
-
67
-
68
-
69
-
70
-
71
-
72
-
73
-
74
-
75
-
76
-
77
-
78
-
79
-
80
-
81
-
82
-
83
-
84
-
85
-
86
-
87
-
88
-
89
-
90
-
91
-
92
-
93
-
94
-
95
-
96
 |
 |