Sony MZ-N1 Operating Instructions - Page 29
Recording in analog (Analog Recording), CD player, cassette recorder, R red, white, Line cable
 |
View all Sony MZ-N1 manuals
Add to My Manuals
Save this manual to your list of manuals |
Page 29 highlights
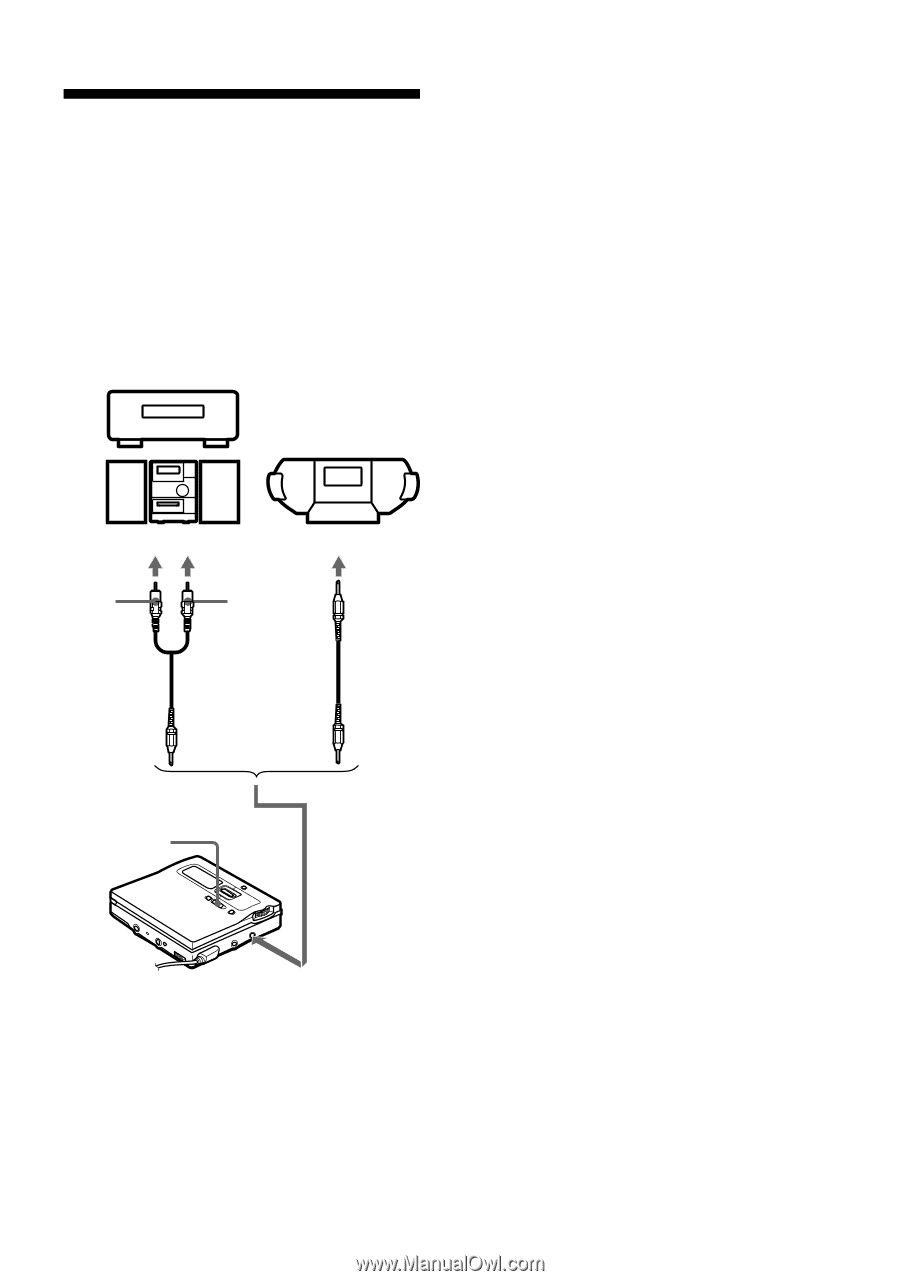
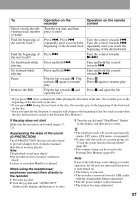
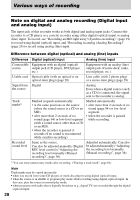
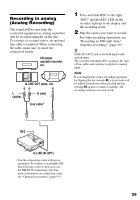
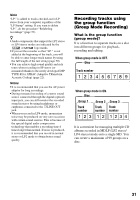
Recording in analog (Analog Recording) The sound will be sent from the connected equipment as analog signal but will be recorded digitally on the disc. To connect to a sound source, an optional line cable is required. When connecting the cable, make sure to insert the connectors firmly. CD player, cassette recorder, etc. to LINE OUT jacks, etc. L (white) R (red) Line cable* 1 Press and slide REC to the right. "REC" and the REC LED on the recorder light up in the display and the recording starts. 2 Play the source you want to record. For other recording operations, see "Recording an MD right away! (Synchro-recording)" (page 19). z LINE IN (OPT) jack is for both digital and analog input. The recorder automatically recognizes the type of line cable and switches to digital or analog input. Note If you temporarily stop a recording operation by flipping the bar towards X, a track mark will be added at that point when you flip the bar towards X again to resume recording. The recording resumes on a new track. REC to LINE IN (OPT) ∗ Use the connecting cords without an attenuator. To connect to a portable CD player having a stereo mini-jack, use the RK-G136 connecting cord. For more information on connecting cords, see "Optional accessories" (page 93). 29
-
 1
1 -
2
-
3
-
4
-
5
-
6
-
7
-
8
-
9
-
10
-
11
-
12
-
13
-
14
-
15
-
16
-
17
-
18
-
19
-
20
-
21
-
22
-
23
-
 24
24 -
 25
25 -
 26
26 -
 27
27 -
 28
28 -
 29
29 -
 30
30 -
 31
31 -
 32
32 -
 33
33 -
 34
34 -
35
-
36
-
37
-
38
-
39
-
40
-
41
-
42
-
43
-
44
-
45
-
46
-
47
-
48
-
49
-
50
-
51
-
52
-
53
-
54
-
55
-
56
-
57
-
58
-
59
-
60
-
61
-
62
-
63
-
64
-
65
-
66
-
67
-
68
-
69
-
70
-
71
-
72
-
73
-
74
-
75
-
76
-
77
-
78
-
79
-
80
-
81
-
82
-
83
-
84
-
85
-
86
-
87
-
88
-
89
-
90
-
91
-
92
-
93
-
94
-
95
-
96
 |
 |