Sony MZ-N1 Operating Instructions - Page 83
Menu on the, recorder, remote, control, Functions, Selecting the Auto Time Stamp setting
 |
View all Sony MZ-N1 manuals
Add to My Manuals
Save this manual to your list of manuals |
Page 83 highlights
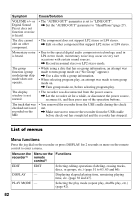
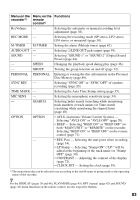
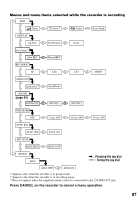
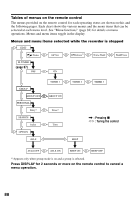
Menu on the Menu on the Functions recorder1) remote control1) RecVolume - Selecting the automatic or manual recording level adjustment (page 36). REC MODE - Selecting the recording mode (SP stereo, LP2 stereo, LP4 stereo, or monaural) (page 30). M-TIMER M-TIMER Setting the alarm (Melody timer) (page 67). AUDIO OUT - Selecting i/LINE OUT jack output (page 49). SOUND - Selecting "SOUND 1" or "SOUND 2" (Digital Sound Preset) (page 44). - SPEED Changing the playback speed during play (page 46). - GROUP Turning the group function on and off (page 32). PERSONAL PERSONAL Entering or erasing the disc information in the Personal Disc Memory (page 69). SYNC REC - Selecting "SYNC ON" or "SYNC OFF" of synchro recording (page 20). TIME MARK - Selecting the Auto Time Stamp setting (page 35). MIC SENS - Selecting the microphone sensitivity (page 34). - SEARCH Selecting Index search (searching while monitoring track numbers or track names) or Time search (searching while monitoring the elapsed time) (page 40). OPTION OPTION • AVLS (Automatic Volume Limiter System) - Selecting "AVLS ON" or "AVLS OFF" (page 70). • BEEP - Selecting "BEEP ON" or "BEEP OFF" for both "MAIN UNIT" or "REMOTE" on the recorder. Selecting "BEEP ON" or "BEEP OFF" on the remote control (page 71). - • REC-Posi - Selecting the start point when recording (page 34). • LP Stamp - Selecting "Stamp ON" ("LP:" will be added at the beginning of the track name) or "Stamp OFF" (page 30). • CONTRAST - Adjusting the contrast of the display (page 72). • CLOCK SET - Setting the clock (page 39). 1) The menu items that can be selected vary according to the on/off status of group mode or the operating status of the recorder. z For the DISPLAY (pages 38 and 48), PLAYMODE (page 43), RPT (repeat) (page 42) and SOUND (page 44) menu functions on the remote control, use the respective buttons. 83
-
 1
1 -
2
-
3
-
4
-
5
-
6
-
7
-
8
-
9
-
10
-
11
-
12
-
13
-
14
-
15
-
16
-
17
-
18
-
19
-
20
-
21
-
22
-
23
-
24
-
25
-
26
-
27
-
28
-
29
-
30
-
31
-
32
-
33
-
34
-
35
-
36
-
37
-
38
-
39
-
40
-
41
-
42
-
43
-
44
-
45
-
46
-
47
-
48
-
49
-
50
-
51
-
52
-
53
-
54
-
55
-
56
-
57
-
58
-
59
-
60
-
61
-
62
-
63
-
64
-
65
-
66
-
67
-
68
-
69
-
70
-
71
-
72
-
73
-
74
-
75
-
76
-
77
-
 78
78 -
 79
79 -
 80
80 -
 81
81 -
 82
82 -
 83
83 -
 84
84 -
 85
85 -
 86
86 -
 87
87 -
 88
88 -
89
-
90
-
91
-
92
-
93
-
94
-
95
-
96
 |
 |