Sony MZ-N1 Operating Instructions - Page 25
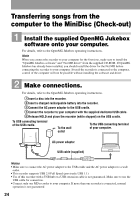
Record audio data to the OpenMG, Jukebox., Transfer the music file to the, recorder Check-out., - usb cable
 |
View all Sony MZ-N1 manuals
Add to My Manuals
Save this manual to your list of manuals |
Page 25 highlights
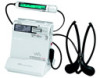
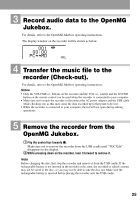
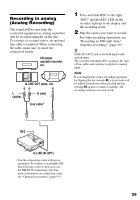
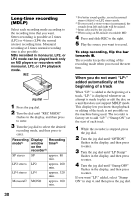
3 Record audio data to the OpenMG Jukebox. For details, refer to the OpenMG Jukebox operating instructions. The display window on the recorder will be shown as below. 001 00:00 PCc cMD 4 Transfer the music file to the recorder (Check-out). For details, refer to the OpenMG Jukebox operating instructions. Notes • Only the VOLUME +/- buttons on the recorder and the VOL +/- control and the SOUND button on the remote control can be used when the recorder is connected to your computer. • Make sure not to touch the recorder or disconnect the AC power adaptor and the USB cable while checking out, as this may cause the data recorded up to that point to be lost. • While the recorder is connected to your computer, the lid will not open during editing operations. 5 Remove the recorder from the OpenMG Jukebox. 1Flip the control bar towards x. Make sure not to remove the recorder from the USB cradle until "TOC Edit" disappears in the display. 2While pressing down on the recorder, lean it forward to remove it. Note Before changing the disc, first stop the recorder and remove it from the USB cradle. If the rechargeable battery is not inserted in the recorder at this time, the recorded or edited contents may not be saved to the disc, or you may not be able to take the disc out. Make sure the rechargeable battery is inserted before placing the recorder onto the USB cradle. 25
-
 1
1 -
2
-
3
-
4
-
5
-
6
-
7
-
8
-
9
-
10
-
11
-
12
-
13
-
14
-
15
-
16
-
17
-
18
-
19
-
 20
20 -
 21
21 -
 22
22 -
 23
23 -
 24
24 -
 25
25 -
 26
26 -
 27
27 -
 28
28 -
 29
29 -
 30
30 -
31
-
32
-
33
-
34
-
35
-
36
-
37
-
38
-
39
-
40
-
41
-
42
-
43
-
44
-
45
-
46
-
47
-
48
-
49
-
50
-
51
-
52
-
53
-
54
-
55
-
56
-
57
-
58
-
59
-
60
-
61
-
62
-
63
-
64
-
65
-
66
-
67
-
68
-
69
-
70
-
71
-
72
-
73
-
74
-
75
-
76
-
77
-
78
-
79
-
80
-
81
-
82
-
83
-
84
-
85
-
86
-
87
-
88
-
89
-
90
-
91
-
92
-
93
-
94
-
95
-
96
 |
 |
