Sony MZ-N1 Operating Instructions - Page 51
Labeling recordings, To label a track, When labeling a track
 |
View all Sony MZ-N1 manuals
Add to My Manuals
Save this manual to your list of manuals |
Page 51 highlights
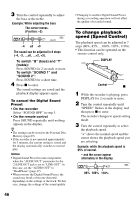
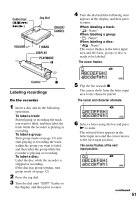
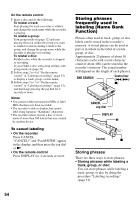
Control bar (X/x/./ >/N) Jog dial GROUP/ CANCEL VOLUME +/- T MARK DISPLAY PLAYMODE X Control x Labeling recordings On the recorder 1 Insert a disc and do the following operations. To label a track: Start playing or recording the track you want to label, and then label the track while the recorder is playing or recording. To label a group: Turn group mode on (page 32) and start playing or recording the track within the group you want to label, and then label the group while the recorder is playing or recording. To label a disc: Label the disc while the recorder is stopped or recording. If the disc has group settings, turn group mode on (page 32). 2 Press the jog dial. 3 Turn the dial until "EDIT" flashes in the display, and then press to enter. 4 Turn the dial until the following item appears in the display, and then press to enter. When labeling a track: " : Name" When labeling a group: " : Name" When labeling a disc: " : Name" The cursor flashes in the letter input area and the track, group, or disc is ready to be labeled. The cursor flashes. ABCDEFGHI abcdefghi 5 Flip the bar towards x. The cursor shifts from the letter input area to the character palette. The cursor and character alternate. BCDEFGHI abcdefghi 6 Select a letter using the bar and press N to enter. The selected letter appears in the letter input area and the cursor moves to the next input position. The cursor flashes at the next input position. A ABCDEFGHI abcdefghi continued 51
-
 1
1 -
2
-
3
-
4
-
5
-
6
-
7
-
8
-
9
-
10
-
11
-
12
-
13
-
14
-
15
-
16
-
17
-
18
-
19
-
20
-
21
-
22
-
23
-
24
-
25
-
26
-
27
-
28
-
29
-
30
-
31
-
32
-
33
-
34
-
35
-
36
-
37
-
38
-
39
-
40
-
41
-
42
-
43
-
44
-
45
-
 46
46 -
 47
47 -
 48
48 -
 49
49 -
 50
50 -
 51
51 -
 52
52 -
 53
53 -
 54
54 -
 55
55 -
 56
56 -
57
-
58
-
59
-
60
-
61
-
62
-
63
-
64
-
65
-
66
-
67
-
68
-
69
-
70
-
71
-
72
-
73
-
74
-
75
-
76
-
77
-
78
-
79
-
80
-
81
-
82
-
83
-
84
-
85
-
86
-
87
-
88
-
89
-
90
-
91
-
92
-
93
-
94
-
95
-
96
 |
 |
