TP-Link TL-MR3040 User Guide - Page 33
TL-MR3040, Subnet Mask, Default Gateway, Primary, Secondary DNS, Survey, Connect, Reboot, Quick - configuration
 |
View all TP-Link TL-MR3040 manuals
Add to My Manuals
Save this manual to your list of manuals |
Page 33 highlights
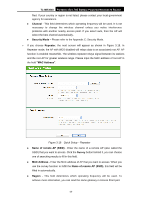
TL-MR3040 Portable 3G/3.75G Battery Powered Wireless N Router z Subnet Mask - The Subnet Mask is used for the WAN IP address, it is usually 255.255.255.0. z Default Gateway - Enter the gateway IP address into the box if required. z Primary DNS - Enter the DNS Server IP address into the box if required. z Secondary DNS - If your ISP provides another DNS server, enter it into this field. 2. Click Next to continue, the Wireless settings page will appear as shown in Figure 3-27. Click Survey button to find the available wireless networks. Select the SSID of your target network and click Connect, and the SSID and BSSID will be filled automatically. If the network security is on, please select the Key type and enter the Password. Figure 3-27 Quick Setup - Wireless 3. Click Next and you will see the page as shown in Figure 3-28. Click the Reboot button to make your wireless configuration take effect and finish the Quick Setup. (You're recommended to go to Wireless > Wireless Security to set up the wireless security.) ) Note: Figure 3-28 Quick Setup - Finish -23-
-
 1
1 -
2
-
3
-
4
-
5
-
6
-
7
-
8
-
9
-
10
-
11
-
12
-
13
-
14
-
15
-
16
-
17
-
18
-
19
-
20
-
21
-
22
-
23
-
24
-
25
-
26
-
27
-
 28
28 -
 29
29 -
 30
30 -
 31
31 -
 32
32 -
 33
33 -
 34
34 -
 35
35 -
 36
36 -
 37
37 -
 38
38 -
39
-
40
-
41
-
42
-
43
-
44
-
45
-
46
-
47
-
48
-
49
-
50
-
51
-
52
-
53
-
54
-
55
-
56
-
57
-
58
-
59
-
60
-
61
-
62
-
63
-
64
-
65
-
66
-
67
-
68
-
69
-
70
-
71
-
72
-
73
-
74
-
75
-
76
-
77
-
78
-
79
-
80
-
81
-
82
-
83
-
84
-
85
-
86
-
87
-
88
-
89
-
90
-
91
-
92
-
93
-
94
-
95
-
96
-
97
-
98
-
99
-
100
-
101
-
102
-
103
-
104
-
105
-
106
-
107
-
108
-
109
-
110
-
111
-
112
-
113
-
114
-
115
-
116
-
117
-
118
-
119
-
120
-
121
-
122
-
123
-
124
-
125
-
126
-
127
-
128
-
129
-
130
-
131
-
132
-
133
-
134
-
135
-
136
-
137
-
138
-
139
-
140
-
141
-
142
-
143
-
144
-
145
-
146
-
147
-
148
-
149
-
150
-
151
-
152
-
153
-
154
-
155
-
156
-
157
-
158
-
159
-
160
-
161
-
162
-
163
-
164
-
165
-
166
-
167
-
168
-
169
-
170
-
171
-
172
-
173
-
174
-
175
-
176
-
177
-
178
-
179
-
180
-
181
-
182
-
183
-
184
-
185
-
186
-
187
-
188
-
189
-
190
-
191
-
192
-
193
-
194
-
195
-
196
-
197
-
198
-
199
-
200
-
201
-
202
-
203
-
204
-
205
-
206
-
207
-
208
-
209
-
210
-
211
-
212
-
213
-
214
-
215
-
216
-
217
-
218
-
219
-
220
-
221
-
222
-
223
-
224
-
225
-
226
-
227
-
228
-
229
-
230
-
231
-
232
-
233
-
234
-
235
-
236
-
237
-
238
-
239
-
240
-
241
-
242
 |
 |
