TP-Link TL-R600VPN TL-R600VPN V1 User Guide - Page 34
Assigned IP Address
 |
View all TP-Link TL-R600VPN manuals
Add to My Manuals
Save this manual to your list of manuals |
Page 34 highlights
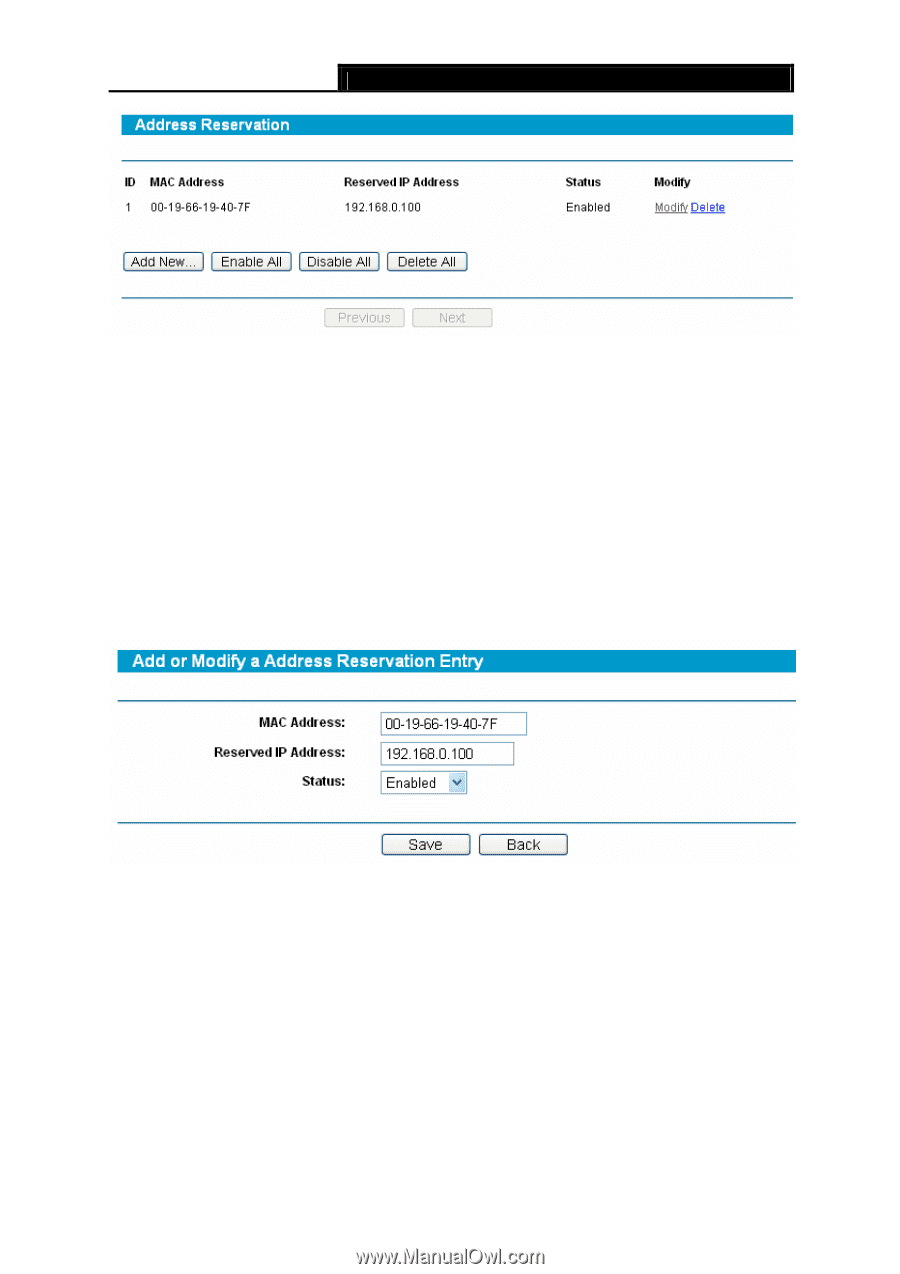
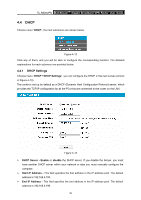
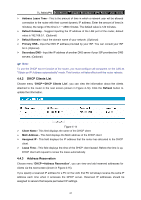
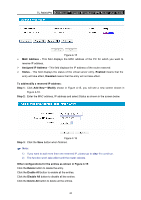
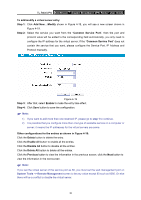
TL-R600VPN SafeStreamTM Gigabit Broadband VPN Router User Guide Figure 4-15 ¾ MAC Address - This field displays the MAC address of the PC for which you want to reserve IP address. ¾ Assigned IP Address - This field displays the IP address of the router reserved. ¾ Status - This field displays the status of the virtual server entry. Enabled means that the entry will take effect, Disabled means that the entry will not take effect. To add/modify a reserved IP address: Step 1: Click Add New.../Modify shown in Figure 4-15, you will see a new screen shown in Figure 4-16. Step 2: Enter the MAC address, IP address and select Status as shown in the screen below. Figure 4-16 Step 3: Click the Save button when finished. ) Note: 1) If you want to add more than one reserved IP, please go to step 1 to continue. 2) The function won't take effect until the router reboots. Other configurations for the entries as shown in Figure 4-15: Click the Delete button to delete the entry. Click the Enable All button to enable all the entries. Click the Disable All button to disable all the entries. Click the Delete All button to delete all the entries. 28
-
 1
1 -
2
-
3
-
4
-
5
-
6
-
7
-
8
-
9
-
10
-
11
-
12
-
13
-
14
-
15
-
16
-
17
-
18
-
19
-
20
-
21
-
22
-
23
-
24
-
25
-
26
-
27
-
28
-
 29
29 -
 30
30 -
 31
31 -
 32
32 -
 33
33 -
 34
34 -
 35
35 -
 36
36 -
 37
37 -
 38
38 -
 39
39 -
40
-
41
-
42
-
43
-
44
-
45
-
46
-
47
-
48
-
49
-
50
-
51
-
52
-
53
-
54
-
55
-
56
-
57
-
58
-
59
-
60
-
61
-
62
-
63
-
64
-
65
-
66
-
67
-
68
-
69
-
70
-
71
-
72
-
73
-
74
-
75
-
76
-
77
-
78
-
79
-
80
-
81
-
82
 |
 |