ViewSonic UPC300-2.2 User Manual - Page 49
Importing And Accessing Files
 |
View all ViewSonic UPC300-2.2 manuals
Add to My Manuals
Save this manual to your list of manuals |
Page 49 highlights
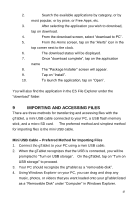
2. Search the available applications by category, or by most popular, or by price, or Free Apps, etc. 3. After selecting the application you wish to download, tap on download. 4. From the download screen, select "download to PC". 5. From the Home screen, tap on the "Alerts" icon in the top corner next to the clock. 6. The download status will be displayed. 7. Once "download complete", tap on the application name 8. The "Package Installer" screen will appear. 9. Tap on "Install". 10. To launch the application, tap on "Open". You will also find the application in the ES File Explorer under the "download" folder. 9 IMPORTING AND ACCESSING FILES There are three methods for transferring and accessing files with the gTablet, a mini USB cable connected to your PC, a USB flash memory stick, and a micro SD card. The preferred method and simplest method for importing files is the mini USB cable. Mini USB Cable - Preferred Method for Importing Files 1. Connect the gTablet to your PC using a mini USB cable. 2. When the gTablet recognizes that the USB is connected, you will be prompted to "Turn on USB storage". On the gTablet, tap on "Turn on USB storage" to proceed. 3. Your PC should recognize the gTablet as a "removable disk". 4. Using Windows Explorer on your PC, you can drag and drop any music, photos, or videos that you want loaded onto your gTablet listed as a "Removable Disk" under "Computer" in Windows Explorer. 49
-
 1
1 -
2
-
3
-
4
-
5
-
6
-
7
-
8
-
9
-
10
-
11
-
12
-
13
-
14
-
15
-
16
-
17
-
18
-
19
-
20
-
21
-
22
-
23
-
24
-
25
-
26
-
27
-
28
-
29
-
30
-
31
-
32
-
33
-
34
-
35
-
36
-
37
-
38
-
39
-
40
-
41
-
42
-
43
-
 44
44 -
 45
45 -
 46
46 -
 47
47 -
 48
48 -
 49
49 -
 50
50 -
 51
51 -
 52
52 -
 53
53 -
 54
54 -
55
-
56
-
57
-
58
-
59
-
60
-
61
-
62
-
63
-
64
-
65
-
66
-
67
-
68
-
69
 |
 |