Yamaha RX V659 MCXSP10 Manual - Page 29
Connecting an external amplifier - remote
 |
UPC - 027108925295
View all Yamaha RX V659 manuals
Add to My Manuals
Save this manual to your list of manuals |
Page 29 highlights
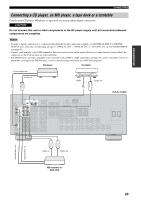
PREPARATION CONNECTIONS Connecting an external amplifier This unit has more than enough power for any home use. However, if you want to add more power to the speaker output or if you want to use another amplifier, connect an external amplifier to the PRE OUT jacks. CAUTION Do not connect this unit or other components to the AC power supply until all connections between components are complete. Notes • When you make connections to the PRE OUT jacks, do not make connections to the SPEAKERS terminals. • Set the volume level of the external amplifiers connected to the PRE OUT jacks to the maximum. • The signals output at the FRONT PRE OUT and CENTER PRE OUT jacks are affected by the TONE CONTROL settings (see page 39). • If SPEAKERS A is turned off (see page 38) and "SP B" is set to "ZONE B" (see page 96), signals are output only at the FRONT PRE OUT jacks. • Each PRE OUT jack outputs the same channel signals as the corresponding SPEAKERS terminals. • Adjust the volume level of the subwoofer with the control on the subwoofer. It is also possible to adjust the volume level with the supplied remote control (see page 42). • Some signals may not be output at the SUBWOOFER PRE OUT jack depending on the settings for "SPEAKER SET" (see page 86) and "LFE/BASS OUT" (see page 88). • To use the external amplifiers in Zone 2, select "EXT" in "ZONE2 AMP" (see page 96). For details. see "Using the external amplifier" on page 105. Front channel amplifier Surround channel amplifier Surround back channel amplifier Front in RL Surround in RL Surround back in RL (U.S.A. model) FRONT PRE OUT SURROUND CENTER SURROUND BACK SUBWOOFER Center in Subwoofer in Center channel amplifier Subwoofer 25
-
 1
1 -
2
-
3
-
4
-
5
-
6
-
7
-
8
-
9
-
10
-
11
-
12
-
13
-
14
-
15
-
16
-
17
-
18
-
19
-
20
-
21
-
22
-
23
-
 24
24 -
 25
25 -
 26
26 -
 27
27 -
 28
28 -
 29
29 -
 30
30 -
 31
31 -
 32
32 -
 33
33 -
 34
34 -
35
-
36
-
37
-
38
-
39
-
40
-
41
-
42
-
43
-
44
-
45
-
46
-
47
-
48
-
49
-
50
-
51
-
52
-
53
-
54
-
55
-
56
-
57
-
58
-
59
-
60
-
61
-
62
-
63
-
64
-
65
-
66
-
67
-
68
-
69
-
70
-
71
-
72
-
73
-
74
-
75
-
76
-
77
-
78
-
79
-
80
-
81
-
82
-
83
-
84
-
85
-
86
-
87
-
88
-
89
-
90
-
91
-
92
-
93
-
94
-
95
-
96
-
97
-
98
-
99
-
100
-
101
-
102
-
103
-
104
-
105
-
106
-
107
-
108
-
109
-
110
-
111
-
112
-
113
-
114
-
115
-
116
-
117
-
118
-
119
-
120
-
121
-
122
-
123
-
124
-
125
-
126
-
127
-
128
-
129
-
130
-
131
-
132
 |
 |
