Yamaha RX V659 MCXSP10 Manual - Page 7
GETTING STARTED, Supplied accessories, Installing batteries in the remote control - receiver
 |
UPC - 027108925295
View all Yamaha RX V659 manuals
Add to My Manuals
Save this manual to your list of manuals |
Page 7 highlights
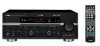
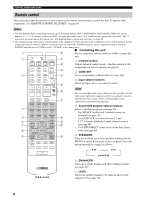
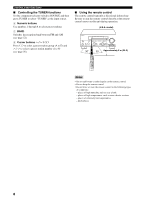
INTRODUCTION GETTING STARTED Supplied accessories Check that you received all of the following parts. Remote control CODE SET TRANSMIT POWER TV POWER AV STANDBY POWER CD DVD V-AUX MD CD-R CBL DTV DVR SLEEP XM TUNER MULTI CH IN VCR PHONO TV VOL TV CH AMP VOLUME SOURCE TV TV MUTE TV INPUT MUTE STEREO 1 MUSIC ENTERTAIN MOVIE 2 3 4 STANDARD SELECT EXTD SUR. PURE DIRECT 5 6 7 8 SPEAKERS 9 ENHANCER 0 NIGHT 10 STRAIGHT ENT. LEVEL TITLE BAND PRESET/CH EFFECT SET MENU MENU SRCH MODE A-E/CAT. RETURN XM MEMORY REC DISC SKIP ENTER A-E/CAT. DISPLAY ON SCREEN AUDIO Batteries (2) (AA, R6, UM-3) Indoor FM antenna (U.S.A., Canada, China, Asia and General models) AM loop antenna (except for U.K. model) Indoor FM antenna (Europe, Australia and Korea models) GETTING STARTED Optimizer microphone Installing batteries in the remote control 13 2 1 Take off the battery compartment cover. 2 Insert the two supplied batteries (AA, R6, UM-3) according to the polarity markings (+ and -) on the inside of the battery compartment. 3 Snap the battery compartment cover back into place. Notes • Change all of the batteries if you notice the following conditions: - the operation range of the remote control decreases. - the TRANSMIT indicator does not flash or its light becomes dim. • Do not use an old battery together with a new one. • Do not use different types of batteries (such as alkaline and manganese batteries) together. Read the packaging carefully as these different types of batteries may have the same shape and color. • If the batteries have leaked, dispose of them immediately. Avoid touching the leaked material or letting it come into contact with clothing, etc. Clean the battery compartment thoroughly before installing new batteries. • Do not throw away batteries with general house waste; dispose of them correctly in accordance with your local regulations. • If the remote control is without batteries for more than 2 minutes, or if exhausted batteries remain in the remote control, the contents of the memory may be cleared. When the memory is cleared, insert new batteries, set up the remote control code and program any acquired functions that may have been cleared. 3
-
 1
1 -
 2
2 -
 3
3 -
 4
4 -
 5
5 -
 6
6 -
 7
7 -
 8
8 -
 9
9 -
 10
10 -
 11
11 -
 12
12 -
13
-
14
-
15
-
16
-
17
-
18
-
19
-
20
-
21
-
22
-
23
-
24
-
25
-
26
-
27
-
28
-
29
-
30
-
31
-
32
-
33
-
34
-
35
-
36
-
37
-
38
-
39
-
40
-
41
-
42
-
43
-
44
-
45
-
46
-
47
-
48
-
49
-
50
-
51
-
52
-
53
-
54
-
55
-
56
-
57
-
58
-
59
-
60
-
61
-
62
-
63
-
64
-
65
-
66
-
67
-
68
-
69
-
70
-
71
-
72
-
73
-
74
-
75
-
76
-
77
-
78
-
79
-
80
-
81
-
82
-
83
-
84
-
85
-
86
-
87
-
88
-
89
-
90
-
91
-
92
-
93
-
94
-
95
-
96
-
97
-
98
-
99
-
100
-
101
-
102
-
103
-
104
-
105
-
106
-
107
-
108
-
109
-
110
-
111
-
112
-
113
-
114
-
115
-
116
-
117
-
118
-
119
-
120
-
121
-
122
-
123
-
124
-
125
-
126
-
127
-
128
-
129
-
130
-
131
-
132
 |
 |
