Yamaha RX V659 MCXSP10 Manual - Page 37
Using Auto Setup, Set Menu, Auto:menu - manual for
 |
UPC - 027108925295
View all Yamaha RX V659 manuals
Add to My Manuals
Save this manual to your list of manuals |
Page 37 highlights
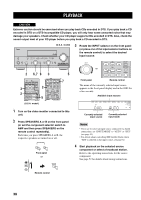
PREPARATION AUTO SETUP Using AUTO SETUP Once you have connected the supplied optimizer microphone to the OPTIMIZER MIC jack on the front panel and have placed it in a suitable location in your listening room, run "AUTO SETUP" in the OSD or in the front panel display. Note To achieve the best results, make sure the room is as quiet as possible while the "AUTO SETUP" procedure is in progress. If there is too much ambient noise, the results may not be satisfactory. y • You can run "AUTO SETUP" using the system menu that appears in the OSD or in the front panel display. This manual uses the OSD illustrations to explain the "AUTO SETUP" procedure. • If an error occurs during the "AUTO SETUP" procedure and an error or warning message appears in the OSD or in the front panel display, see the "AUTO SETUP" section in "TROUBLESHOOTING" on pages 116 and 117 for a complete list of error and warning messages and proper remedies. • The initial setting for each parameter is indicated in bold. • If the volume level and the crossover frequency of your subwoofer can be adjusted, set the volume level to about half way (or slightly less) and set the crossover frequency to the maximum. 1 Set the component selector switch to AMP and then press SET MENU to enter "SET MENU". The top "SET MENU" display appears in the OSD. AMP SOURCE TV SET MENU MENU SRCH MODE SET MENU . ;AUTO SETUP ;MANUAL SETUP . ;SIGNAL INFO [ ]/[ ]:Up/Down [ENTER]:Enter p p 2 Press u / d to select "AUTO SETUP". PRESET/CH A-E/CAT. ENTER A-E/CAT. p p SET MENU . ;AUTO SETUP ;MANUAL SETUP . ;SIGNAL INFO [ ]/[ ]:Up/Down [ENTER]:Enter VOLUME CROSSOVER HIGH CUT MIN MAX MIN MAX Subwoofer TV CD DVD V-AUX AV MD CD-R CBL DTV DVR SLEEP XM TUNER MULTI CH IN VCR PHONO TV VOL TV CH AMP VOLUME SOURCE TV 1 TV MUTE TV INPUT MUTE STEREO MUSIC ENTERTAIN MOVIE (U.S.A. model) STEREO 1 MUSIC ENTERTAIN MOVIE 2 3 4 STANDARD SELECT EXTD SUR. PURE DIRECT 5 6 7 8 SPEAKERS 9 LEVEL TITLE BAND ENHANCER 0 NIGHT 10 PRESET/CH STRAIGHT ENT. EFFECT SET MENU MENU SRCH MODE A-E/CAT. RETURN XM MEMORY REC ENTER A-E/CAT. DISPLAY ON SCREEN 1,11 2-10 3 Press ENTER to enter "AUTO SETUP". The "AUTO:MENU" display appears in the OSD. PRESET/CH A-E/CAT. ENTER A-E/CAT. p p 1 AUTO:MENU . SETUP;;;;;;;AUTO START Automatic processing of all items [ ]/[ ]:Up/Down []:Select 33
-
 1
1 -
2
-
3
-
4
-
5
-
6
-
7
-
8
-
9
-
10
-
11
-
12
-
13
-
14
-
15
-
16
-
17
-
18
-
19
-
20
-
21
-
22
-
23
-
24
-
25
-
26
-
27
-
28
-
29
-
30
-
31
-
 32
32 -
 33
33 -
 34
34 -
 35
35 -
 36
36 -
 37
37 -
 38
38 -
 39
39 -
 40
40 -
 41
41 -
 42
42 -
43
-
44
-
45
-
46
-
47
-
48
-
49
-
50
-
51
-
52
-
53
-
54
-
55
-
56
-
57
-
58
-
59
-
60
-
61
-
62
-
63
-
64
-
65
-
66
-
67
-
68
-
69
-
70
-
71
-
72
-
73
-
74
-
75
-
76
-
77
-
78
-
79
-
80
-
81
-
82
-
83
-
84
-
85
-
86
-
87
-
88
-
89
-
90
-
91
-
92
-
93
-
94
-
95
-
96
-
97
-
98
-
99
-
100
-
101
-
102
-
103
-
104
-
105
-
106
-
107
-
108
-
109
-
110
-
111
-
112
-
113
-
114
-
115
-
116
-
117
-
118
-
119
-
120
-
121
-
122
-
123
-
124
-
125
-
126
-
127
-
128
-
129
-
130
-
131
-
132
 |
 |
