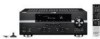
Yamaha RXV1065 Owner's Manual - Page 15
U.K., Europe, Russia and Asia models, together so that they will not cause a short - manual
 |
UPC - 027108933474
View all Yamaha RXV1065 manuals
Add to My Manuals
Save this manual to your list of manuals |
Page 15 highlights
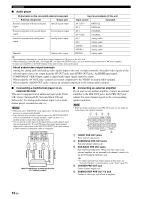
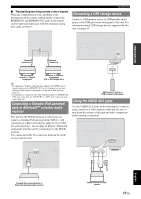
Connections Caution • A speaker cable is a pair of insulated cables running side by side in general. One of the cables is colored differently or striped to indicate a polarity. Connect one end of the colored/striped cable to the "+" (red) terminal of this unit and the other end to that of your speaker, and connect one end of the other cable to the "-" (black) terminal of this unit and the other end to that of your speaker. • Before connecting the speakers, be sure to disconnect the power cable. • Do not let the bare speaker wires touch each other or any metal part of this unit. This could damage this unit and/or speakers. If the circuit shorts out, "CHECK SP WIRES!" appears on the front panel display when this unit is turned on. • If images on the monitor (CRT) are distorted, place the speakers away from the video monitor. If it does not work, use magnetically shielded speakers. • Use speakers with an impedance of 6-ohm or larger. Set speaker impedance in the advanced setup menu before connecting the speakers (page 64). You can also use 4-ohm speakers as the front speakers when you set "SP IMP." to "6ΩMIN". ■ Connecting speaker cables 1 Remove approximately 10 mm (0.4 in) of insulation from the end of each speaker cable and then twist bare wires of the cable together so that they will not cause a short circuits. ■ Using bi-amplification connections You can make bi-amplification connections to one speaker system which supports bi-amplification connection as shown below. To activate the connections, set "BI-AMP" to "ON" in the advanced setup menu (page 64). Front speakers Right Left 10 mm (0.4 in) 2 Loosen the knob, insert the twisted bare wires into the hole and then tighten the knob. This unit FRONT SURROUND BACK/ BI-AMP 2 1 3 Red: positive (+) Black: negative (-) Connecting the banana plug (Except Korea, U.K., Europe, Russia and Asia models) Tighten the knob and then insert the banana plug into the end of the terminal. Caution Before making bi-amplification connections, remove any brackets or cables that connect a woofer with a tweeter. Refer to the instruction manuals of speakers for details. When not making bi-amplification connections, make sure that the brackets or cables are connected before connecting the speaker cables. Note • You cannot use surround back speakers or extra speakers (presence and Zone2 speakers) when bi-amplification connections are made. Banana plug 12 En
-
 1
1 -
2
-
3
-
4
-
5
-
6
-
7
-
8
-
9
-
 10
10 -
 11
11 -
 12
12 -
 13
13 -
 14
14 -
 15
15 -
 16
16 -
 17
17 -
 18
18 -
 19
19 -
 20
20 -
21
-
22
-
23
-
24
-
25
-
26
-
27
-
28
-
29
-
30
-
31
-
32
-
33
-
34
-
35
-
36
-
37
-
38
-
39
-
40
-
41
-
42
-
43
-
44
-
45
-
46
-
47
-
48
-
49
-
50
-
51
-
52
-
53
-
54
-
55
-
56
-
57
-
58
-
59
-
60
-
61
-
62
-
63
-
64
-
65
-
66
-
67
-
68
-
69
-
70
-
71
-
72
-
73
-
74
-
75
-
76
-
77
-
78
-
79
-
80
-
81
-
82
-
83
-
84
-
85
-
86
-
87
-
88
-
89
-
90
-
91
-
92
-
93
-
94
-
95
-
96
-
97
-
98
 |
 |
