Yamaha RXV1065 Owner's Manual - Page 18
Connecting other components - subwoofer
 |
UPC - 027108933474
View all Yamaha RXV1065 manuals
Add to My Manuals
Save this manual to your list of manuals |
Page 18 highlights
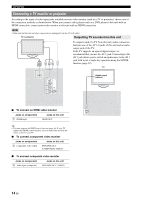
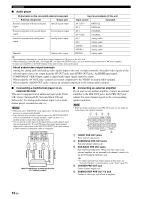
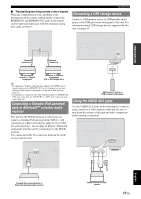
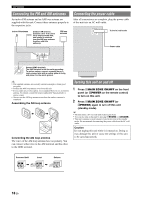
Connections Connecting other components This unit has input and output terminals for respective input and output sources. You can reproduce sound and movies from input sources selected with the front panel display or remote control. Note • Make sure that this unit and other components are unplugged from the AC wall outlets. Audio input (PHONO) Audio / video output (AV OUT) INTRODUCTION PREPARATION BASIC OPERATION ADVANCED OPERATION ADDITIONAL INFORMATION Audio / video input (AV 1-6) SIRIUS DOCK XM HDMI OUT HDMI 1 (BD/DVD) HDMI 2 HDMI 3 HDMI 4 HDMI input (HDMI 1-4) COMPONENT VIDEO PR PB Y PHONO VIDEO GND MONITOR OUT COMPONENT VIDEO PR REMOTE IN OUT PB VIDEO Y 12V 0.1A MAX. FRONT TRIGGER OUT CENTER Audio output (AUDIO OUT) OPTICAL ( TV ) AV 1 COAXIAL AV 2 COAXIAL (CD) AV 3 OPTICAL AV 4 AV 5 AV 6 AV OUT AUDIO1 AUDIO2 FRONT SURROUND SUR.BACK SUBWOOFER AUDIO ZO MULTI CH INPUT OUT O Audio input (AUDIO 1/2) Multi channel audio input (MULTI CH INPUT) ■ Audio and video player / Set-top box Output jacks on the connected external component External component Signal Output jack Input sources/jacks of this unit Input source Input jack External component with HDMI output Audio/Video HDMI output HDMI 1 (BD/DVD) HDMI 1 HDMI 2 HDMI 2 HDMI 3 HDMI 3 HDMI 4 HDMI 4 External component with component video output Audio Video Audio Optical digital output Component video Coaxial digital output AV 1 (TV) AV 2 OPTICAL COMPONENT VIDEO COAXIAL External component with composite video output Video Audio Video Audio Component video output Coaxial digital output Composite output Optical digital output AV 3 (CD) AV 4 COMPONENT VIDEO COAXIAL VIDEO OPTICAL Video Audio Composite output Analog audio output AV 5 VIDEO Analog audio Video Composite output VIDEO Audio Video Analog audio output Composite output AV 6 Analog audio VIDEO y • Input sources in parentheses are recommended to connect to the respective jacks. If your Yamaha component has the remote in/out terminal, you can switch the input source to that component with a single key operation using the SCENE function (page 22). • You can change the name of the input source displayed on the front panel display as necessary (page 60). • See page 61 on how to use the ZONE2 OUT jacks. 15 En APPENDIX English
-
 1
1 -
2
-
3
-
4
-
5
-
6
-
7
-
8
-
9
-
10
-
11
-
12
-
 13
13 -
 14
14 -
 15
15 -
 16
16 -
 17
17 -
 18
18 -
 19
19 -
 20
20 -
 21
21 -
 22
22 -
 23
23 -
24
-
25
-
26
-
27
-
28
-
29
-
30
-
31
-
32
-
33
-
34
-
35
-
36
-
37
-
38
-
39
-
40
-
41
-
42
-
43
-
44
-
45
-
46
-
47
-
48
-
49
-
50
-
51
-
52
-
53
-
54
-
55
-
56
-
57
-
58
-
59
-
60
-
61
-
62
-
63
-
64
-
65
-
66
-
67
-
68
-
69
-
70
-
71
-
72
-
73
-
74
-
75
-
76
-
77
-
78
-
79
-
80
-
81
-
82
-
83
-
84
-
85
-
86
-
87
-
88
-
89
-
90
-
91
-
92
-
93
-
94
-
95
-
96
-
97
-
98
 |
 |
