3Com 3CRWE675075-UK User Guide - Page 24
Attaching An, External Antenna, Determining if you, Need to Con the Bridge
 |
UPC - 662705477848
View all 3Com 3CRWE675075-UK manuals
Add to My Manuals
Save this manual to your list of manuals |
Page 24 highlights
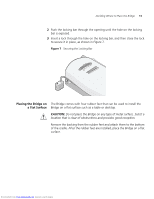
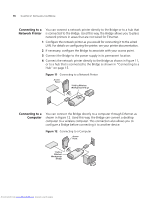
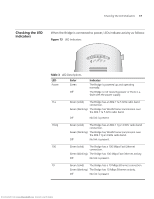
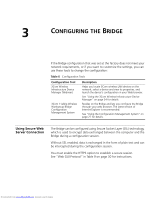
18 CHAPTER 2: INSTALLING THE BRIDGE Attaching An External Antenna The Bridge has two internal diversity dual-band antennas. If you want to increase the range of the Bridge, an external antenna can be attached to the external antenna connector on the Bridge. The 3Com-approved external antenna for this Bridge is the 3Com 2.4/5 GHz Omnidirectional Workgroup Bridge Antenna (3CWE501). For more information, go to www.3Com.com Determining if you Need to Configure the Bridge If your network has a DHCP server and no special security requirements, you can most likely use the Bridge just as it is shipped from the factory. It takes approximately one to two minutes for the Bridge to determine if there is a DHCP server on the network. View the Bridge's default settings on page 20 to determine whether or not you need to configure the Bridge for your network. If the factory defaults meet your requirements, you can connect the Bridge as described in "Connecting the Bridge" on page 14. If your network does not have a DHCP server or is more complex, you may have to configure the Bridge and organize devices so that you can manage the wireless LAN easily and keep it secure. You can use the 3Com Wireless Infrastructure Device Manager (Widman) included on the 3Com Installation CD. For non-U.S. versions of the Bridge, you need to set the Country mode. This is done when you first open the Bridge's Configuration Management System. See "Using the Configuration Management System" on page 27 for instructions. Networks with a DHCP Server If your network has a DHCP server, an IP address is automatically assigned to the Bridge. It takes approximately one to two minutes for the Bridge to determine if there is a DHCP server on the network. Use the 3Com Wireless Infrastructure Device Manager (Widman) included on the 3Com Installation CD to locate the Bridge on the network and view its IP address. Alternatively, you can enter the Bridge's IP address into a web browser on a computer on the same subnet to view the Bridge's system status or change its configuration. See "Configuring the Bridge" on page 23 for instructions. Downloaded from www.Manualslib.com manuals search engine
-
 1
1 -
2
-
3
-
4
-
5
-
6
-
7
-
8
-
9
-
10
-
11
-
12
-
13
-
14
-
15
-
16
-
17
-
18
-
 19
19 -
 20
20 -
 21
21 -
 22
22 -
 23
23 -
 24
24 -
 25
25 -
 26
26 -
 27
27 -
 28
28 -
 29
29 -
30
-
31
-
32
-
33
-
34
-
35
-
36
-
37
-
38
-
39
-
40
-
41
-
42
-
43
-
44
-
45
-
46
-
47
-
48
-
49
-
50
-
51
-
52
-
53
-
54
-
55
-
56
-
57
-
58
-
59
-
60
-
61
-
62
-
63
-
64
-
65
-
66
-
67
-
68
-
69
-
70
 |
 |
