3Com 3CRWER300-73-US User Guide - Page 19
Wireless Antenna, WPS button, Ethernet Ports 4 ports, CAUTION
 |
UPC - 662705532622
View all 3Com 3CRWER300-73-US manuals
Add to My Manuals
Save this manual to your list of manuals |
Page 19 highlights
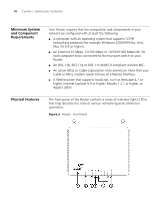
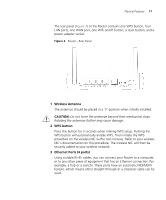
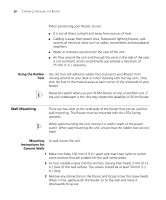
Physical Features 17 The rear panel (Figure 4) of the Router contains one WPS button, four LAN ports, one WAN port, one WiFi on/off button, a reset button, and a power adapter socket. Figure 4 Router - Rear Panel 1 Wireless Antenna The antennas should be placed in a 'V' position when initially installed. CAUTION: Do not force the antennae beyond their mechanical stops. Rotating the antennae further may cause damage. 2 WPS button Press this button for 3 seconds when making WPS setup. Pushing the WPS button will automatically enable WPS. Then initiate the WPS procedure on the wireless NIC within two minutes. Refer to your wireless NIC's documentation on this procedure. The wireless NIC will then be securely added to your wireless network. 3 Ethernet Ports (4 ports) Using suitable RJ-45 cables, you can connect your Router to a computer, or to any other piece of equipment that has an Ethernet connection (for example, a hub or a switch). These ports have an automatic MDI/MDIX feature, which means either straight-through or a crossover cable can be used.
-
 1
1 -
2
-
3
-
4
-
5
-
6
-
7
-
8
-
9
-
10
-
11
-
12
-
13
-
 14
14 -
 15
15 -
 16
16 -
 17
17 -
 18
18 -
 19
19 -
 20
20 -
 21
21 -
 22
22 -
 23
23 -
 24
24 -
25
-
26
-
27
-
28
-
29
-
30
-
31
-
32
-
33
-
34
-
35
-
36
-
37
-
38
-
39
-
40
-
41
-
42
-
43
-
44
-
45
-
46
-
47
-
48
-
49
-
50
-
51
-
52
-
53
-
54
-
55
-
56
-
57
-
58
-
59
-
60
-
61
-
62
-
63
-
64
-
65
-
66
-
67
-
68
-
69
-
70
-
71
-
72
-
73
-
74
-
75
-
76
-
77
-
78
-
79
-
80
-
81
-
82
-
83
-
84
-
85
-
86
-
87
-
88
-
89
-
90
-
91
-
92
-
93
-
94
-
95
-
96
-
97
-
98
-
99
-
100
-
101
-
102
-
103
-
104
-
105
-
106
-
107
-
108
-
109
-
110
-
111
-
112
-
113
-
114
-
115
-
116
-
117
-
118
-
119
-
120
-
121
-
122
-
123
-
124
-
125
-
126
-
127
-
128
-
129
-
130
-
131
-
132
-
133
-
134
-
135
-
136
-
137
-
138
-
139
-
140
-
141
-
142
-
143
-
144
-
145
-
146
-
147
-
148
-
149
-
150
-
151
-
152
-
153
-
154
-
155
-
156
-
157
-
158
-
159
-
160
-
161
-
162
-
163
-
164
-
165
-
166
-
167
-
168
-
169
-
170
-
171
-
172
 |
 |
