Adaptec 5325301728 User Guide - Page 25
Replacing DIMMs, Guidelines for Replacing DIMMs, Shutting Down the Server
 |
UPC - 753253017287
View all Adaptec 5325301728 manuals
Add to My Manuals
Save this manual to your list of manuals |
Page 25 highlights
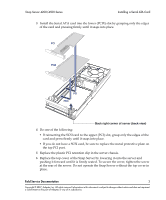
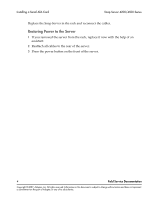
Snap Server 4200/4500 Replacing DIMMs Caution There are static-sensitive electronics inside the unit. Before you handle any parts, make sure you are working at a static-controlled workstation and that you are properly grounded. Guidelines for Replacing DIMMs The Snap Server 4200/4500 provides three DIMM slots, supporting up to 3 GB of RAM. Before replacing or upgrading your RAM, consider the following guidelines: • Use only DIMMs supplied by Adaptec - Adaptec strongly recommends that you use only DIMMs qualified and supplied by us. Qualified means that Adaptec technicians have tested and verified that the component operates properly with the Snap Server. Caution Failure to use qualified DIMMs supplied by Adaptec may seriously impact data availability, could potentially lead to data loss and corruption, and will void your warranty. • Do not install DIMMs of different capacity on the same Snap Server - Each DIMM you install must carry the same capacity. For example, if your Snap Server came with a single 512MB DIMM installed, you could install two more 512MB DIMMs for total of 1.5GB of RAM. To upgrade to 3GB of RAM, you would have to discard the 512MB DIMM that came with your server, and install three 1GB DIMMs. • Install DIMMs in the proper order - If you are installing fewer than three modules, make sure you install them consecutively from left to right. Standing at the rear of the unit, the first slot is the leftmost slot, closest to the power supply. Shutting Down the Server Caution Shut down the server before you make any repairs. Improper shutdown may lead to loss of data or physical harm. 1 To start the shutdown process, press the power button on the front of the server. The green power LED remains lit until the shutdown process is complete. Do not disconnect the AC power cord while the LED remains lit. Field Service Documentation 1 Copyright © 2007, Adaptec, Inc. All rights reserved. Information in this document is subject to change without notice and does not represent a commitment on the part of Adaptec or any of its subsidiaries.
-
 1
1 -
2
-
3
-
4
-
5
-
6
-
7
-
8
-
9
-
10
-
11
-
12
-
13
-
14
-
15
-
16
-
17
-
18
-
19
-
 20
20 -
 21
21 -
 22
22 -
 23
23 -
 24
24 -
 25
25 -
 26
26 -
 27
27 -
 28
28 -
 29
29 -
 30
30 -
31
-
32
-
33
-
34
-
35
-
36
-
37
-
38
-
39
-
40
-
41
-
42
 |
 |
