Asus V8200 T2 T5 ASUS V8200 Series Graphic Card English Version User Manual - Page 42
Scheme, On Screen Display
 |
View all Asus V8200 T2 T5 manuals
Add to My Manuals
Save this manual to your list of manuals |
Page 42 highlights
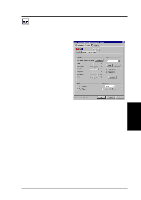
4. Software Reference Scheme This field lists the various default schemes that change the appearance of many screen elements simultaneously. Use existing schemes by selecting from the games listed in the drop-down menu and then go to the main program field to browse for the default settings file supplied with each game for OpenGL OSD settings. Click on Save to engage the file with the NVIDIA system. Create and save your own scheme by saving current custom settings. Unwanted schemes may be deleted. You may want to save a scheme that you created for some special situations, such as when you want to use the same settings when playing a certain game or a movie. On Screen Display Enable OSD Clicking on the check box enables access to the advanced box. When selected, this option opens the OpenGL On Screen Display. Use the defined Hotkey and adjust the onscreen settings of the 3D glasses and display card while playing Direct 3D games or watching 3D movies. Advanced Click on the button to access the advanced box to access hotkey assignments. Hotkey This function assigns hot keys to enable onscreen display or OSD. Select Enable OSD then click on the advanced button. Change the default hot key (CTRL + ALT + O) if it conflicts with hot keys of certain games, video players or Windows programs. To change the default hot keys With the mouse cursor in the Hotkey box, press the hot key combination of your choice (only CTRL + ALT + X key combinations can be defined). Keys that are unavailable for hotkey X values include: ESC, ENTER, TAB, SPACEBAR, PRINT SCREEN, or BACKSPACE. Press any other key to complete the combination. For example: to define the hot key combination CTRL+ALT+D, having placed the cursor in the box - press D. NOTE: Hot keys will be available only if you selected the Enable OSD check box. IMPORTANT: Before enabling OpenGL stereoscopic mode and using the stereoscopic or 3D glasses (ASUS VR-100G), make sure the monitor can support the selected refresh rate (interlaced mode) under the following display scales: 16 bits: 2048x1536 → 1024x768 Stereo Mode 32 bits: 1280x960 → 640x480 Stereo Mode, 1280x1024 → 640x480 Stereo Mode, 1600x900 → 800x600 Stereo Mode, 1600x1200 → 800x600 Stereo Mode WARNING! To prevent discomfort and eye fatigue when using your stereoscopic or 3D glasses, DO NOT try to use your 3D glasses for an extended period of time. Take frequent short breaks to give your muscles and eyes a chance to rest by taking off your 3D glasses and then looking up and focusing on distant objects. 4. S/W Reference Advanced OpenGL 42 ASUS V8200 Series User's Manual
-
 1
1 -
2
-
3
-
4
-
5
-
6
-
7
-
8
-
9
-
10
-
11
-
12
-
13
-
14
-
15
-
16
-
17
-
18
-
19
-
20
-
21
-
22
-
23
-
24
-
25
-
26
-
27
-
28
-
29
-
30
-
31
-
32
-
33
-
34
-
35
-
36
-
 37
37 -
 38
38 -
 39
39 -
 40
40 -
 41
41 -
 42
42 -
 43
43 -
 44
44 -
 45
45 -
 46
46 -
 47
47 -
48
-
49
-
50
-
51
-
52
-
53
-
54
-
55
-
56
-
57
-
58
-
59
-
60
-
61
-
62
-
63
-
64
-
65
-
66
-
67
-
68
-
69
-
70
-
71
-
72
-
73
-
74
-
75
-
76
-
77
-
78
-
79
-
80
-
81
-
82
-
83
-
84
-
85
-
86
-
87
-
88
-
89
-
90
-
91
-
92
-
93
-
94
-
95
-
96
-
97
-
98
-
99
-
100
-
101
-
102
-
103
-
104
-
105
-
106
 |
 |
