Brother International BAS-311E Network Users Manual - English - Page 77
Adjusting the needle up stop position
 |
View all Brother International BAS-311E manuals
Add to My Manuals
Save this manual to your list of manuals |
Page 77 highlights
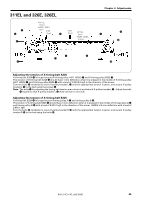
18. Adjusting the needle up stop position e Chapter 4. Adjustments Material Feed plate in operation r q t w u y Feed plate not in operation 1. Loosen the screw t (at the U side on the pulley q), and turn the pulley q so that the mark w on the pulley is inside the mark r of the belt cover e . The pulley q stops later if it is turned clockwise; it stops earlier if it is turned counterclockwise. The standerd needle up stop position is 6 mm below the needle bar dead point. 2. Timing between the needle and the feed mechanism is adjusted so that the feed mechanism srarts operating after the needle comes out of the material sewn, and stops before the needle penetrates the material. The screw y on the D side is tightened fully counterclockwise at the time of shipment. 3. The screw u cannot be adjusted because it is used for detecting the needle stop position. BAS-311E.311EL.326E.326EL 69
-
 1
1 -
2
-
3
-
4
-
5
-
6
-
7
-
8
-
9
-
10
-
11
-
12
-
13
-
14
-
15
-
16
-
17
-
18
-
19
-
20
-
21
-
22
-
23
-
24
-
25
-
26
-
27
-
28
-
29
-
30
-
31
-
32
-
33
-
34
-
35
-
36
-
37
-
38
-
39
-
40
-
41
-
42
-
43
-
44
-
45
-
46
-
47
-
48
-
49
-
50
-
51
-
52
-
53
-
54
-
55
-
56
-
57
-
58
-
59
-
60
-
61
-
62
-
63
-
64
-
65
-
66
-
67
-
68
-
69
-
70
-
71
-
 72
72 -
 73
73 -
 74
74 -
 75
75 -
 76
76 -
 77
77 -
 78
78 -
 79
79 -
 80
80 -
 81
81 -
 82
82 -
83
-
84
-
85
-
86
-
87
-
88
-
89
-
90
-
91
-
92
-
93
-
94
-
95
-
96
-
97
-
98
-
99
-
100
-
101
-
102
-
103
-
104
-
105
-
106
-
107
-
108
-
109
-
110
-
111
-
112
-
113
-
114
-
115
-
116
-
117
-
118
-
119
-
120
-
121
-
122
-
123
-
124
-
125
-
126
-
127
-
128
-
129
-
130
-
131
-
132
-
133
-
134
-
135
-
136
-
137
-
138
-
139
-
140
-
141
-
142
-
143
-
144
-
145
-
146
-
147
-
148
-
149
-
150
 |
 |
