Brother International LS2-B877 Instruction Manual - English and Spanish - Page 48
Brother International LS2-B877 Manual
 |
View all Brother International LS2-B877 manuals
Add to My Manuals
Save this manual to your list of manuals |
Page 48 highlights
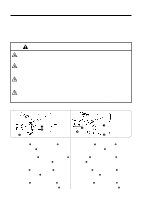
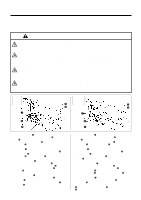
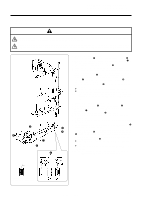
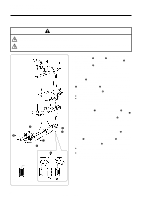
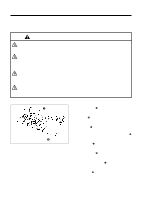
6. PREPARATION BEFORE SEWING 6. VORBEREITUNGEN ZUM NÄHEN 6. PREPARATIFS AVANT LA COUTURE 6. PREPARATIVOS ANTES DE COSER 6-4-1. Installing the bobbin [B877, B878-5] 6-4-1. Einsetzen der Spule [B877, B878-5] 6-4-1. Installation de la canette [B877, B878-5] 6-4-1. Instalación de la bobina [B877, B878-5] w r q w e t 50 mm w e A t 1. Turn the machine pulley to raise the needle q to its highest position. 2. Insert the bobbin w into the rotary hook e so that the winding direction is as shown in the illustration. 3. Return the rotary hook latch r to its original position. 4. Turn the machine pulley to rotate the rotary hook e until the tension spring t is visible. 5. Pass the thread through slit A in the rotary hook and then pass it under the thread tension spring t. 6. Pull out the thread to a length of approximately 50 mm. 7. Close the slide plates. 1. Stellen Sie die Nadel q durch Drehen der Riemenscheibe in die höchste Position. 2. Setzen Sie die Spule w in der gezeigten Wickelrichtung in den Greifer e ein. 3. K l a p p e n S i e d i e G r e i f e r l a s c h e r w i e d e r i n d i e Ausgangsstellung zurück. 4. Drehen Sie die Riemenscheibe bis der Greifer e und die Spannungsfeder t sichtbar sind. 5. Ziehen Sie den Faden durch den Schlitz A des Greifers und führen Sie ihn unter die Fadenspannungsfeder t. 6. Ziehen Sie den Faden ungefähr 50 mm heraus. 7. Schließen Sie die Schiebeplatte. 1. Tourner la poulie de machine pour relever l'aiguille q jusqu'à sa position la plus haute. 2. Insérer la canette w dans le crochet rotatif e de manière que la direction de bobinage soit comme indiqué sur l'illustration. 3. Remettre le verrou r du crochet rotatif à sa position initiale. 4. Tourner la poulie de machine pour faire tourner le crochet rotatif e jusqu'à ce que le ressort de tension t devienne visible. 5. Faire passer le fil à travers la fente A dans le crochet rotatif, puis le faire passer sous le ressort t de tension du fil. 6. Tirer le fil d'environ 50 mm vers l'extérieur. 7. Refermer les plaques coulissantes. 1. Girar la polea de la máquina para levantar la aguja q a su posición más alta. 2. Insertar la bobina w en el cangrejo e de manera que la dirección de enrollado sea igual a la indicada en la figura. 3. Volver a poner las perillas del cangrejo r en su posición original. 4. Girar la polea de la máquina para mover el garfio giratorio e hasta que el resorte de tensión t quede a la vista. 5. Pasar el hilo por la ranura A en el cangrejo y luego pasarlo debajo del resorte de tensión del hilo t. 6. Tirar el hilo hacia afuera una longitud de aproximadamente 50 mm. 7. Cerrar las placas laterales. 29 LS2-B877, LT2-B878
-
 1
1 -
2
-
3
-
4
-
5
-
6
-
7
-
8
-
9
-
10
-
11
-
12
-
13
-
14
-
15
-
16
-
17
-
18
-
19
-
20
-
21
-
22
-
23
-
24
-
25
-
26
-
27
-
28
-
29
-
30
-
31
-
32
-
33
-
34
-
35
-
36
-
37
-
38
-
39
-
40
-
41
-
42
-
 43
43 -
 44
44 -
 45
45 -
 46
46 -
 47
47 -
 48
48 -
 49
49 -
 50
50 -
 51
51 -
 52
52 -
 53
53 -
54
-
55
-
56
-
57
-
58
-
59
-
60
-
61
-
62
-
63
-
64
-
65
-
66
-
67
-
68
-
69
-
70
-
71
-
72
-
73
-
74
-
75
-
76
-
77
-
78
-
79
-
80
-
81
-
82
-
83
-
84
-
85
-
86
-
87
-
88
-
89
-
90
-
91
-
92
-
93
-
94
-
95
-
96
-
97
-
98
-
99
-
100
-
101
-
102
-
103
-
104
-
105
-
106
-
107
-
108
-
109
-
110
-
111
-
112
-
113
-
114
-
115
-
116
-
117
-
118
-
119
-
120
-
121
-
122
-
123
-
124
-
125
-
126
-
127
-
128
-
129
-
130
-
131
-
132
-
133
-
134
-
135
 |
 |
