Brother International MFC-8710DW Software User's Guide - English - Page 220
Start, Duplex Scan, File Name, Glass Scan Size, File Size, Do Not Remove media., Next Scanning
 |
View all Brother International MFC-8710DW manuals
Add to My Manuals
Save this manual to your list of manuals |
Page 220 highlights
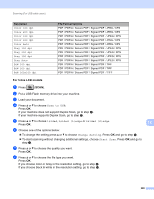
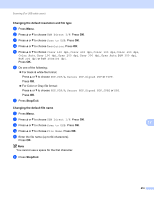
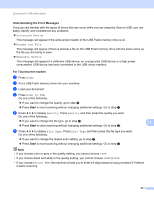
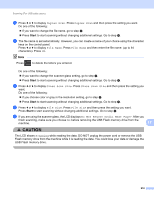
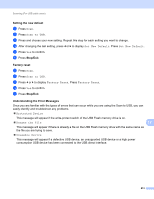
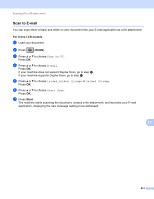
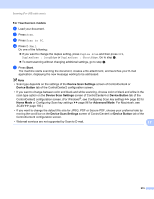
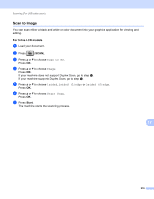
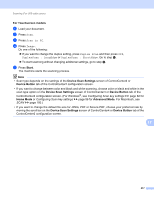
Scanning (For USB cable users) g Press d or c to display Duplex Scan. Press Duplex Scan and then press the setting you want. Do one of the following: If you want to change the file name, go to step h. Press Start to start scanning without changing additional settings. Go to step k. h The file name is set automatically. However, you can create a name of your choice using the character keys on the control panel. Press d or c to display File Name. Press File Name and then enter the file name. (up to 64 characters). Press OK. Note Press to delete the letters you entered. Do one of the following: If you want to change the scanner glass setting, go to step i. Press Start to start scanning without changing additional settings. Go to step k. i Press d or c to display Glass Scan Size. Press Glass Scan Size and then press the setting you want. Do one of the following: If you choose color or gray in the resolution setting, go to step j. Press Start to start scanning without changing additional settings. Go to step k. j Press d or c to display File Size. Press File Size and then press the setting you want. Press Start to start scanning without changing additional settings. Go to step k. k If you are using the scanner glass, the LCD displays Do Not Remove media. Next Page?. After you finish scanning, make sure you choose No before removing the USB Flash memory drive from the machine. 12 CAUTION The LCD shows Scanning while reading the data. DO NOT unplug the power cord or remove the USB Flash memory drive from the machine while it is reading the data. You could lose your data or damage the USB Flash memory drive. 212
-
 1
1 -
2
-
3
-
4
-
5
-
6
-
7
-
8
-
9
-
10
-
11
-
12
-
13
-
14
-
15
-
16
-
17
-
18
-
19
-
20
-
21
-
22
-
23
-
24
-
25
-
26
-
27
-
28
-
29
-
30
-
31
-
32
-
33
-
34
-
35
-
36
-
37
-
38
-
39
-
40
-
41
-
42
-
43
-
44
-
45
-
46
-
47
-
48
-
49
-
50
-
51
-
52
-
53
-
54
-
55
-
56
-
57
-
58
-
59
-
60
-
61
-
62
-
63
-
64
-
65
-
66
-
67
-
68
-
69
-
70
-
71
-
72
-
73
-
74
-
75
-
76
-
77
-
78
-
79
-
80
-
81
-
82
-
83
-
84
-
85
-
86
-
87
-
88
-
89
-
90
-
91
-
92
-
93
-
94
-
95
-
96
-
97
-
98
-
99
-
100
-
101
-
102
-
103
-
104
-
105
-
106
-
107
-
108
-
109
-
110
-
111
-
112
-
113
-
114
-
115
-
116
-
117
-
118
-
119
-
120
-
121
-
122
-
123
-
124
-
125
-
126
-
127
-
128
-
129
-
130
-
131
-
132
-
133
-
134
-
135
-
136
-
137
-
138
-
139
-
140
-
141
-
142
-
143
-
144
-
145
-
146
-
147
-
148
-
149
-
150
-
151
-
152
-
153
-
154
-
155
-
156
-
157
-
158
-
159
-
160
-
161
-
162
-
163
-
164
-
165
-
166
-
167
-
168
-
169
-
170
-
171
-
172
-
173
-
174
-
175
-
176
-
177
-
178
-
179
-
180
-
181
-
182
-
183
-
184
-
185
-
186
-
187
-
188
-
189
-
190
-
191
-
192
-
193
-
194
-
195
-
196
-
197
-
198
-
199
-
200
-
201
-
202
-
203
-
204
-
205
-
206
-
207
-
208
-
209
-
210
-
211
-
212
-
213
-
214
-
 215
215 -
 216
216 -
 217
217 -
 218
218 -
 219
219 -
 220
220 -
 221
221 -
 222
222 -
 223
223 -
 224
224 -
 225
225 -
226
-
227
-
228
-
229
-
230
-
231
-
232
-
233
-
234
-
235
-
236
-
237
-
238
-
239
-
240
-
241
-
242
-
243
-
244
-
245
-
246
-
247
-
248
-
249
-
250
-
251
-
252
-
253
-
254
-
255
-
256
-
257
-
258
-
259
-
260
-
261
-
262
-
263
-
264
-
265
-
266
-
267
-
268
-
269
-
270
-
271
 |
 |